Gladiator Ravaged Her Again and Again
(Optional): Find and complete the Labyrinth Trial
Find the go out to the Upper Prison house
Discover the go out to the Warden's Quarter's and head to the Warden's Chambers
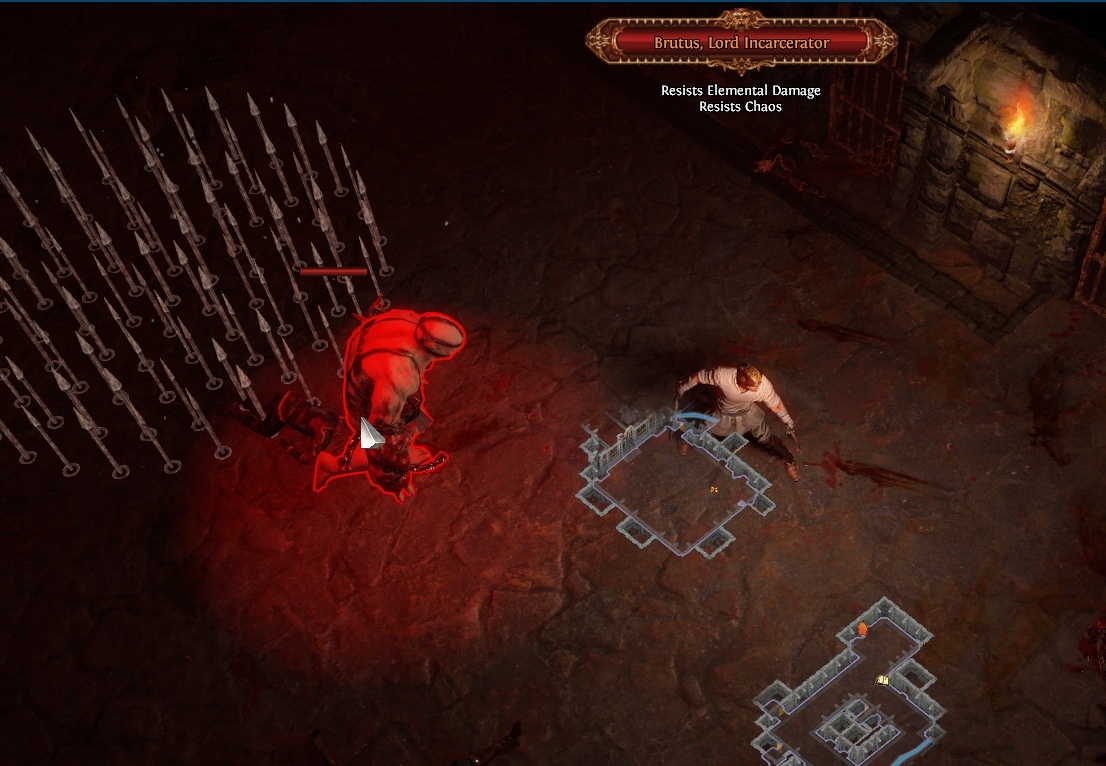
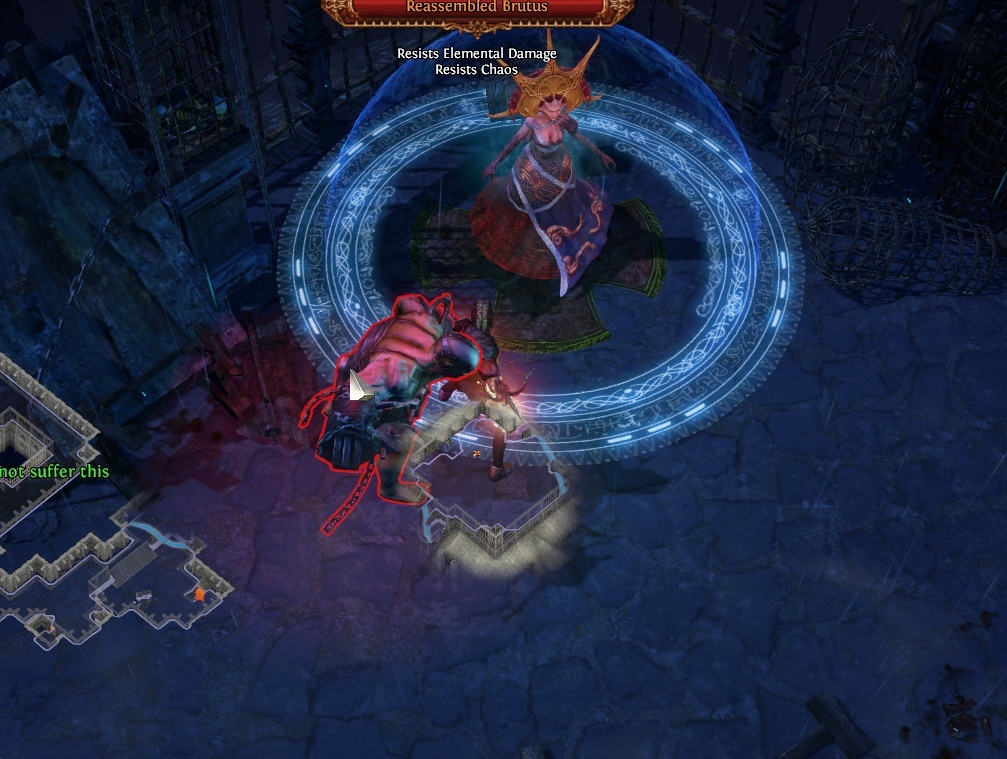
Kill Brutus . Logout
Talk to Tarkleigh to receive Bound Slam . Swap it with Dash
Take the Waypoint to the Prisoner's Gate
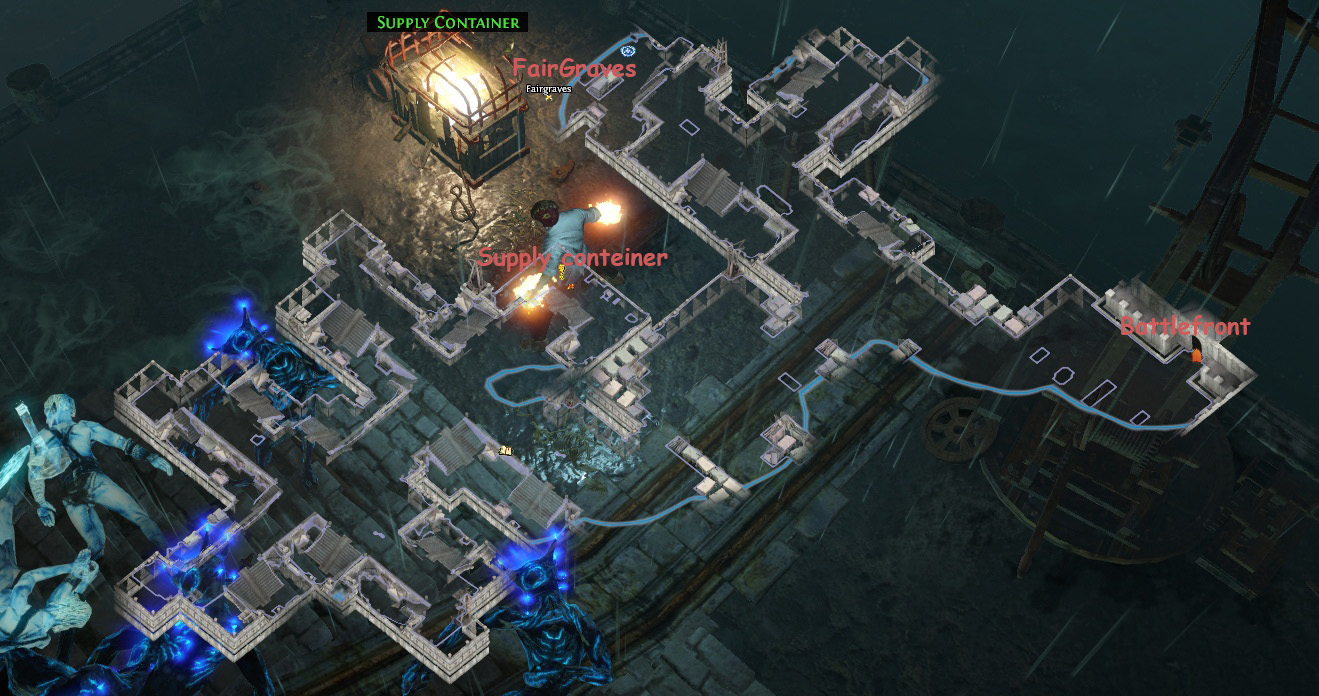
Go out into the Ship Graveyard
Grab the Waypoint . Find and enter the Ship Graveyard Cave
Retrieve the Allflame and exit back into the Ship Graveyard
Find the leave into the Cavern of Wrath and acquire the Waypoint
Accept the Waypoint back to the Ship Graveyard
Talk to Fairgraves and kill him. Logout
Talk to Bestel and Tarkleigh to receive book of skill rewards
Lioneye's Watch (Act one)
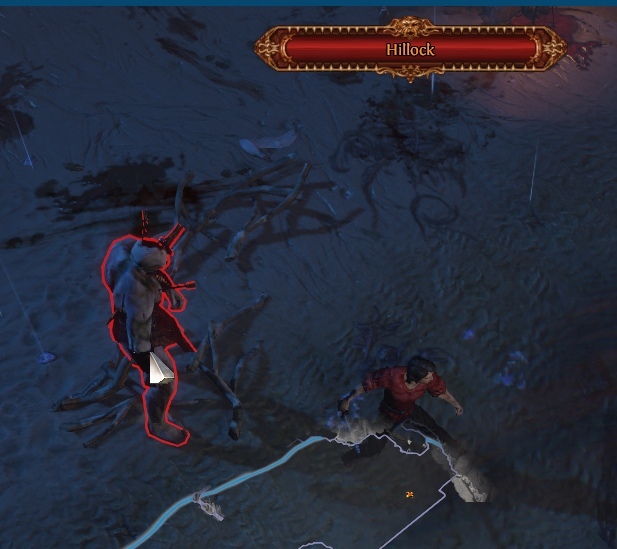


Kill Hillock at the end of the Twilight Strand
Enter the Lioneye'southward Watch
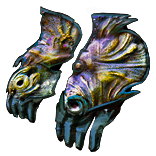

Lochtonial Cuddle Atomic number 26 Gauntlets
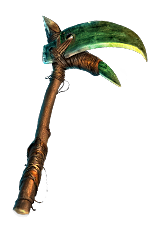
The Screaming Eagle Jade Hatchet
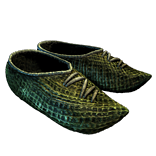
Recommended items to purchase if you take some currency : (click on flick for link)
Enter the Declension and run to the end of the zone
Take the Waypoint and enter the Mud Flats
Discover the three Rhoa Nests . Once you lot have them find the glyph wall and open up the
exit to the Submerged Passage . Enter and grab the Waypoint
Move to the Coast and enter the Tidal Island
Detect and impale Hailrake. Accept Midecine Chest. Return to town
Talk to Nessa to receive Quicksilver flask and Onslaught , purchase State of war Banner
Talk to Tarkleigh to receive Ancestral Protector and Dash
Your current setup :
Take the Waypoint to the S. Passage. Find and enter the Flooded Depths
Find and kill the Deep Dweller . Logout
Accept the Waypoint to the Submerged Passage
and detect the archway to the Ledge
Run through the Ledge. Enter the Climb
Run through the Climb
(Optional): Rescue Navali from the Faun
Enter the Lower Prison house and grab the Waypoint . Render to town
Talk to Nessa to receive Maim . Add it to Bequeathed Protector
E'er await for a improve two-paw axe/sword
Buy 2 atomic number 26 rings and rustic stash if u dont take it yet
Take the Waypoint to the Cavern of Wrath
Exit into the Cave of Anger
Exit into the Merveil's Lair
Kill Merveil and enter the Southern Woods
Run through the zone and enter the Forest Encampment
Talk to Nessa to purchase Spectral Helix . Swap it with Splitting Steel
Arts and crafts 2 Sapphire rings to get cold resistance confronting Merveil if need :
Look for Chiliad-Thousand -R links and boots with movement speed
Take Splitting steel from Tarkleigh and link it with Chance to bleed
Purchase Two-Mitt Sword from Tarkleigh and equip information technology
performed one time per league
Basic info
This guide works for both 3.17 Siege of The Atlas and Standart leagues
If you are looking to level up in a new league equally fast as possible but without
missing any of the essential quests, this guide is what you need
Some quests are non included, every bit they are simply not worth investing time
Helpful screenshots can be revealed past hovering over the colored text (FOR PC USERS Only)
except the blue one which is used to highlight NPC
Slap-up league starter
You lot can utilize Nuance if you similar it more
Welcome to Spectral Helix Gladiator leveling guide (iii.17)
Banner can be placed on the ground to boost DPS
Apply it against Bosses
Leveling advices :
Level 1-16 - stay ~ the zone lvl
Level 17-31 - stay ~ 4 levels under
Level 32-47 - stay ~ 5 levels under
Level 48-60 - stay ~ half-dozen levels under
Approximate level past the beginning of the act :
act2 - 12-13
act3 - 20-21
act4 - 30 -31
act5 - 36-38
act6 - 41-43
act7 - 46-48
act8 - 51-53
act9 - 55-57
act10 - 59-61
Kitava - 61-63
What to sell to get currency :
Armour Scrap =
x2 scroll of wisdom
Blacksmith's Whetstone =
x4 scroll of wisdom
Unidentified Magic/Rares = Transmutation shards
Identified Magic/Rares = Amending shards
The woods encampment (Act ii)


Accept the right go out into the Onetime Fields
Follow the road until you discover the exit into the Crossroads
Follow the road, discover and take hold of the Waypoint
Take the right path to observe the exit to the Broken Bridge
Follow the road until you find Kraityn . Kill him and grab the amulet. Logout
Take the Waypoint to the Crossroads
(Optional): Enter the Felshrine Ruins . Enter the Catacomb
Find and complete the Labyrinth Trial . Logout
Take the Waypoint back to the Crossroads
Enter the Bedchamber of Sins(Lvl1) . Leave into the Bedchamber of Sins(Lvl2)
(Optional): Detect and complete the Labyrinth Trial
Observe and impale Fidelitas . Accept the Baleful Gem. Return to town
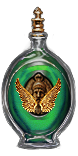
Recommended items to purchase if you take some currency : (click on picture for link)
Daresso'due south Salute Citrine Amulet
Talk to Greust to receive Blood Rage
Talk to Yeena to buy Herald of Ash and Herald of Purity . Activate em
Enter the Riverways taking the left leave
Follow the road. Grab the waypoint . Keep going and enter the Western Woods
Grab the Waypoint and detect the Blackguards . Kill them and click on
Thaumetic Seal to open up the exit to Human activity I
Find and kill Alira . Grab the amulet
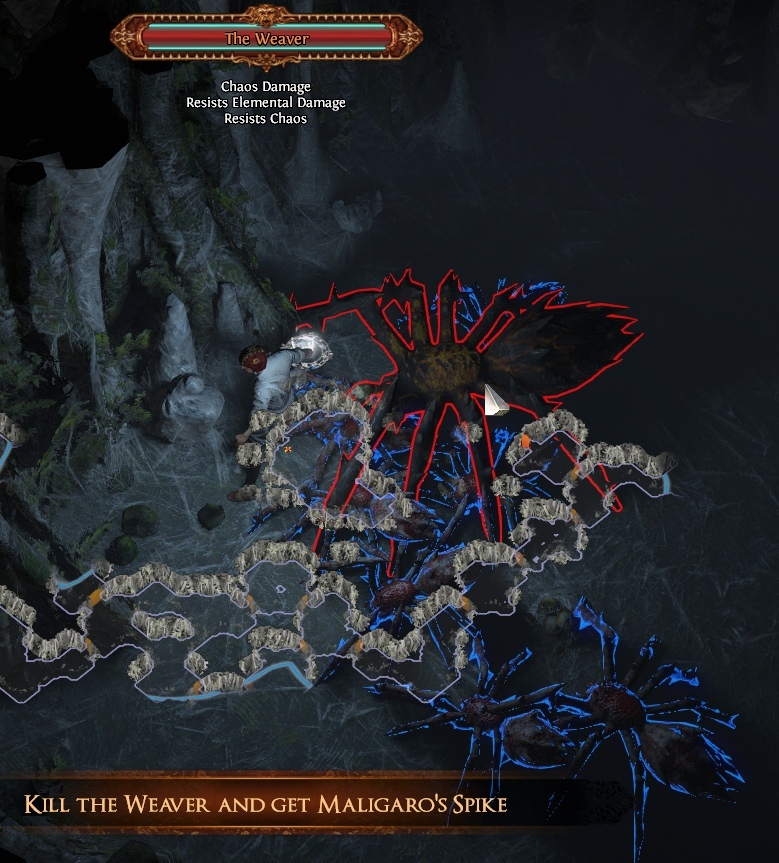
Find and enter the Weaver's Chambers . Make your way to the end
Enter the Weaver'due south Nest , kill the Weaver and accept Maligaro's Spike. Logout
Talk to Silk to receive Faster Attacks . Add together information technology to Leap Slam
Your current gem links :
If u aid Kraityn - skip this part and bargain with Alira and Oak . Than render to Kraityn and cull help option to receive the Apex
If u help Alira - skip this office and bargain with Kraityn and Oak . Than return to Alira and choose help selection to receive the Apex
If u assist Oak - deal with Kraityn and Alira . Than move to Oak and choose assist option to receive the Noon
If u helped a Brigand - skip this
Motion to act1 and talk to Bestel to receive the book of skill advantage
Take the Waypoint to the Riverways. Find the exit into the Wetlands
Find Oak , impale him. Take hold of the amulet
Notice the tree roots next to Waypoint, click on it, enter the Vaal Ruins
Break the seal when you encounter it. Leave into the Northern Forest
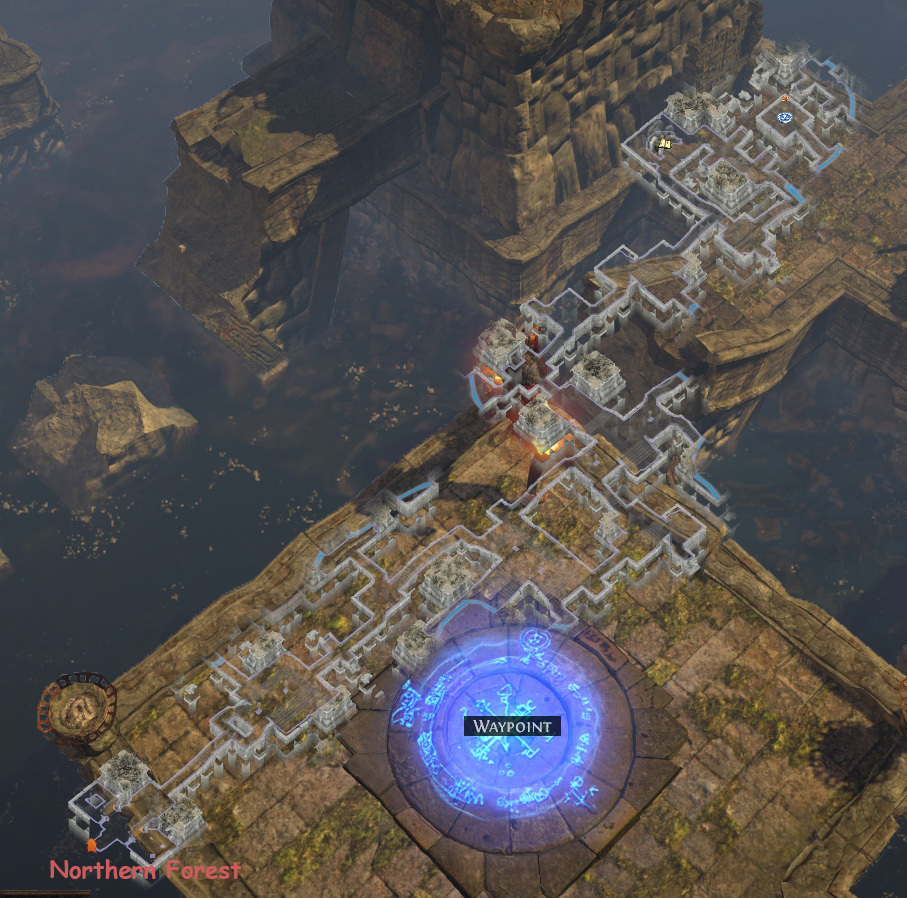
Run through the Northern Forest until yous achieve the leave into the Caverns
(Exercise non enter the Dread Thicket)
Grab the Waypoint and move to town, talk to Eramir to receive the Noon
Return to Caverns. Find and enter the Ancient Pyramid
Ascend the levels of the pyramid until you observe the Pyramid Apex
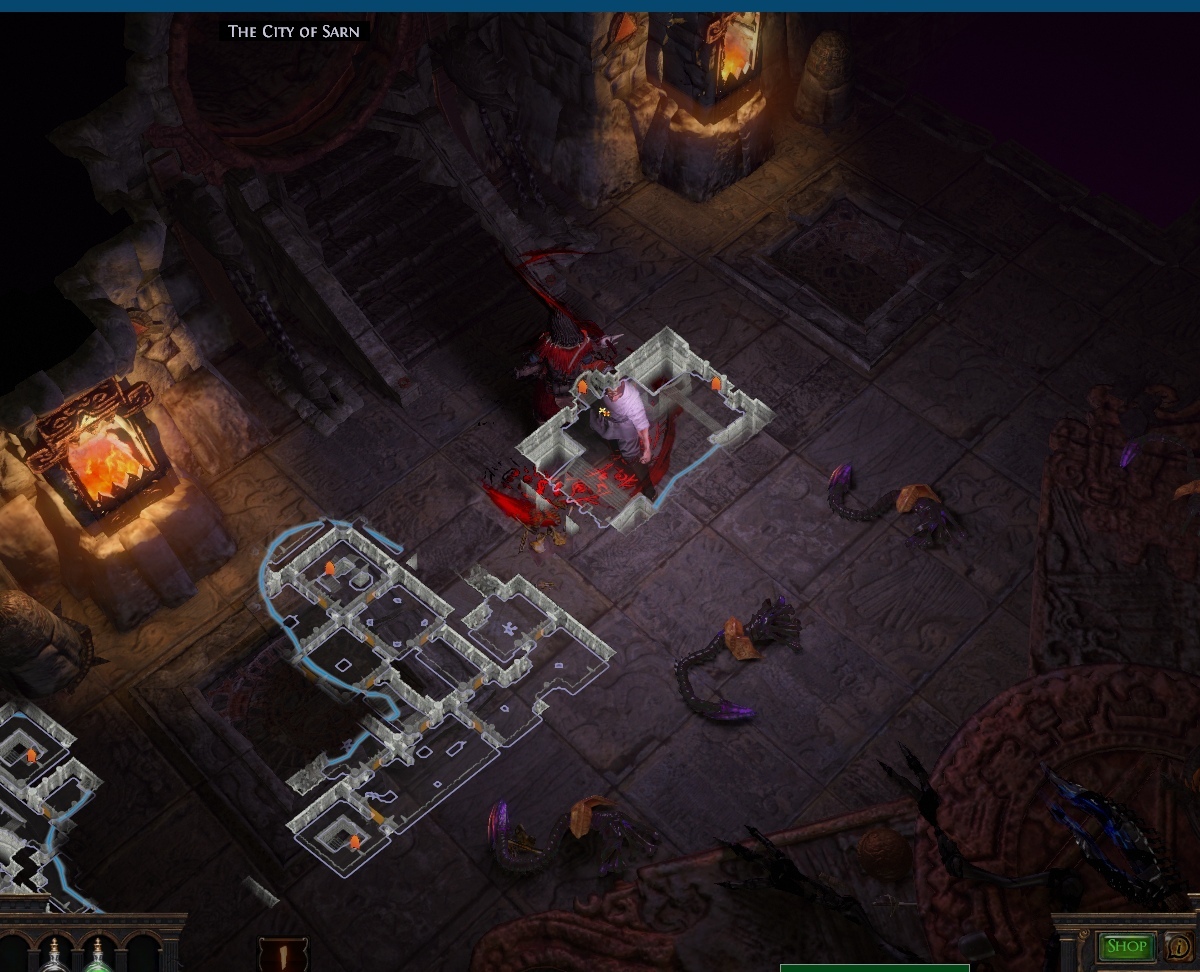
Kill the Vaal Oversoul and go out into the City of Sarn
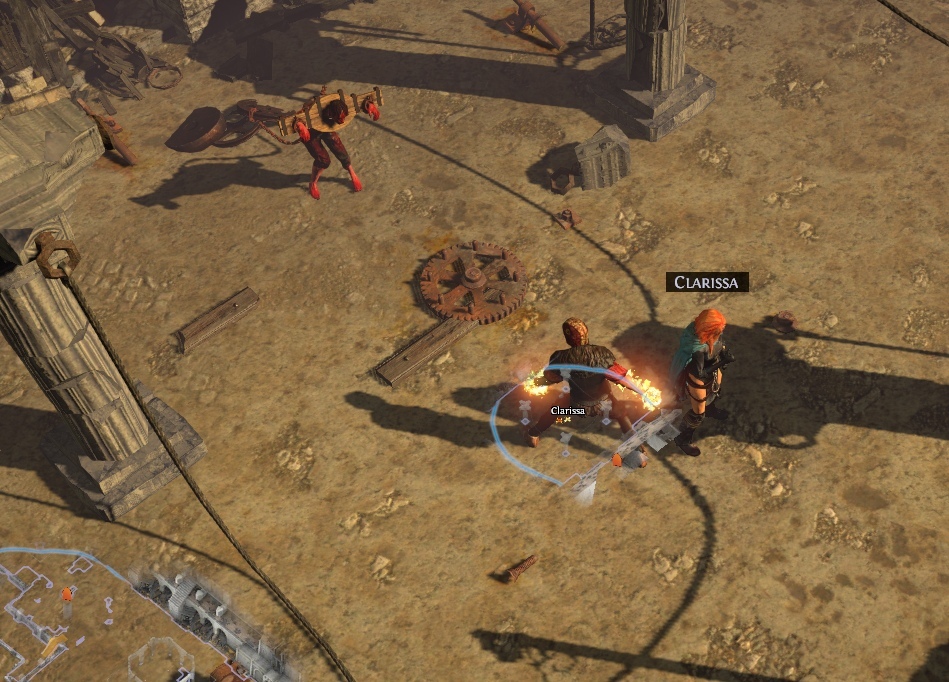
Notice the Blackguards and kill them to rescue Clarissa . Talk to her
Enter the Sarn Encampment
Move to the Den and impale Great White Beast. Talk to Yeena to receive 2nd quicksilver flask
(skip this if you lot already have 2 quicksilver flasks)

Buy two-hand Axe/Sword, use melee physical arts and crafts recipe :
(do information technology before Vaal Oversoul)
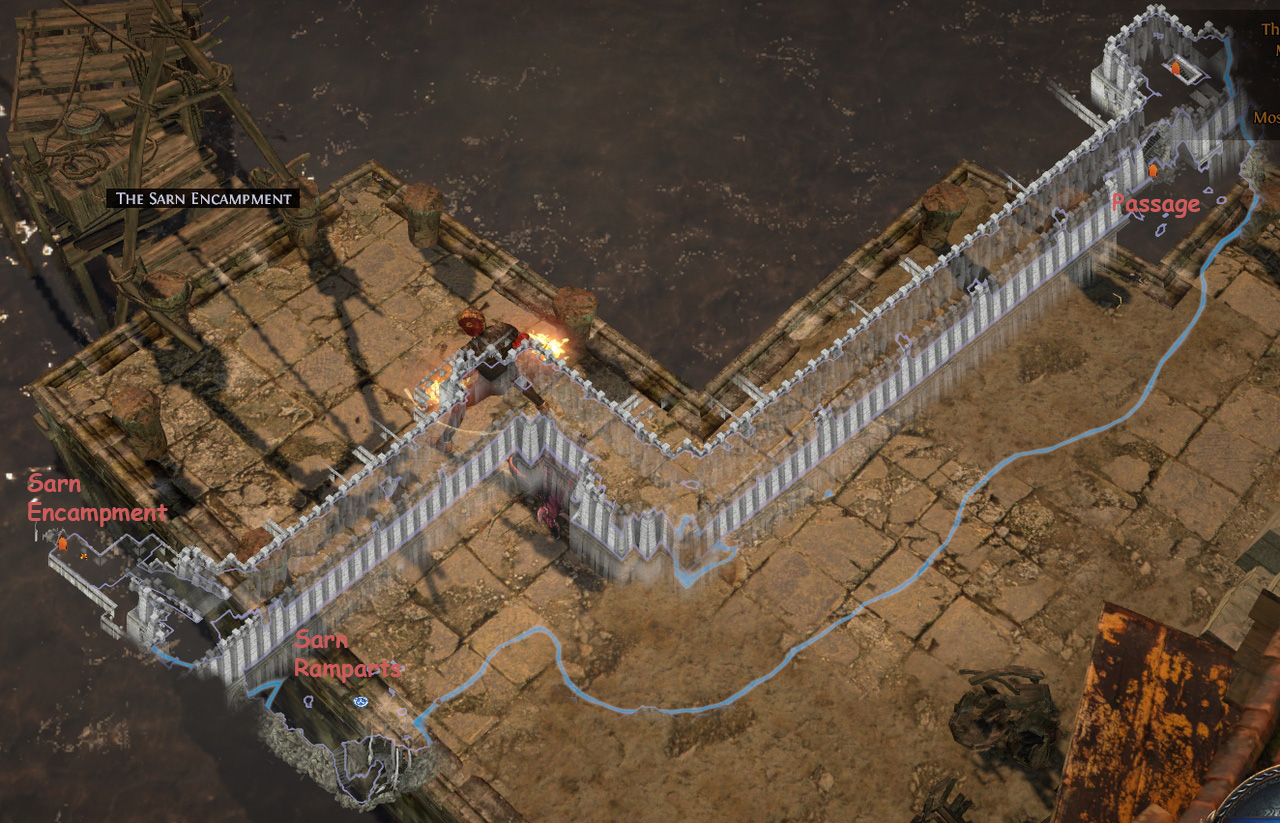
The sarn encampment (Deed three)
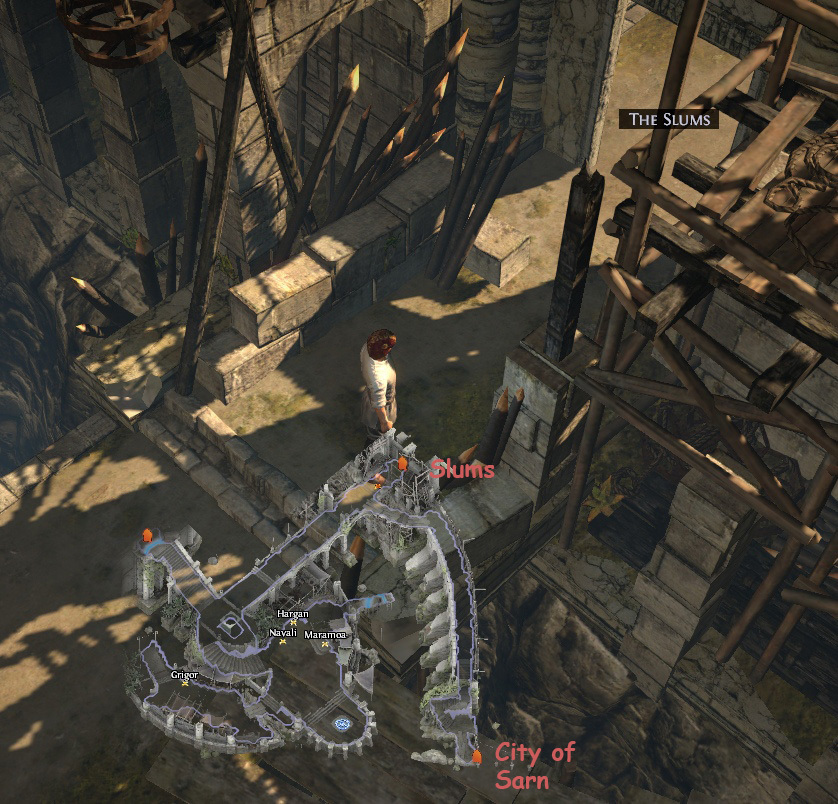
Go out into the Slums
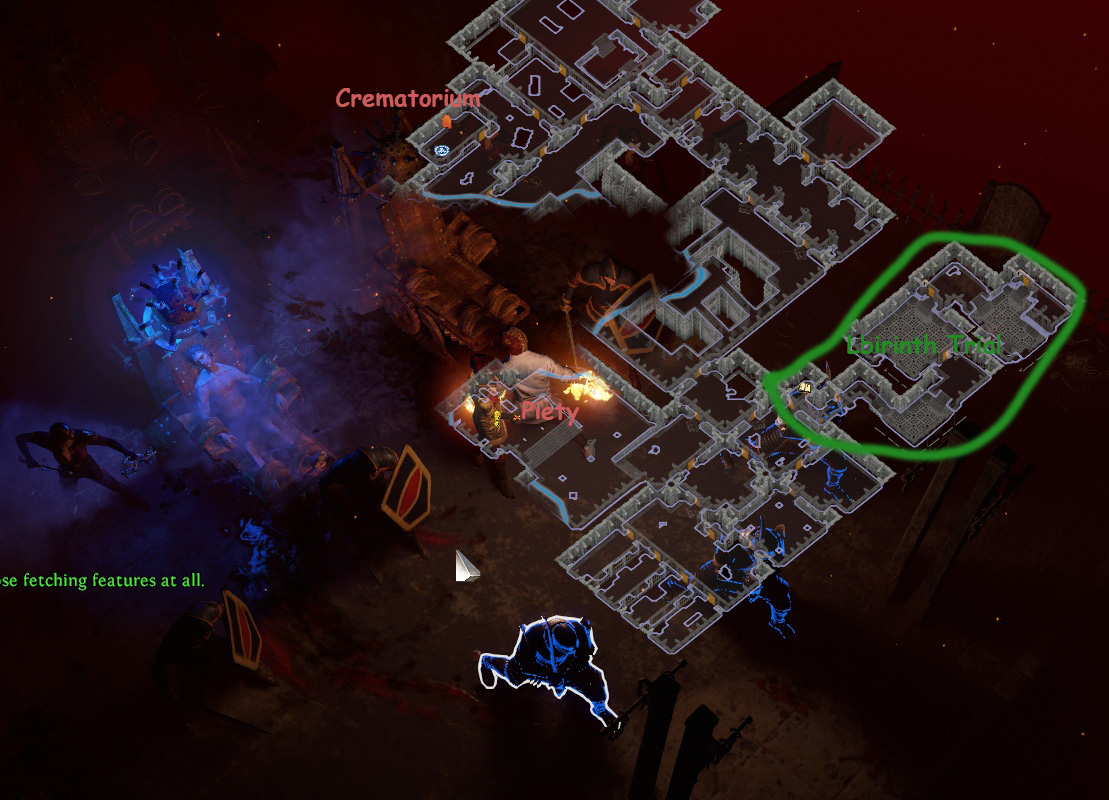
Find and enter the Crematorium
(Optional): Find and consummate the Labyrinth Trial
Find Piety and kill her. Interact with Tolman
and accept Tolman'south Bracelet. Logout
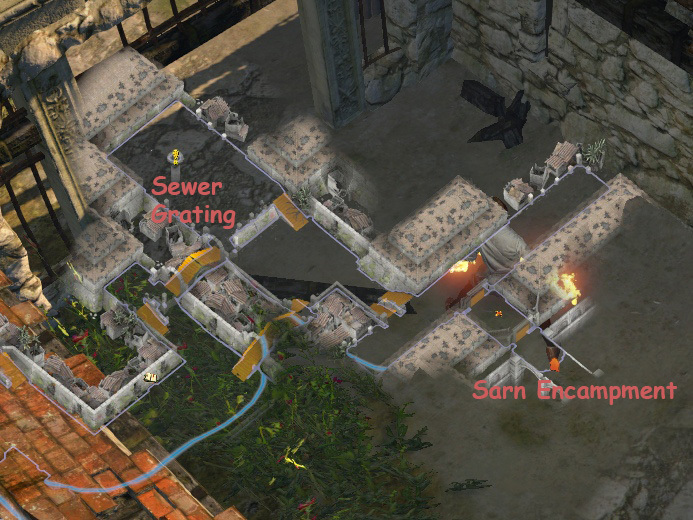
Talk to Clarissa to receive the Sewer Keys
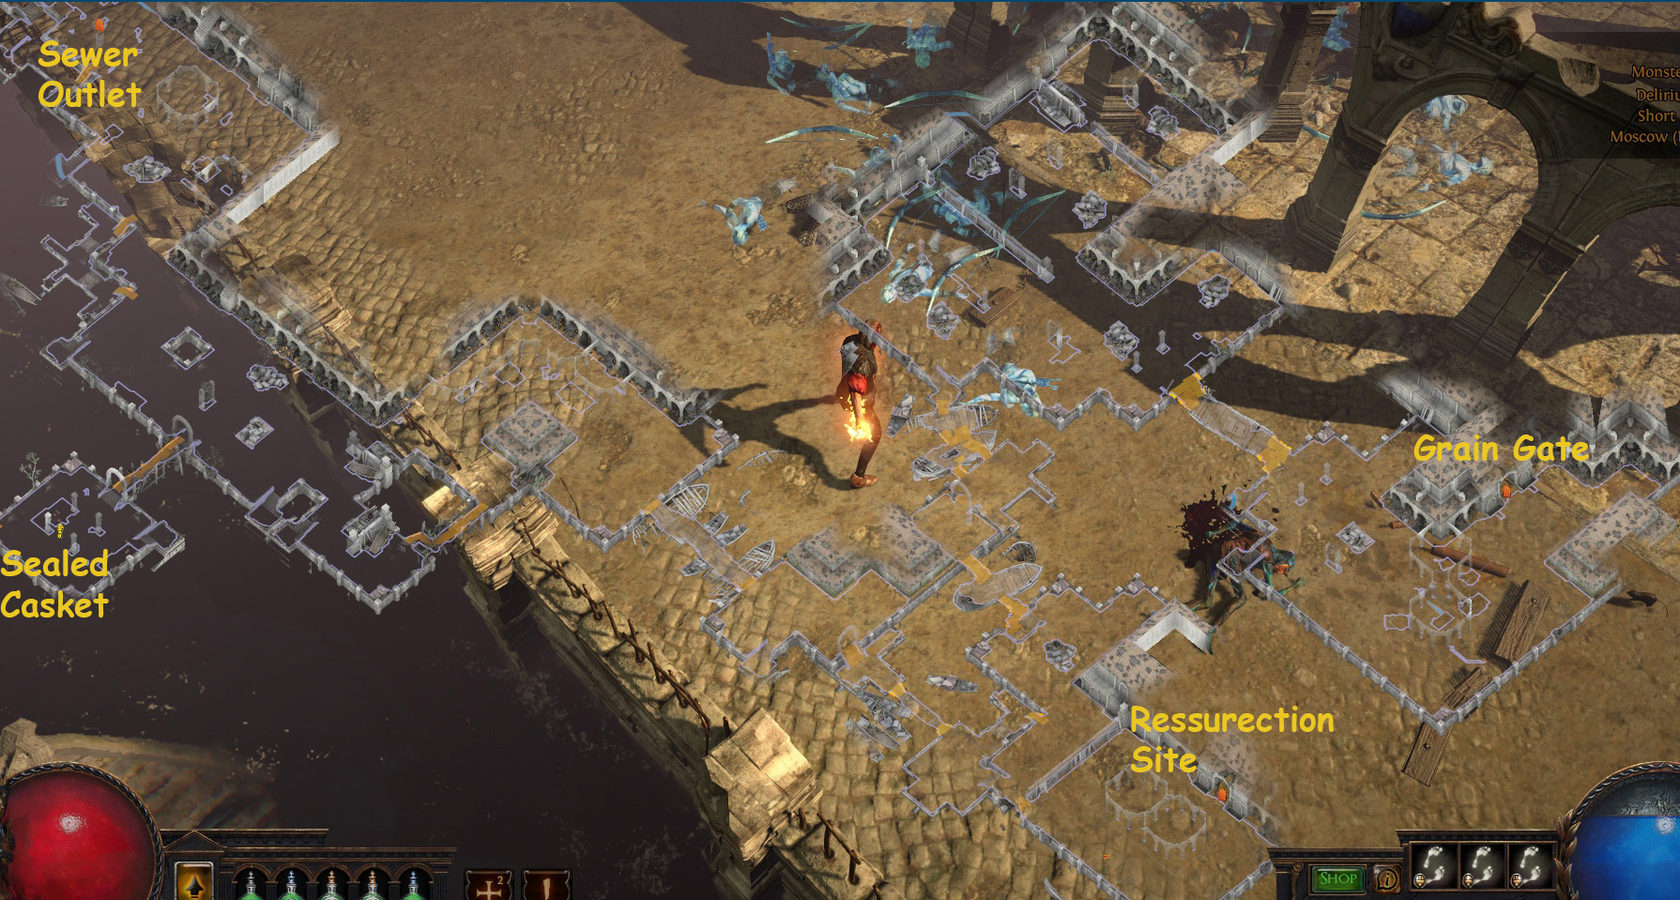
Enter the Slums and detect the Sewer Grating . Open up it and enter the Sewers
Find iii Platinum Busts, grab the Waypoint . Detect the exit into the Market place
((Optional): Grab the Waypoint and enter the Catacombs
Notice and complete the Labyrinth Trial . Render to Market place via Waypoint )
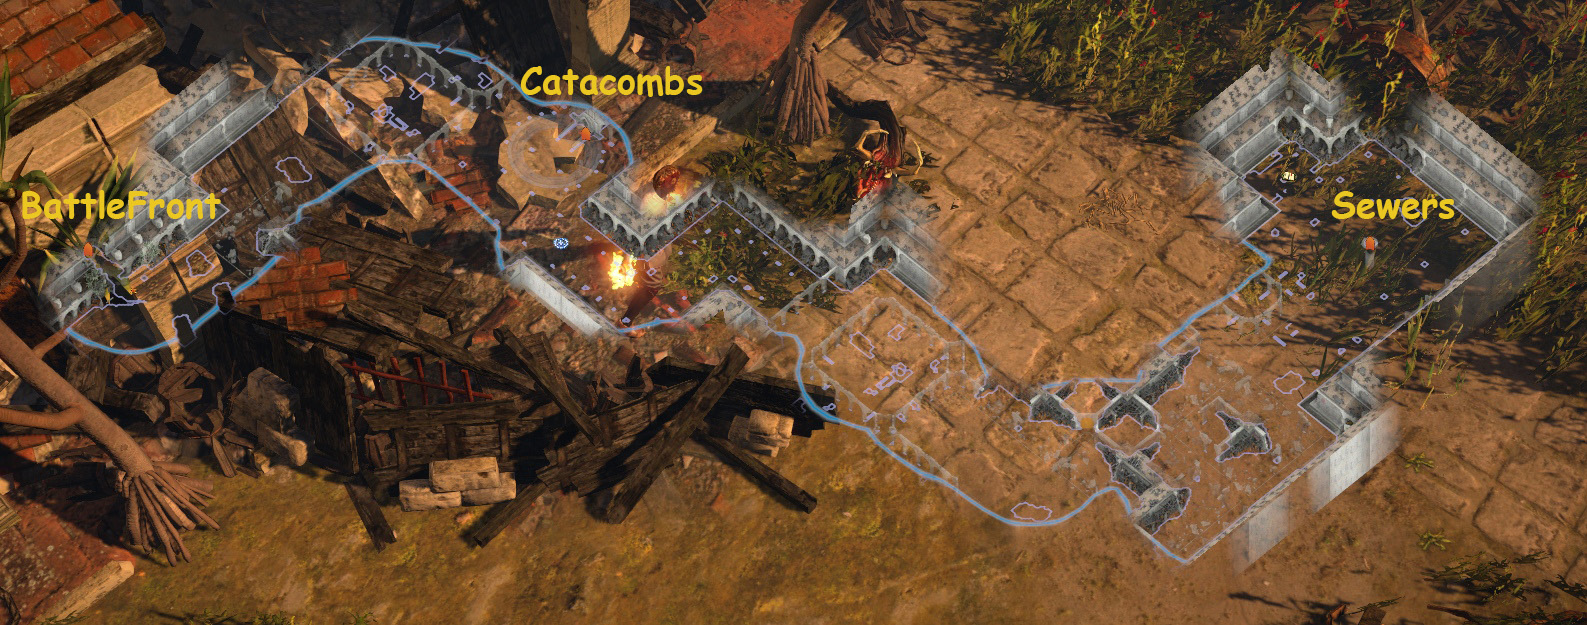
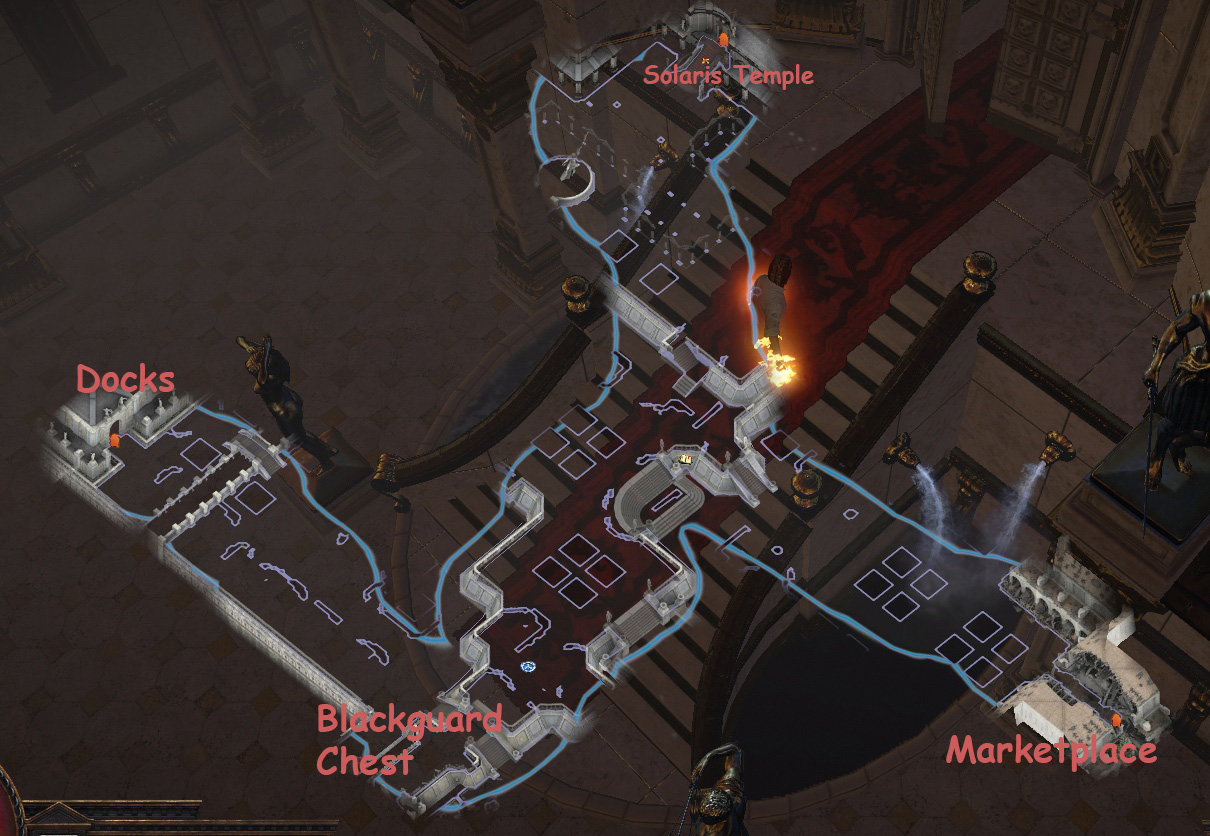
Find the leave into the Battlefront
Find and grab the Waypoint and Lackguard Chest
Observe and enter the Docks
Find the Supply Container and take Thaumetic Sulphite. Logout
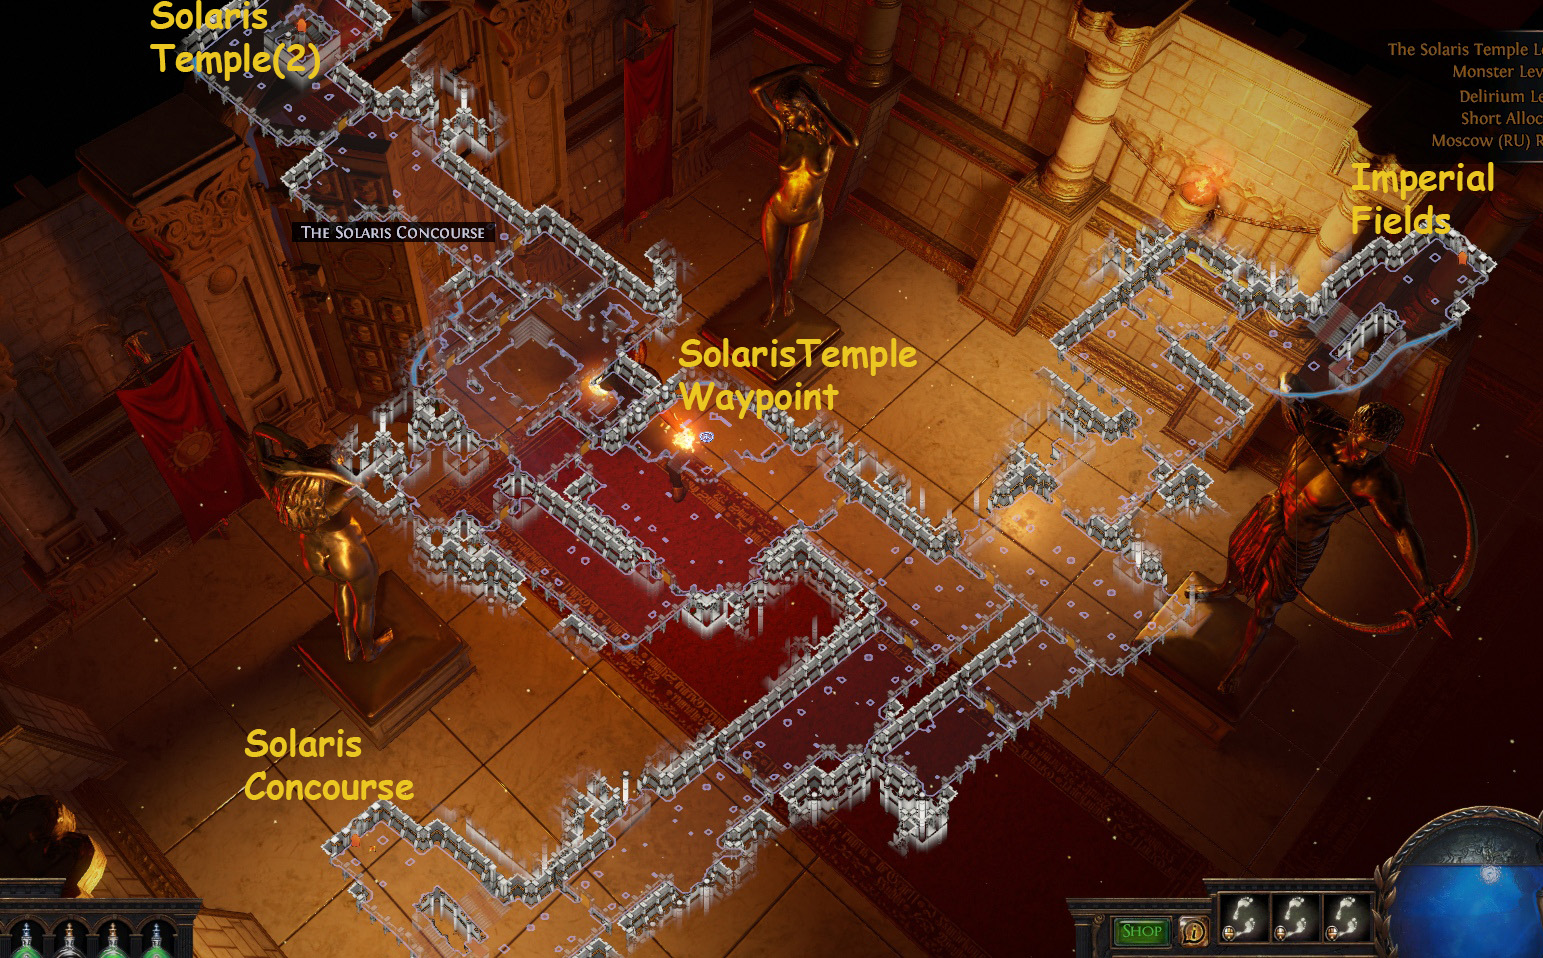
Have the Waypoint to the Battlefront , find and enter the Solaris Temple
Run through the Solaris Temple (Level 1) . Enter the Solaris Temple (Level ii)
Find and talk to Lady Dialla to receive the Infernal Talc (+ dext amulet)
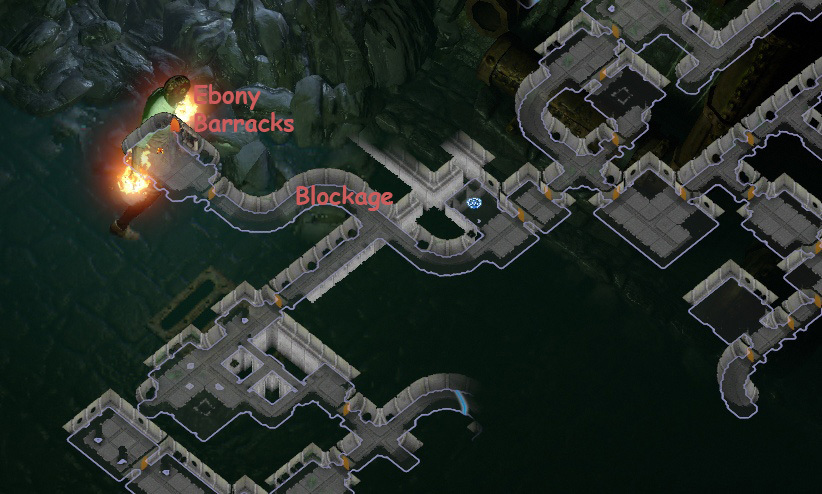
Take the Waypoint to the Sewers
Burn away the Undying Blockage . Enter the Ebony Barracks
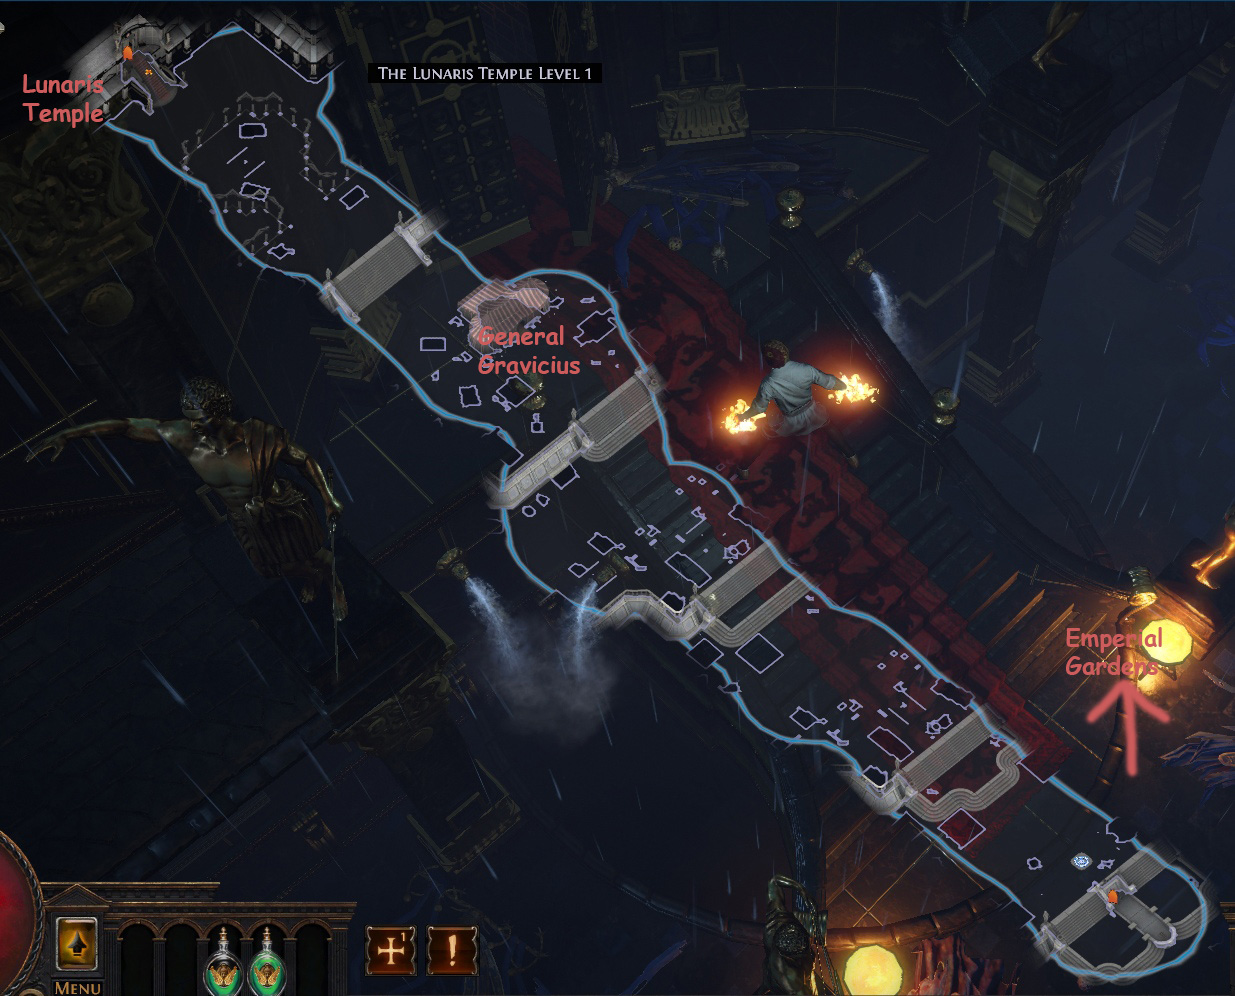
Catch the Waypoint . Move through the expanse . Find and kill General Gravicius
Go on heading upwards. Enter the Lunaris Temple (Level 1)
Find and enter the Lunaris Temple (Level 2)
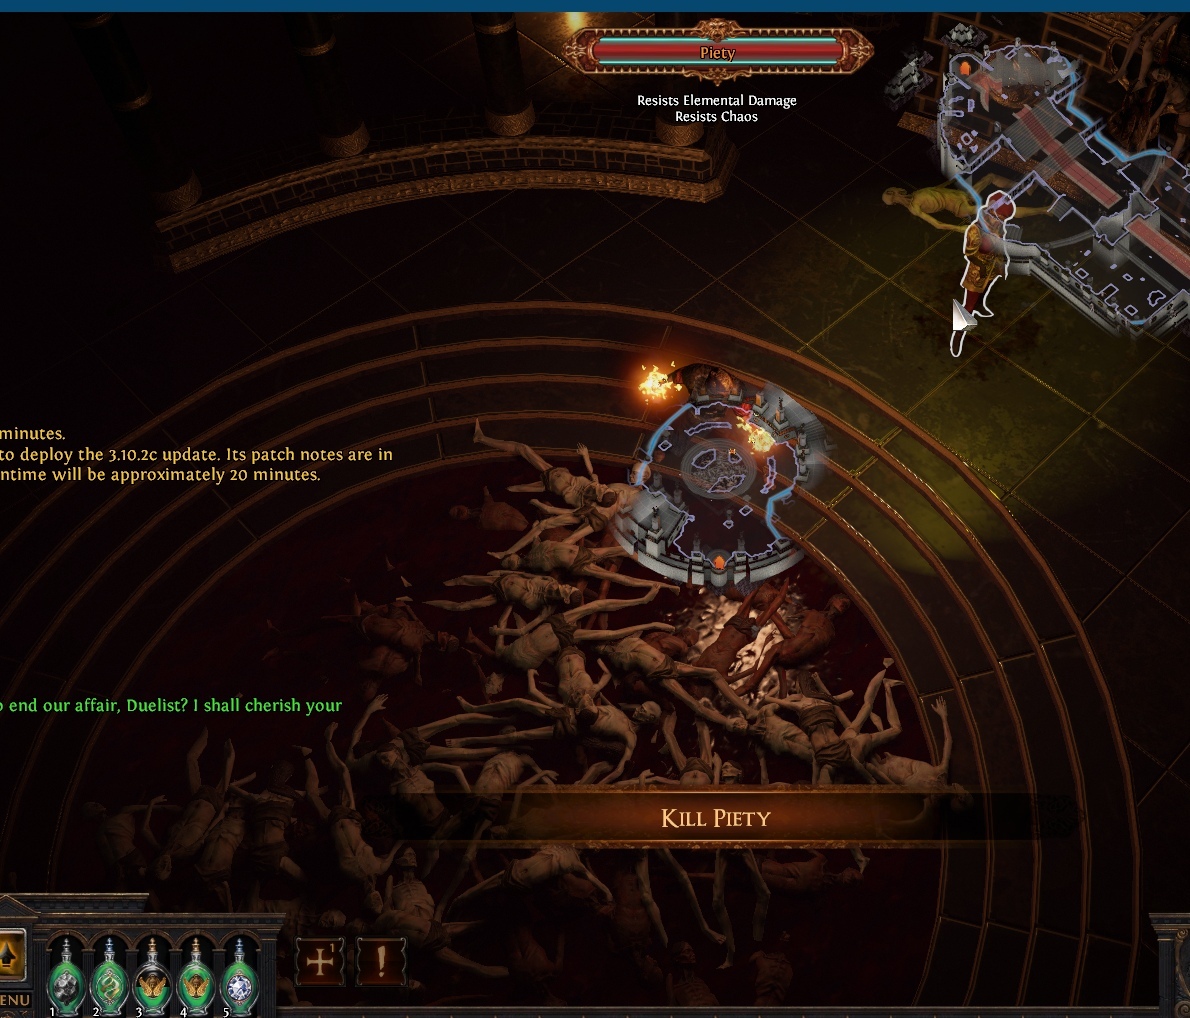
Find and impale Piety
Return to town. Talk to Grigor and Hargan to receive the volume of skill rewards


Take the Waypoint to the Ebony Barracks
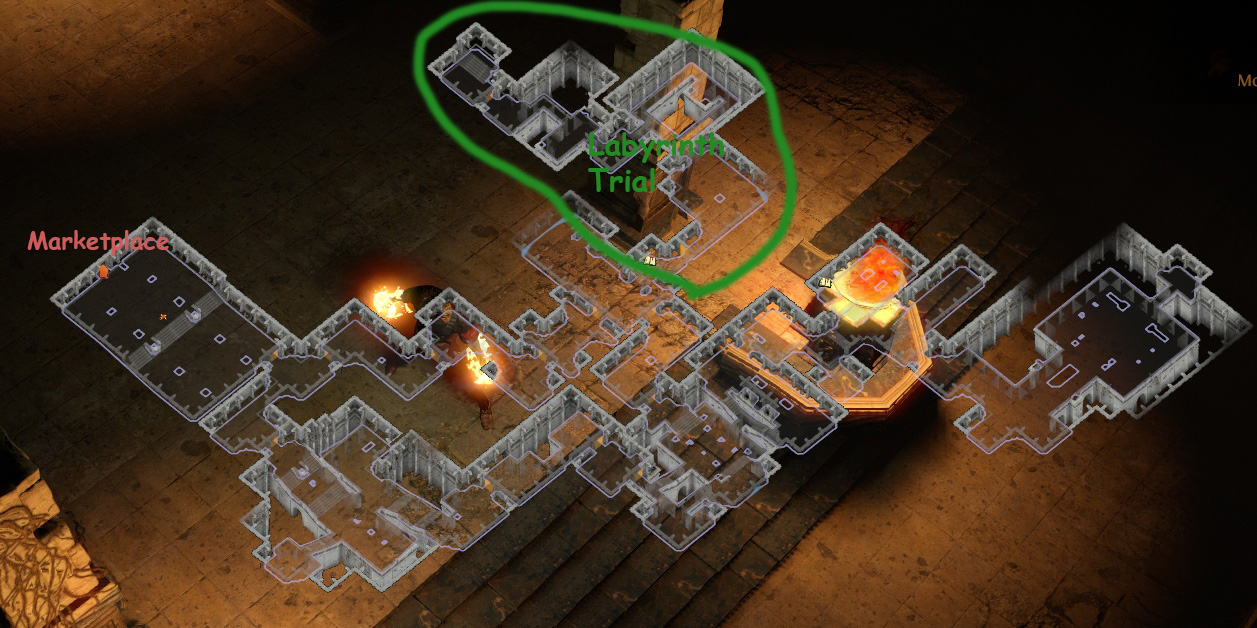
Notice and enter the Imperial Gardens
(Optional): Notice and complete the last Labyrinth Trial for the Normal Lab
Talk to Clarissa to buy Ancestral Warchief
Swap Ancestral Warchief with Bequeathed Protector
Talk to Maramoa to receive Poacher'southward Mark
Move to Act2 and talk to Yeena to buy Flesh and Stone , Cruelty , Culling Strike
Wait for a Two-Hand Axe. Use essence/phys recipe. Your main setup is:
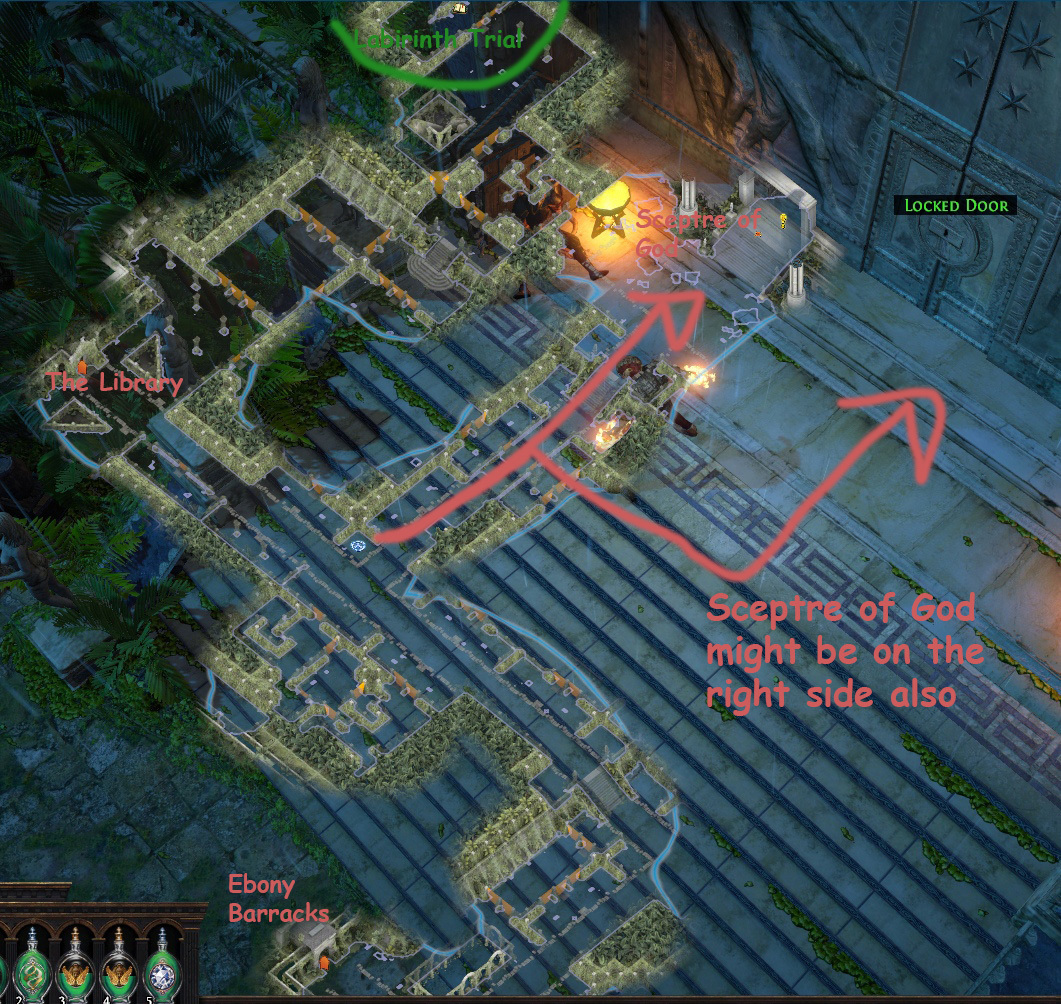
Find and enter the Sceptre of God
Arise the levels to find and enter the Upper Sceptre of God
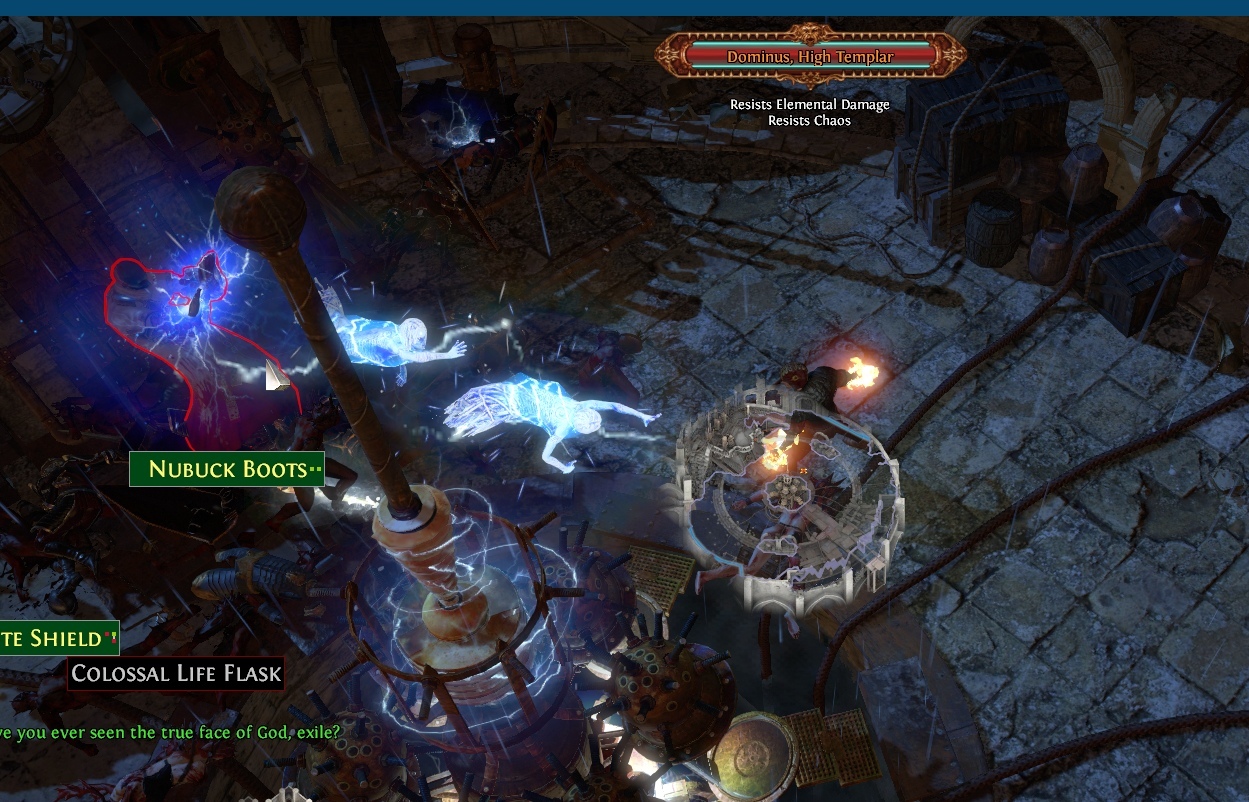
Kill Dominus
Enter the Aqueduct and make your way through the expanse
Enter Highgate
Move to town. Enter the Aspirant'south Plaza
Complete showtime labyrinth
Choose Gladiator ascendancy. Skill Arena Challenger
Return to Imperial Gardens
Equally you accomplish Hatchet Master node by the end of act3 - remove O nslaught and add together Lifetap to master link instead
(act1, Nessa )
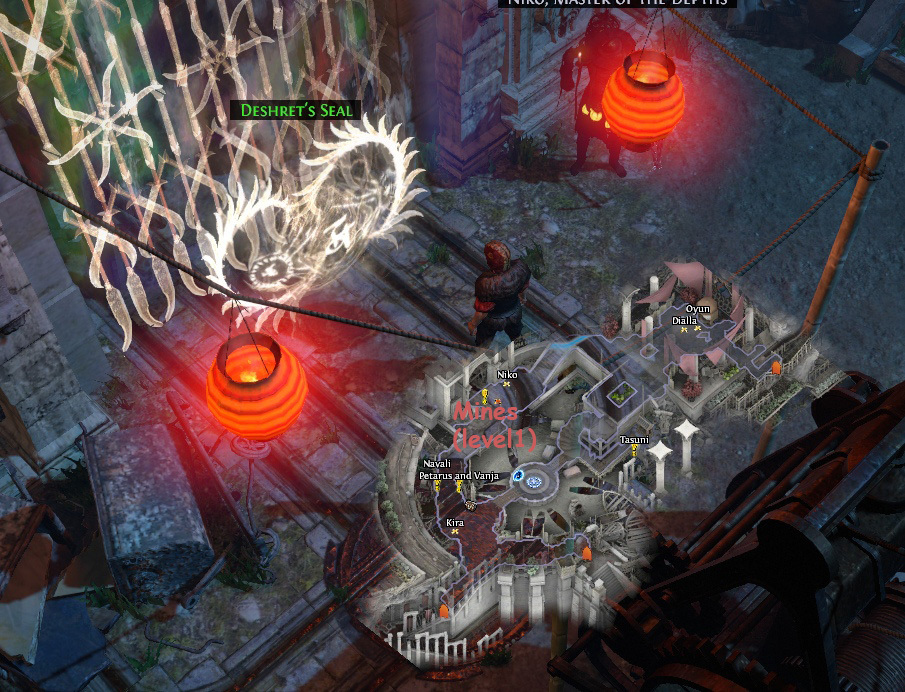
Enter the Mines (Level ane) by using Deshret'south Imprint
Move through the surface area and enter the Mines (Level 2)
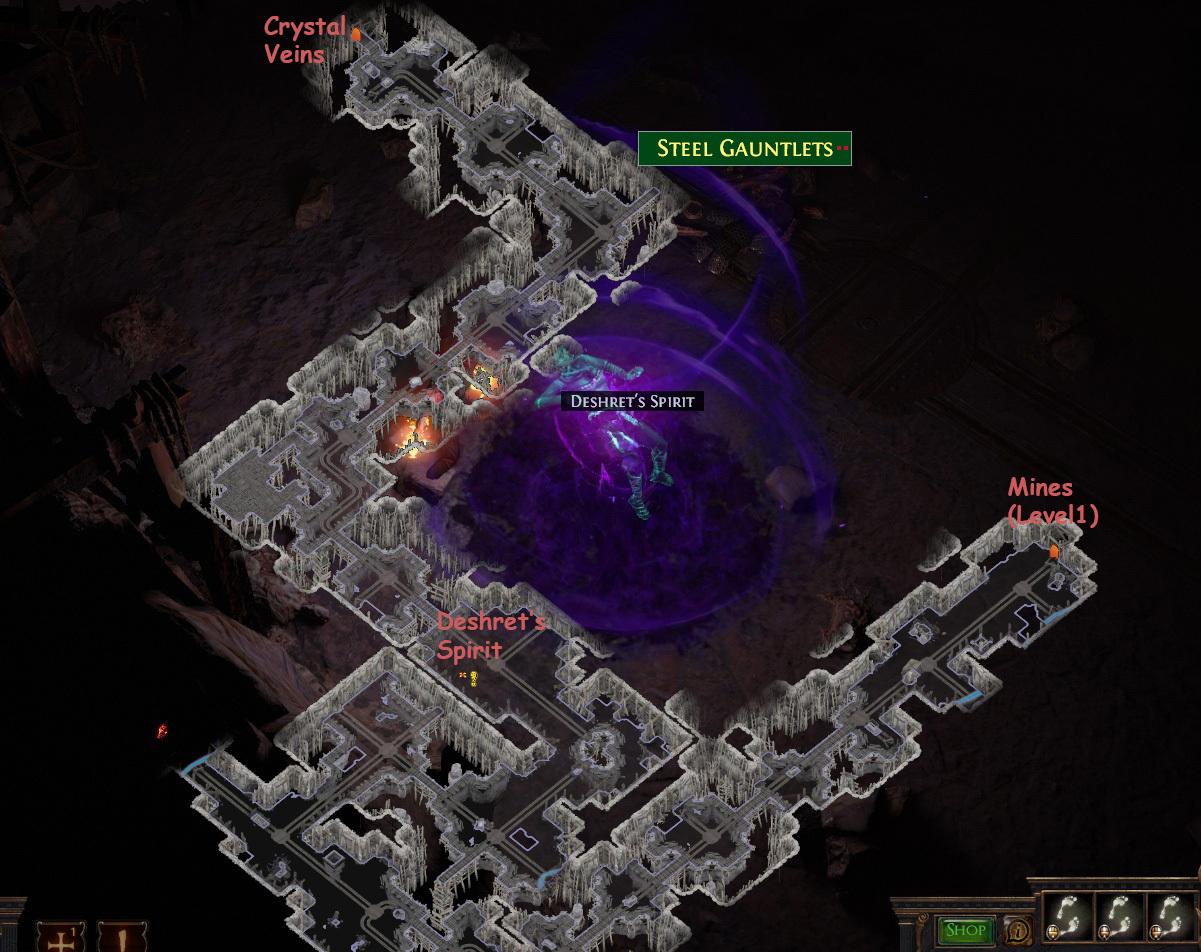
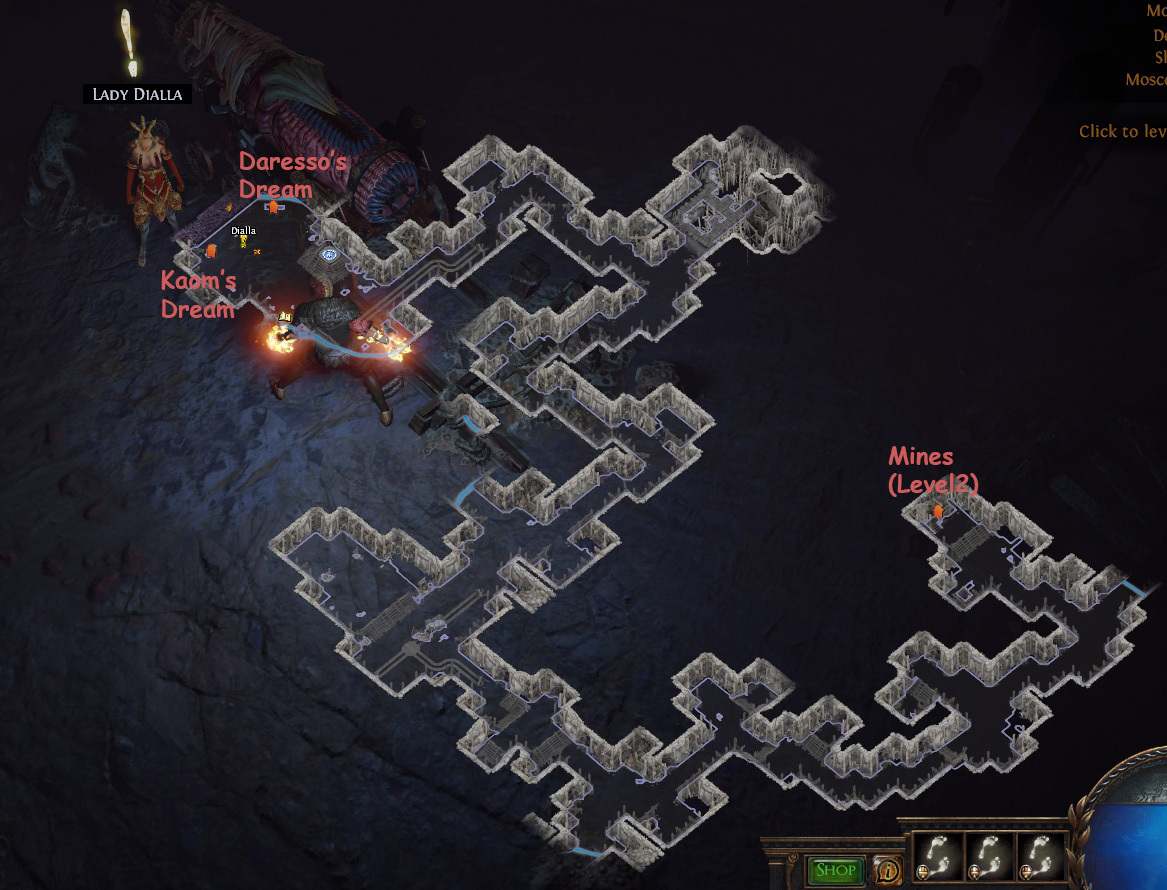
Notice Deshret's Spirit and release it. Enter the Crystal Veins
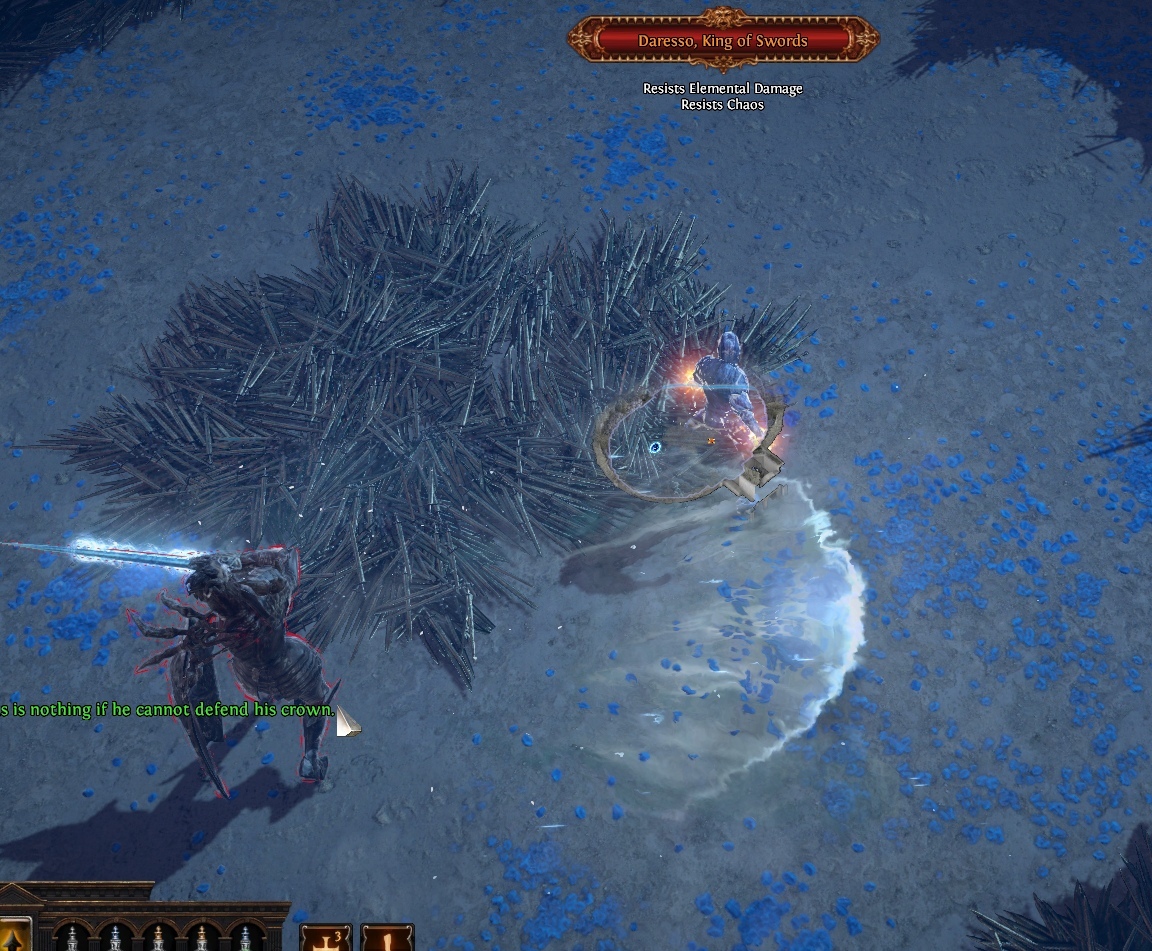
Locate Dialla , grab the Waypoint. Enter Daresso'due south Dream
Move through the area, enter the Grand Loonshit
Find get out into the Ring of Blades
Impale Daresso and have Eye of Want. Logout
Take the Waypoint to the Crystal Veins
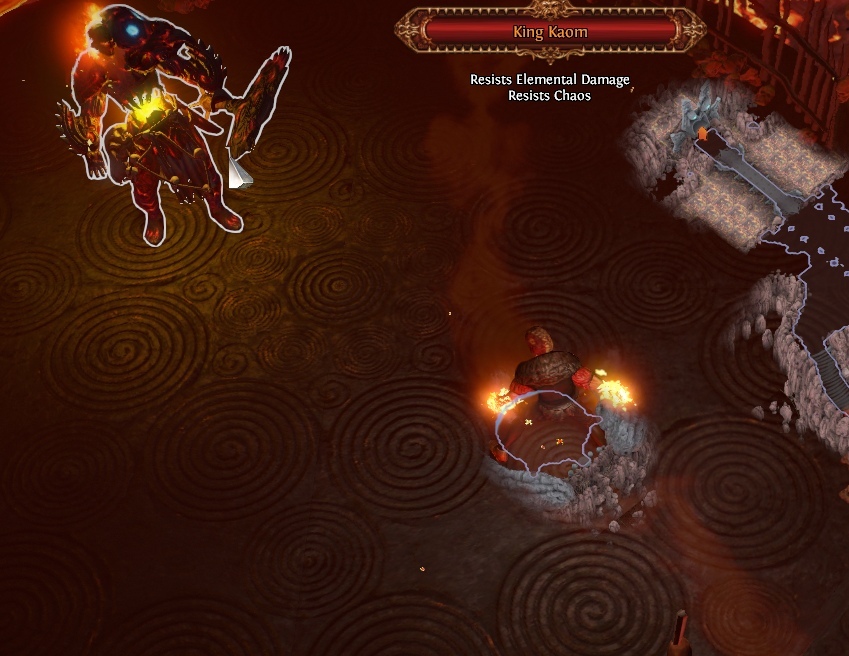
Enter Kaom'southward Dream
Move through the area until you reach Kaom's Stronghold
Motion through the surface area and enter the Caldera of the King.
Kill Kaom and take Centre of Fury. Logout
Talk to Tasuni to receive the volume of skill
Take the Waypoint to the Crystal Veins. Talk to Dialla
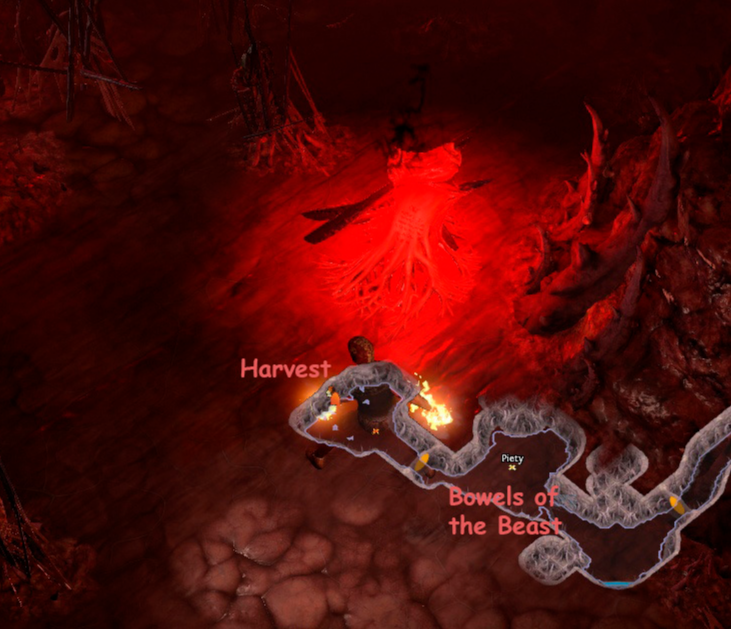
Enter the Belly of the Fauna (Level i)
Move through the area, enter the Belly of the Beast (Level two)
Move through the expanse, enter the Bowels of the Beast
Kill Piety . Talk to her, quit into the Harvest
Kill Malachai's 3 guardians : Doedre, Maligaro and Shavronne
Pick up the organs they drop
Enter the Black Core
Kill Malachai . Logout
Highgate (Act 4)
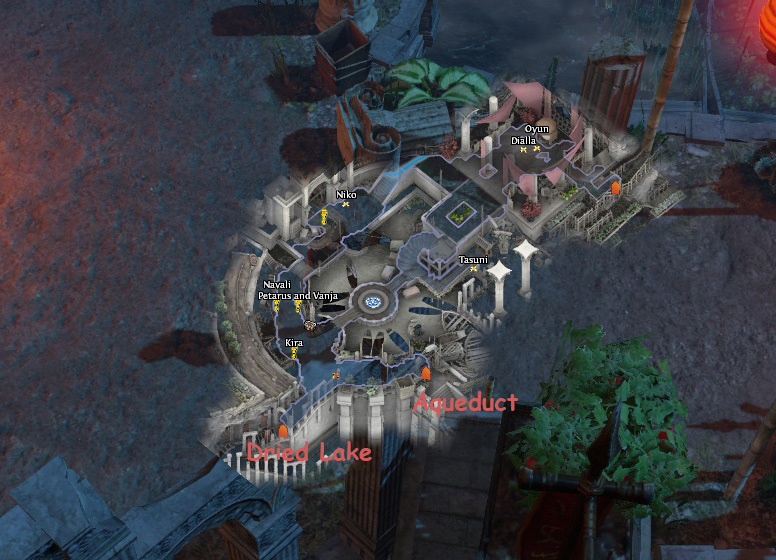
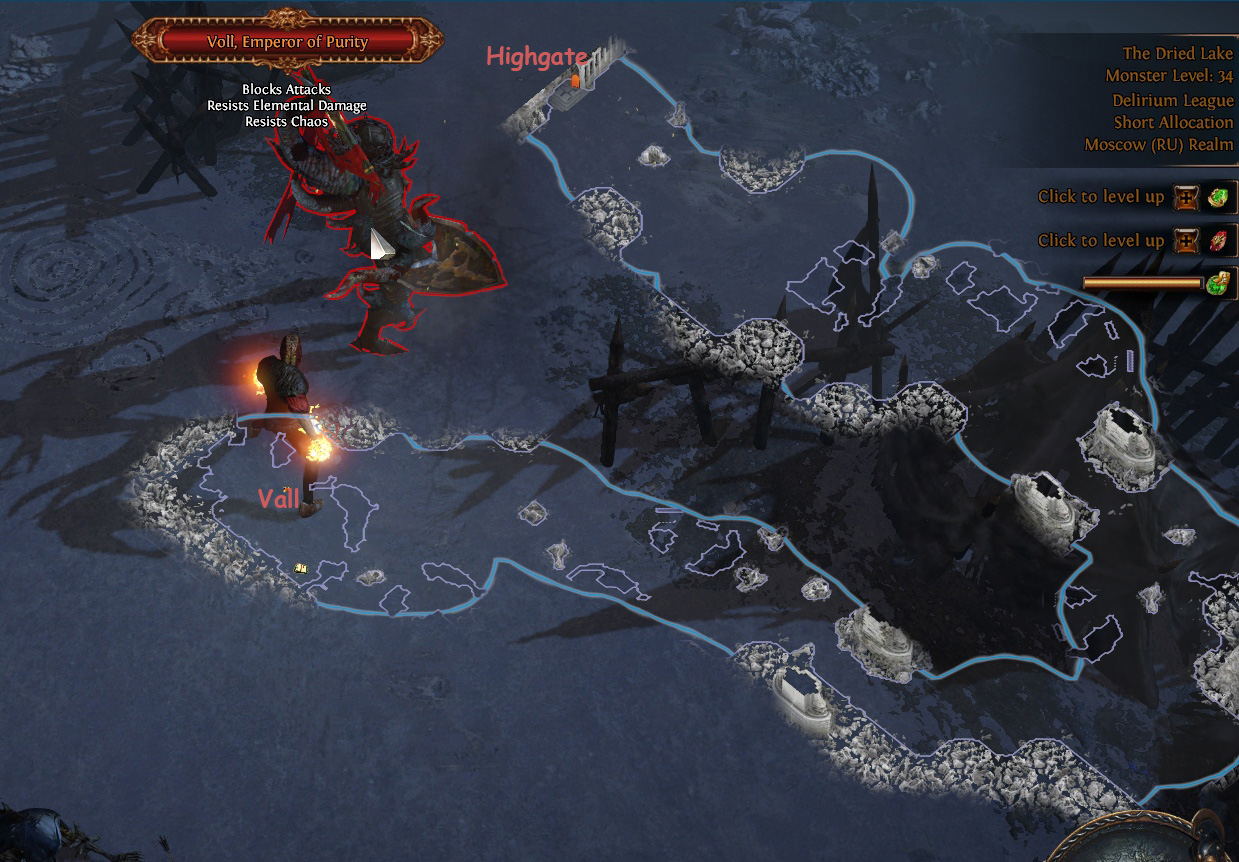

Enter the Dried Lake
Motion through the surface area and kill Voll , take Deshret'south Banner. Logout
Leveling advices :
Level 1-sixteen - stay ~ the zone lvl
Level 17-31 - stay ~ 4 levels nether
Level 32-47 - stay ~ v levels under
Level 48-lx - stay ~ 6 levels under
Approximate level by the beginning of the act :
act2 - 12-xiii
act3 - twenty-21
act4 - 30 -31
act5 - 36-38
act6 - 41-43
act7 - 46-48
act8 - 51-53
act9 - 55-57
act10 - 59-61
Kitava - 61-63
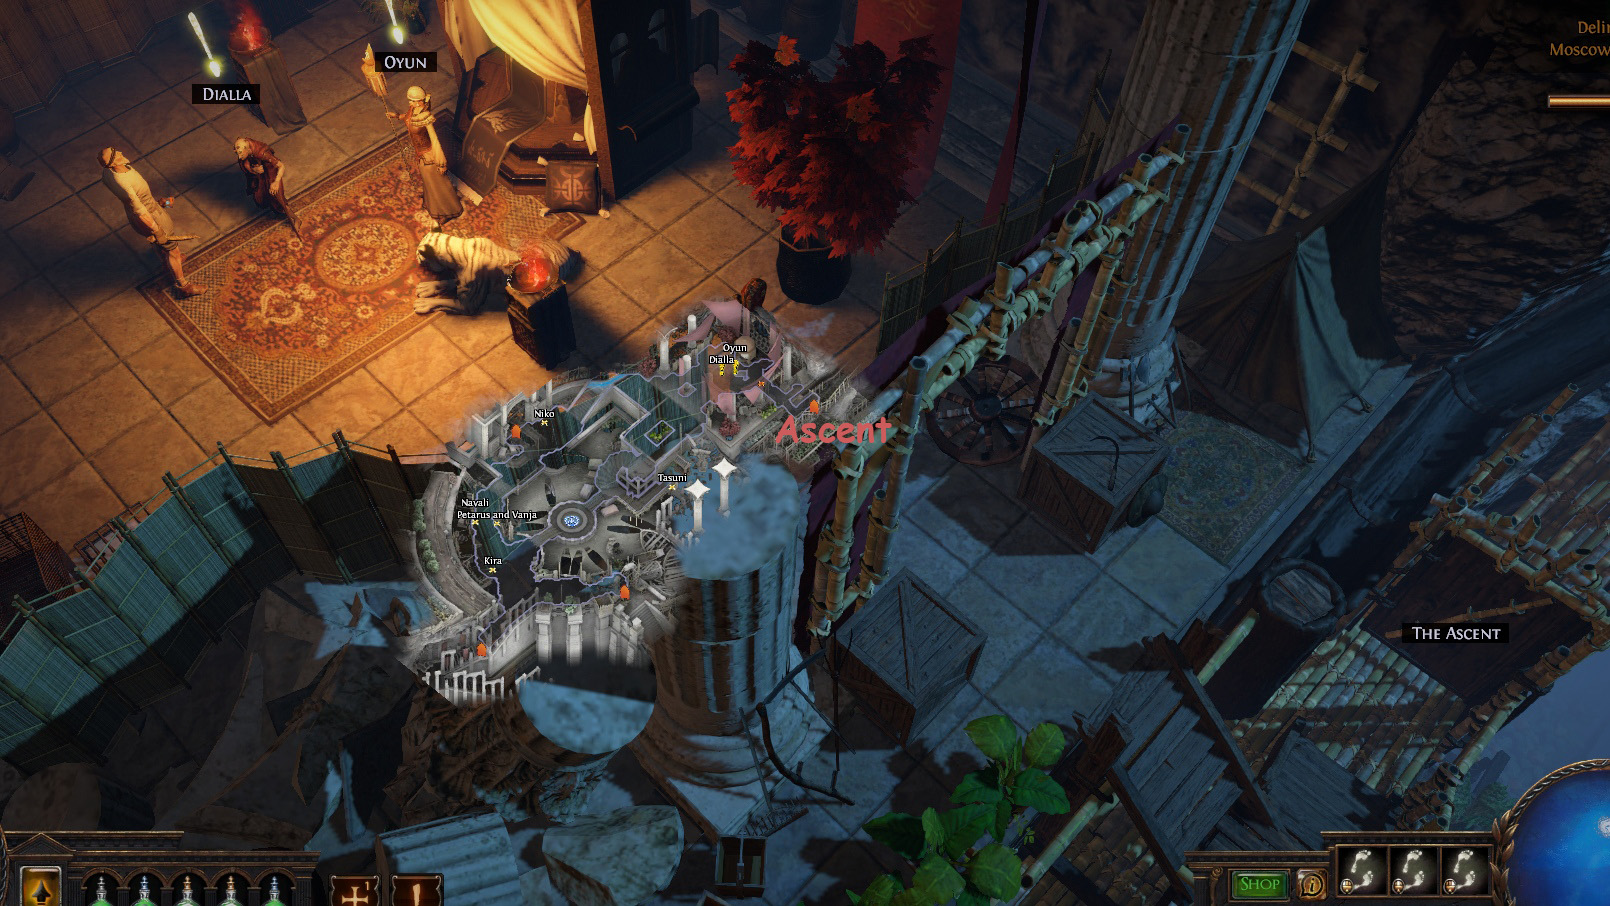
Exit into the Ascent
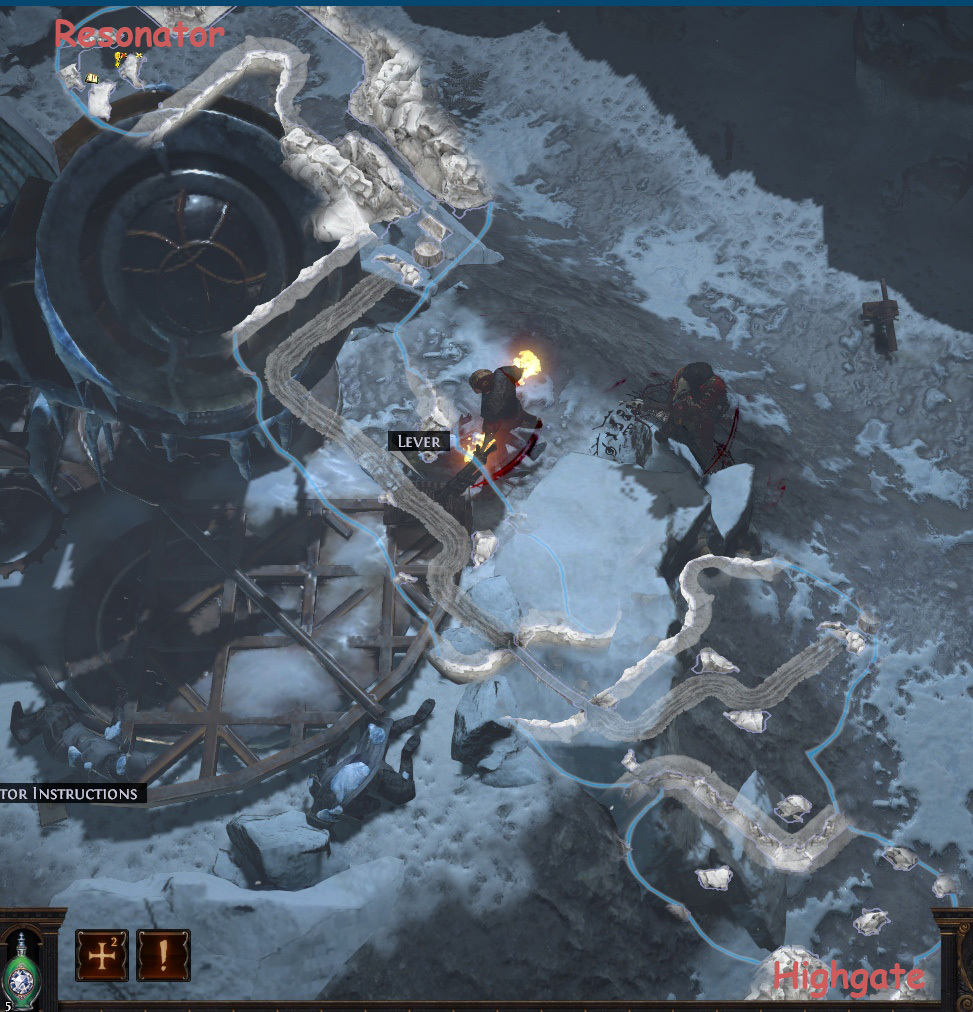
Find the Resonator and have the Oriath Portal
Talk to Oyun to receive Stone Golem . Your setup :
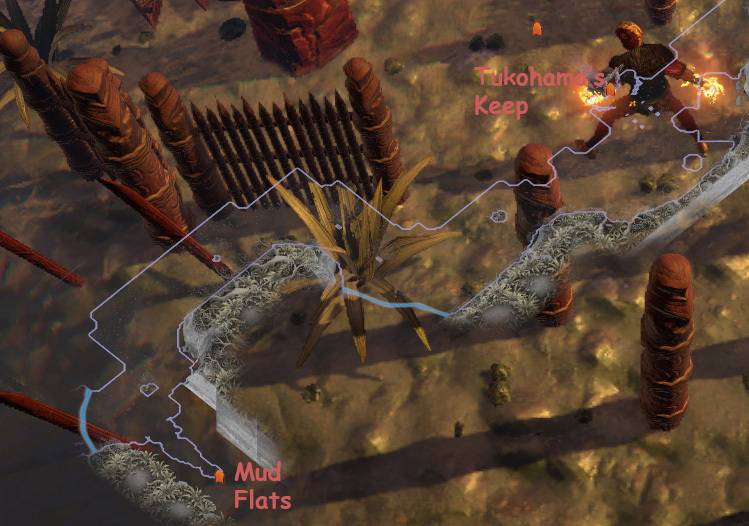
Lioneye's Watch(Act vi)
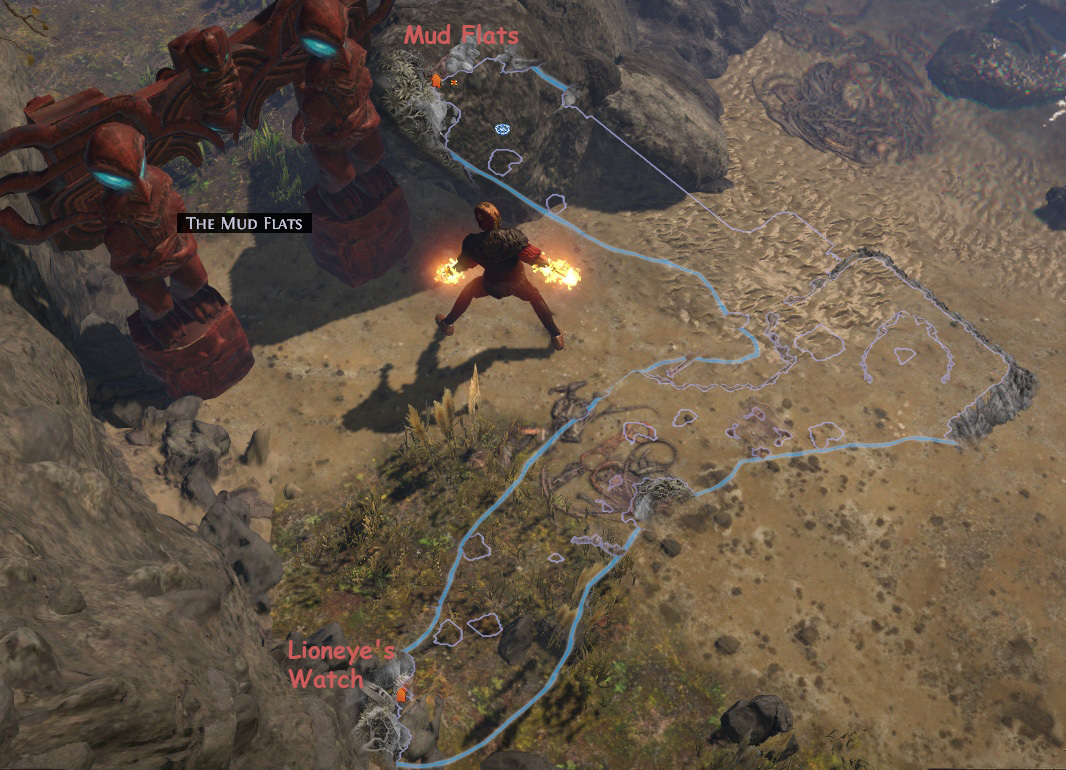
Enter the Coast
Motion through the area, find and enter the Mud Flats
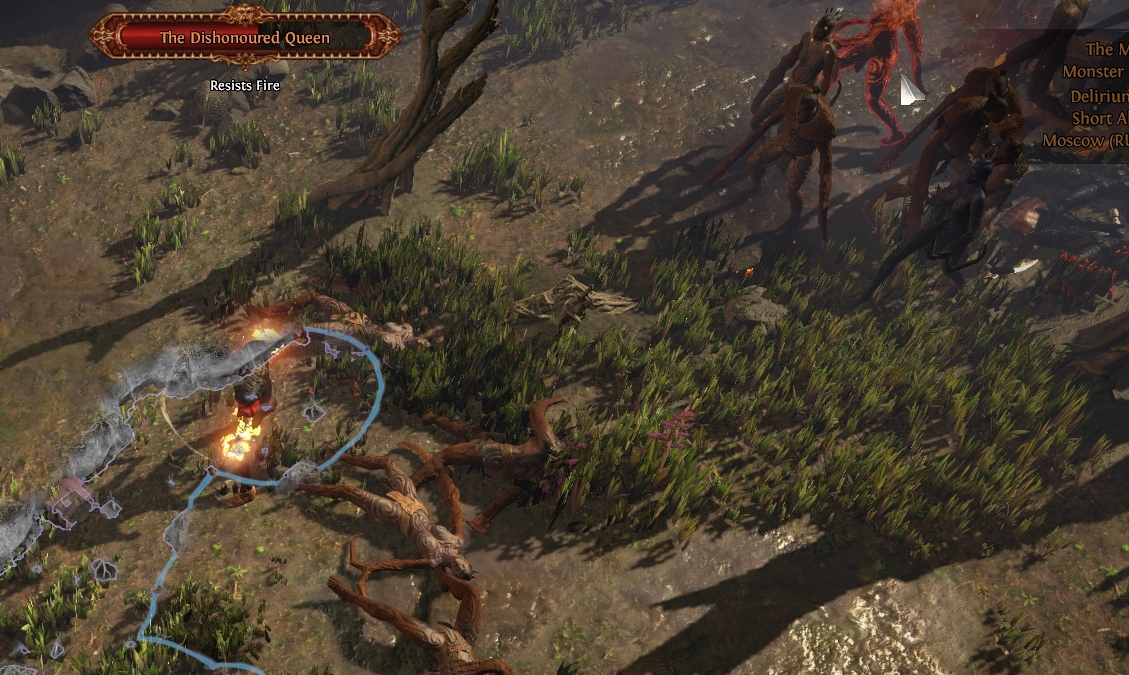
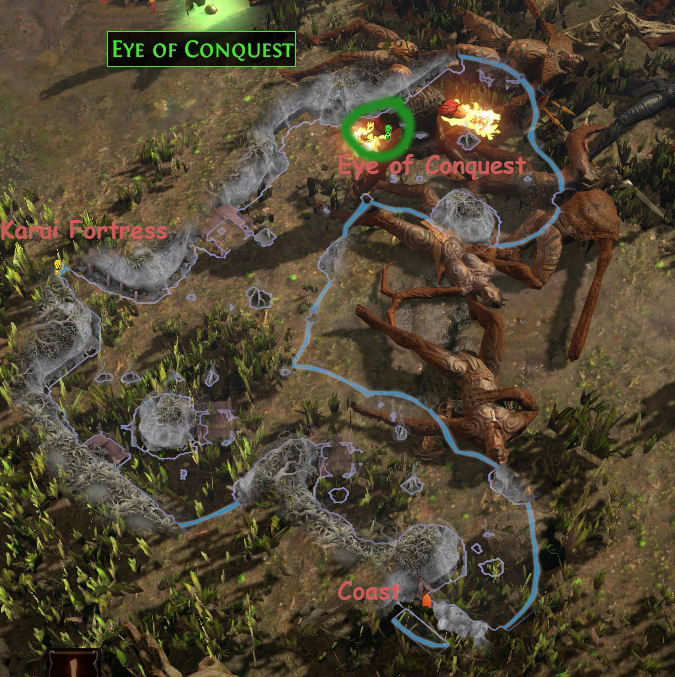
Find and kill the Dishonored Queen and take Eye of Conquest
Notice the exit into the Karui Fortress
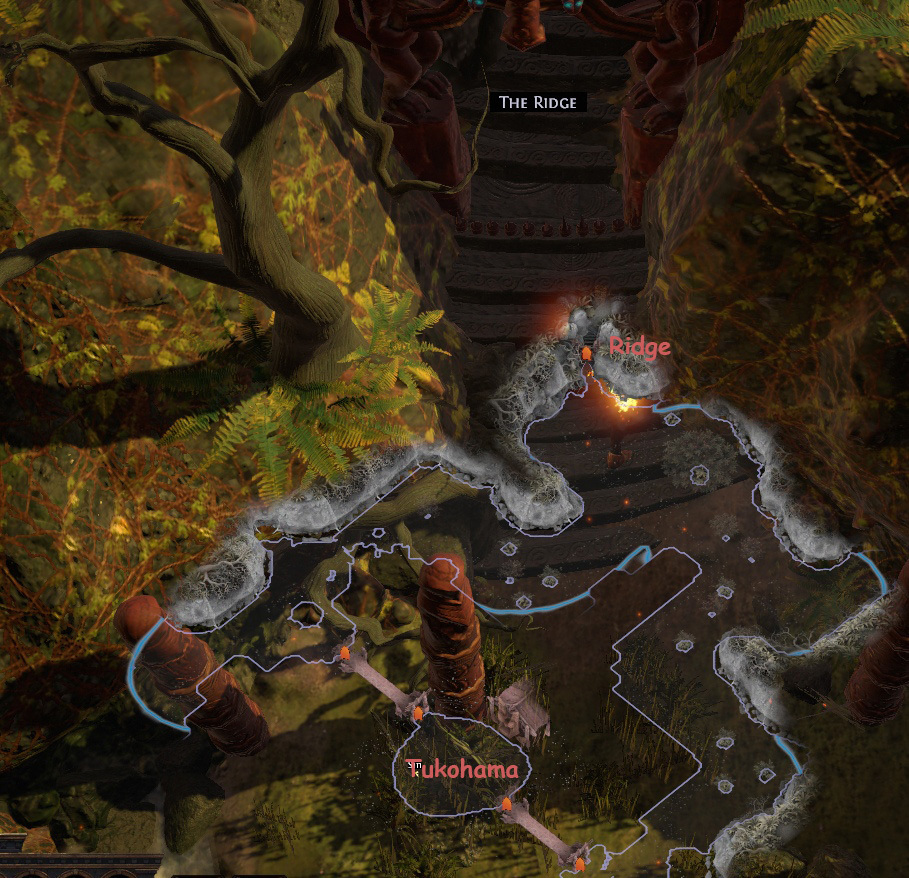
Enter the Tukohama's Keep
Impale Tukohama
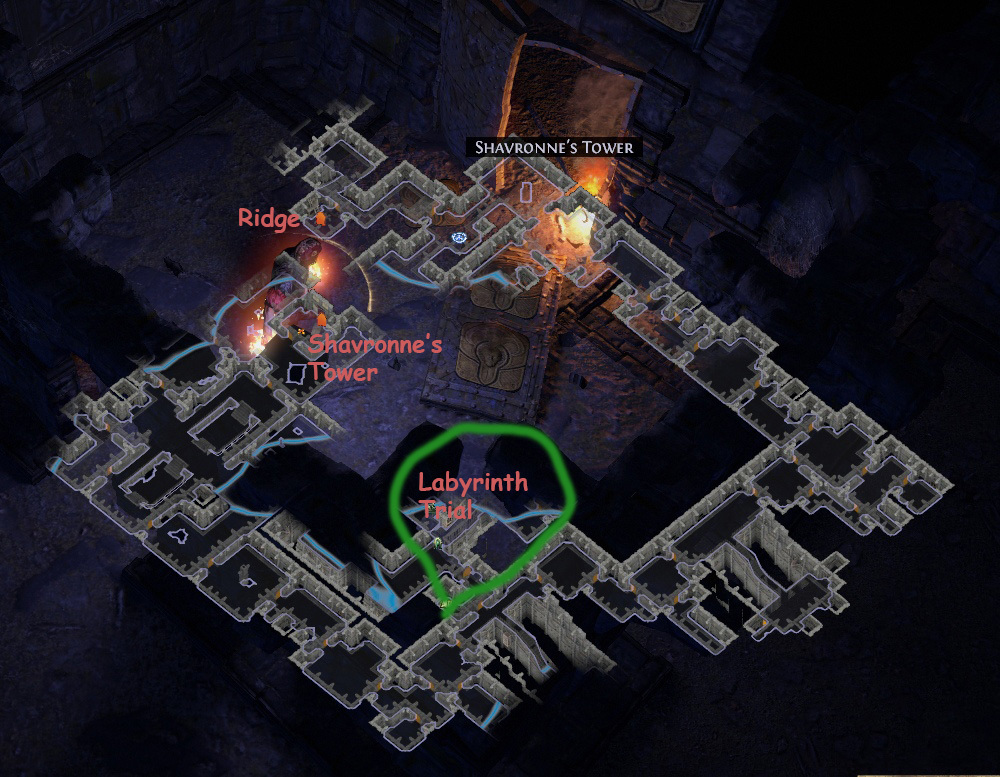
Find and enter the Ridge
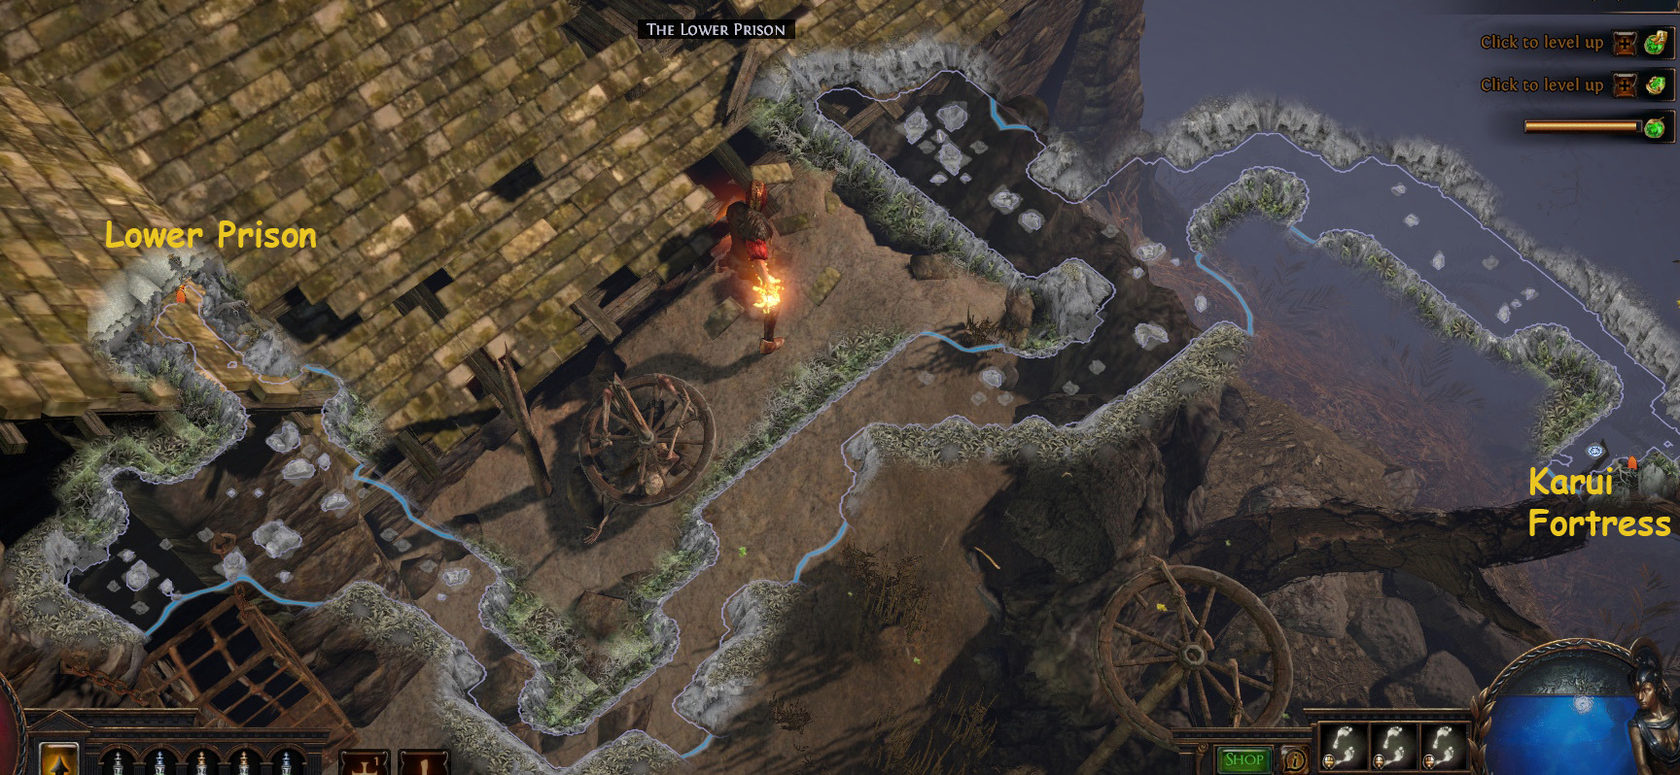
Find and enter the Lower Prison
(Optional): Find and consummate the Labyrinth Trial
Observe and enter the Shavronne's Belfry
Ascend the tower until you reach the Prison house Rooftop
Kill Brutus and Shavronne . Logout
Take the Waypoint to the Prisoner's Gate
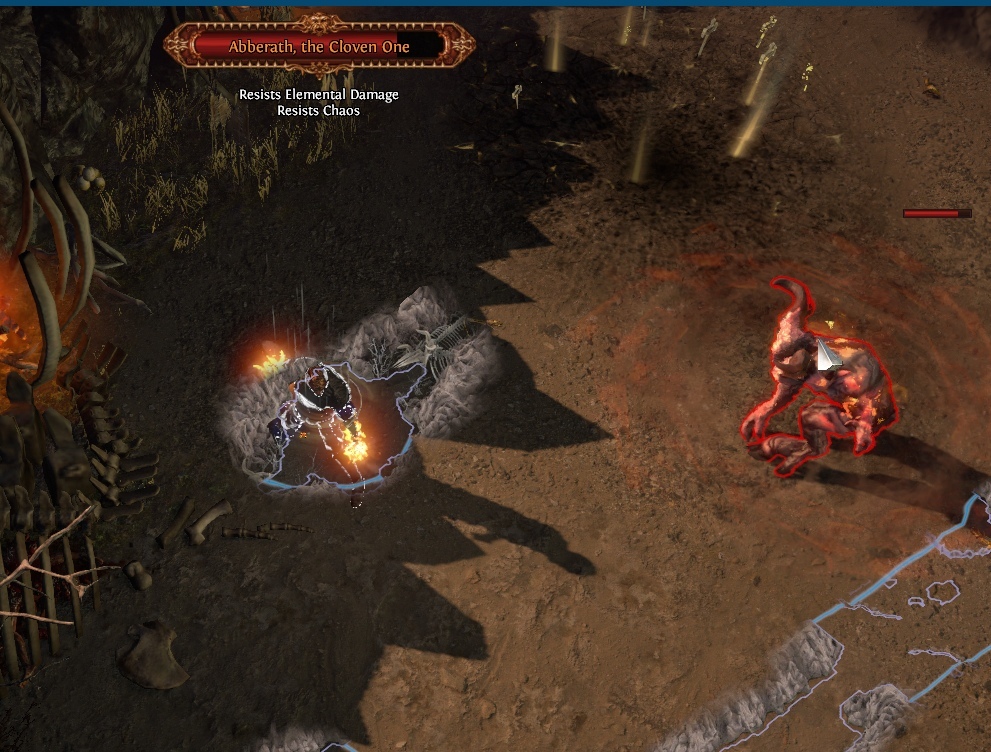
Move through the area. Enter the Valley of the Fire Drinker and impale Abberath
If you detect the Western Forest first, enter information technology
you lot will do the Abberath quest later
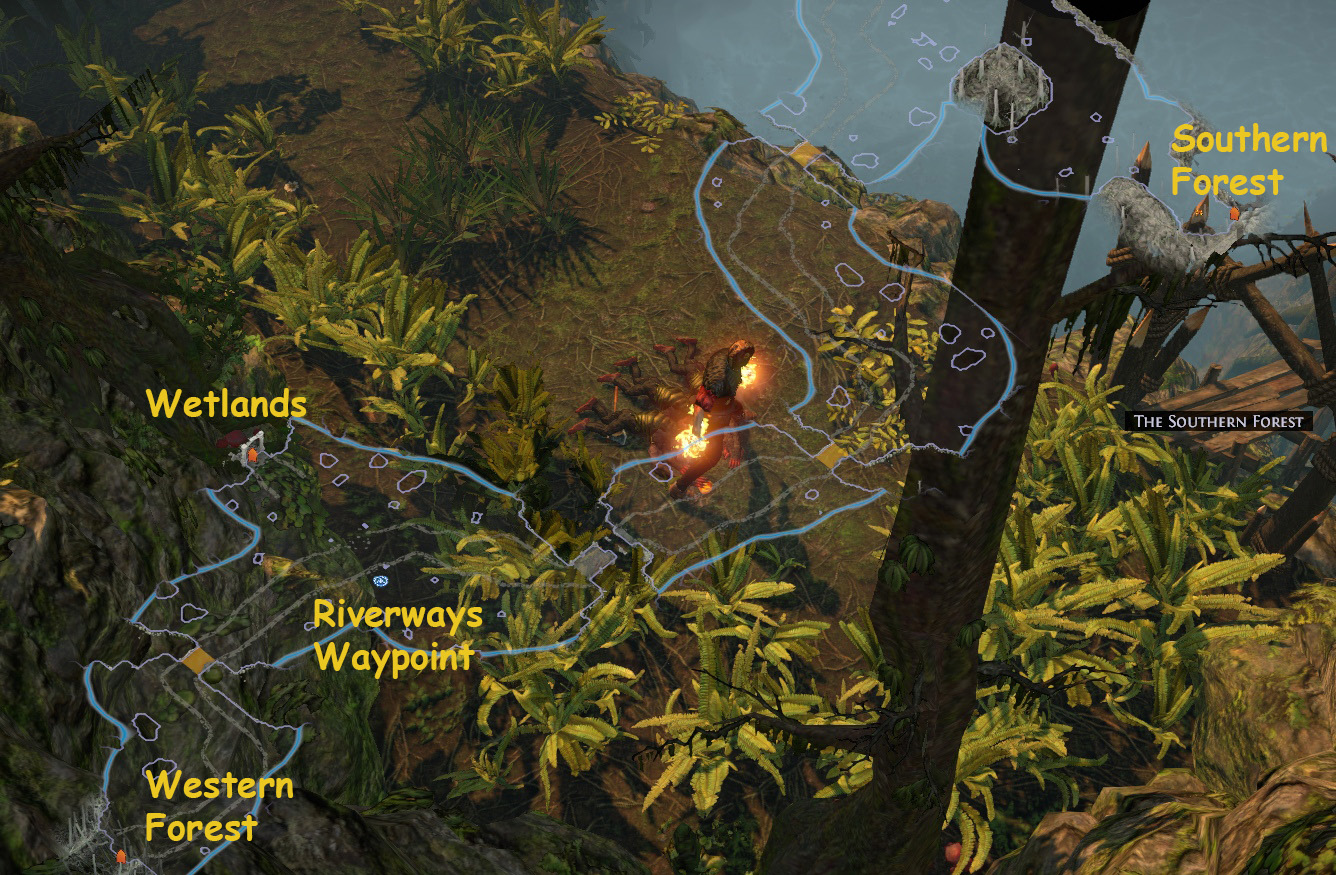
Follow the main road and enter the Riverways
Follow the main road, grab the Waypoint
Find and enter the Wetlands
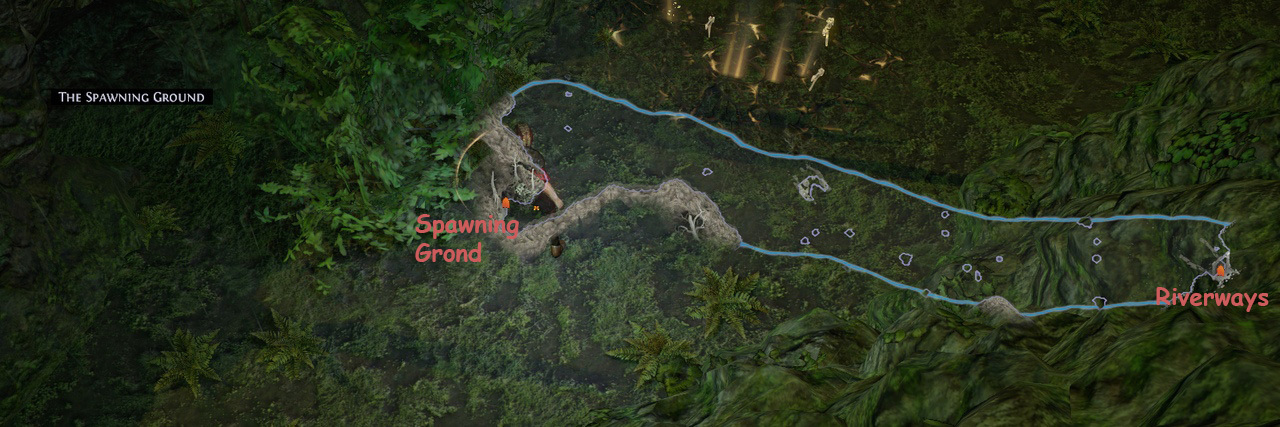
Motility through the surface area and enter the Spawning Ground
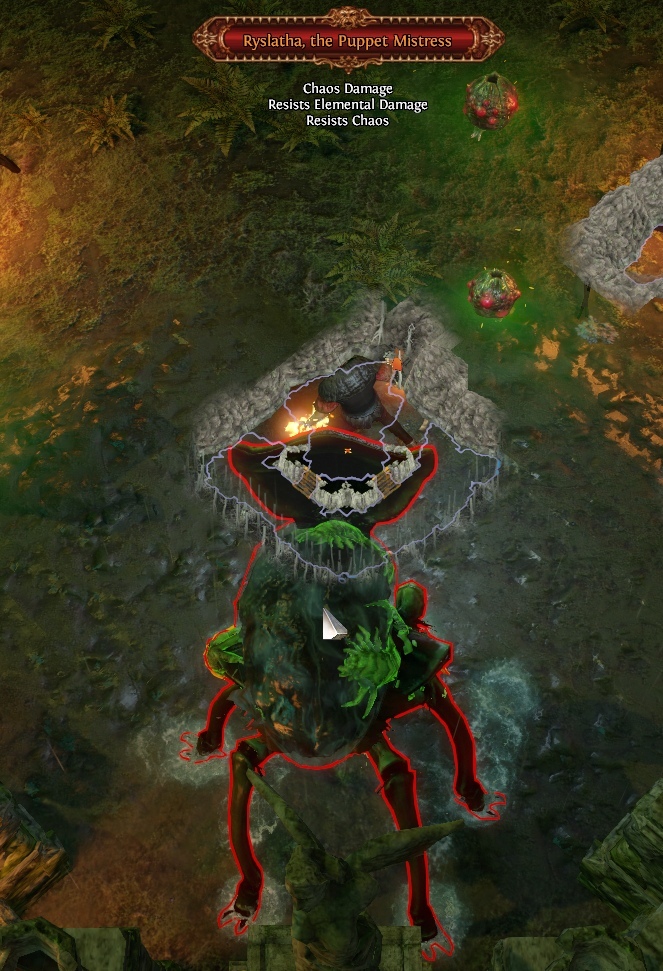
Kill Boob Mistress . Logout
(Have Waypoint to the Prisoner'southward Gate , discover the Valley of the Fire Drinker
and impale Abberath if you did not do it yet). Logout
Talk to Lilly , Bestel and Tarkleigh to receive the volume of skill rewards
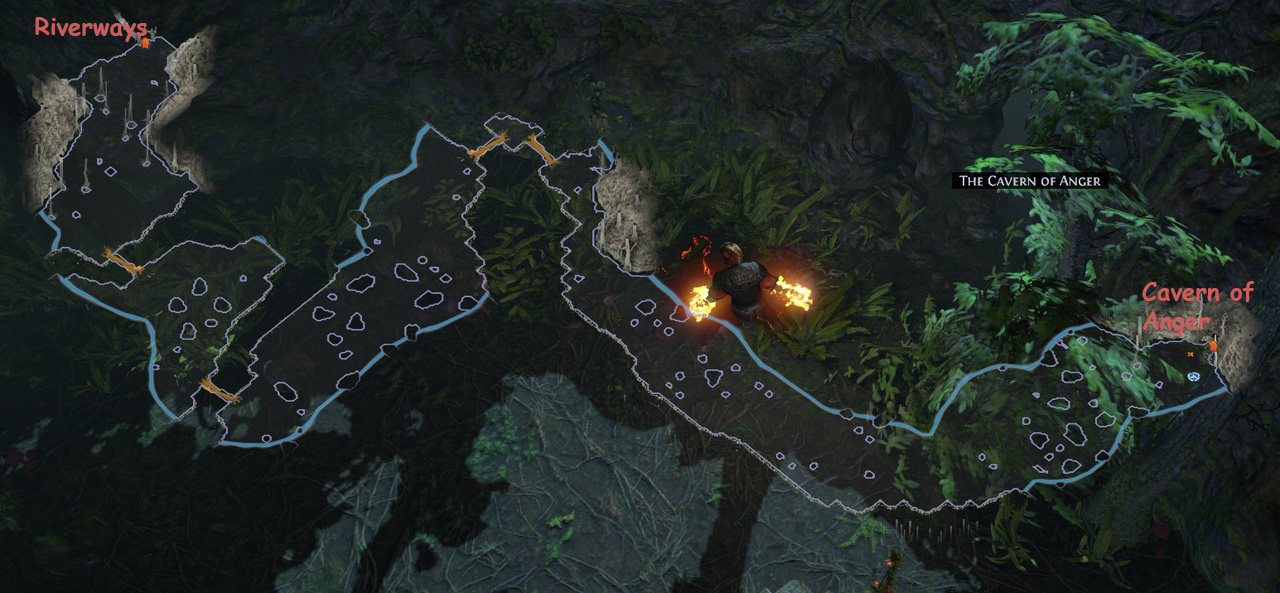
Have Waypoint to the Riverways. Find and enter the Southern Woods
Move through the area, enter the Cave of Anger
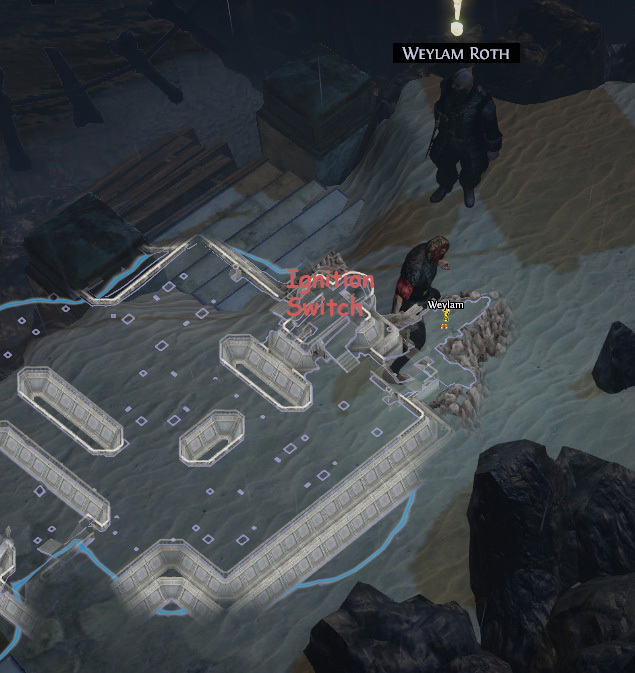
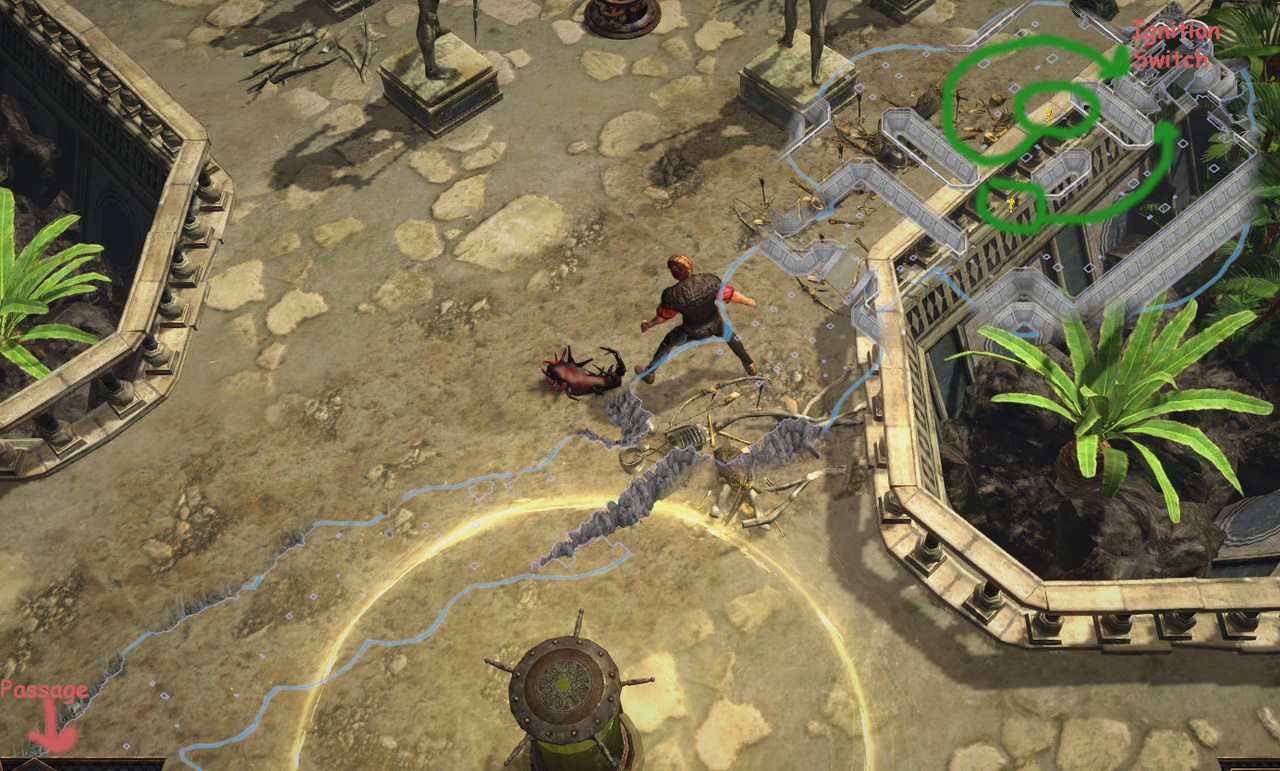
Open the Flag Chest and have the Black Flag. Enter the passage
Motility through the cavern until y'all reach the Buoy
Detect the pyramid-esque structure and arise it
Escort the two pillars to their berths by standing within the glowing circle
Click on the ignition switch and and so over again on the Buoy
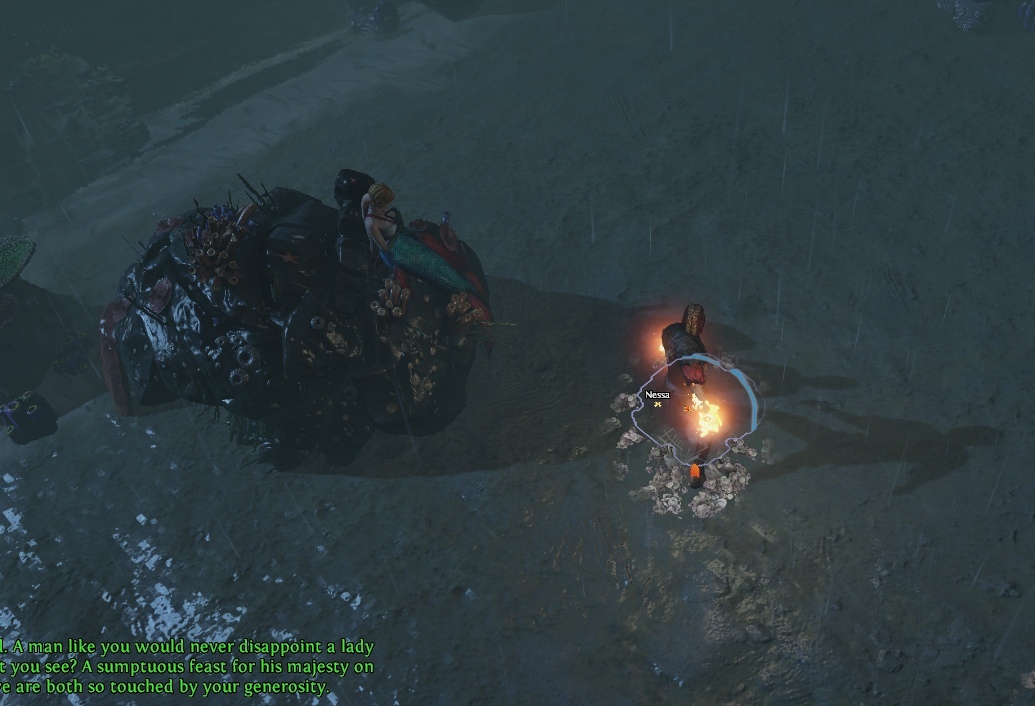
Talk to Weylam and sail to the Brine Rex's Reef
Find and enter the Brine King's Throne
Kill Brine Rex
Talk to Weylam and sail to Deed 7

![]()

![]()

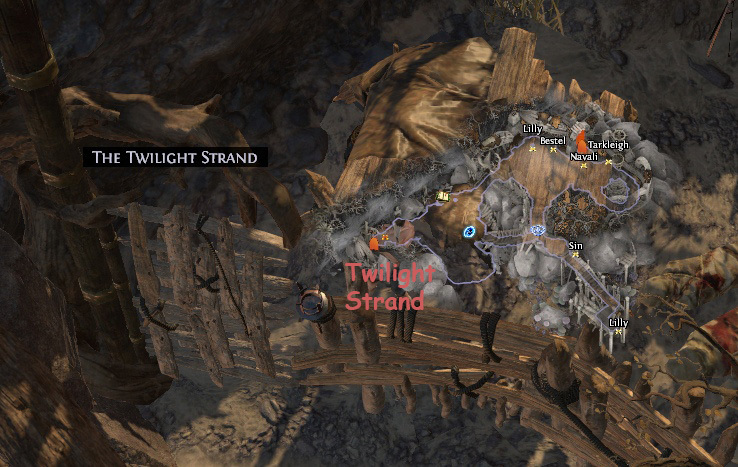
Talk to Lilly to take the Twilight Strand quest. Enter the Twilight Strand
Clear the area . Return to town
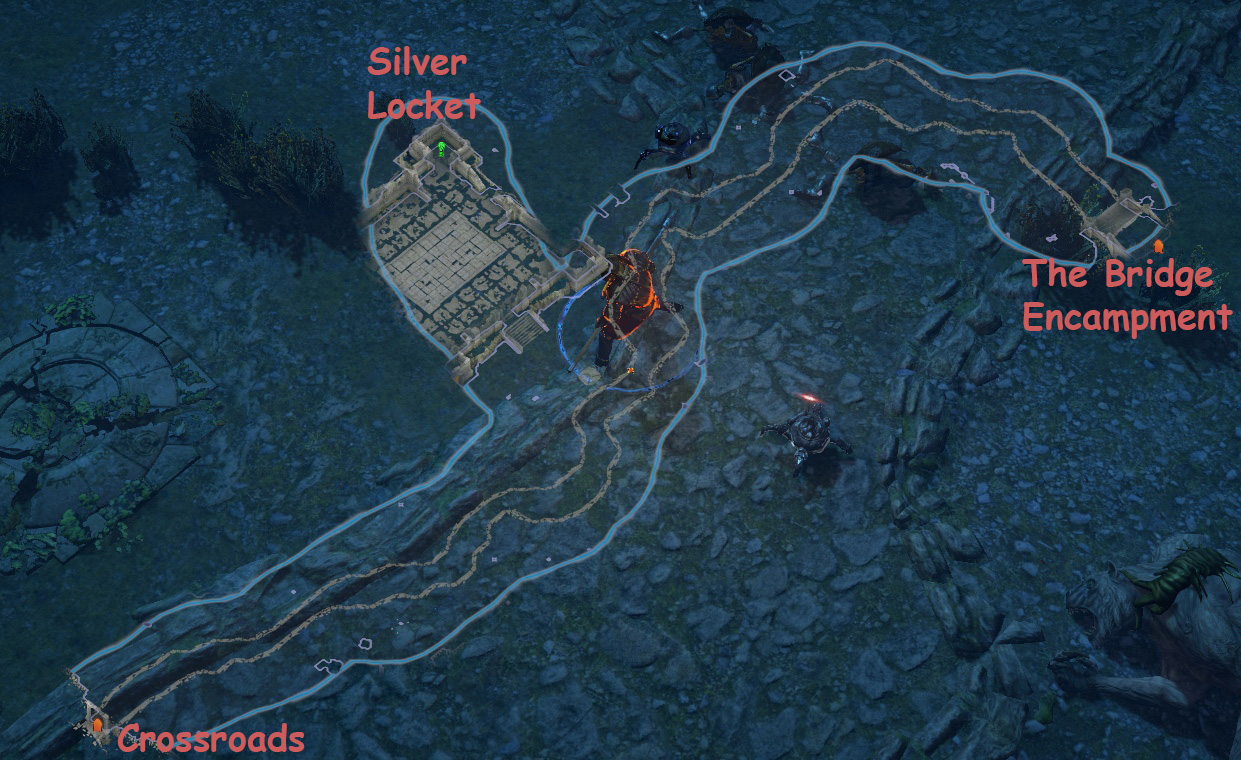
Enter the Broken Bridge
(Optional): Notice Silver Locket and deliver it to Weylam
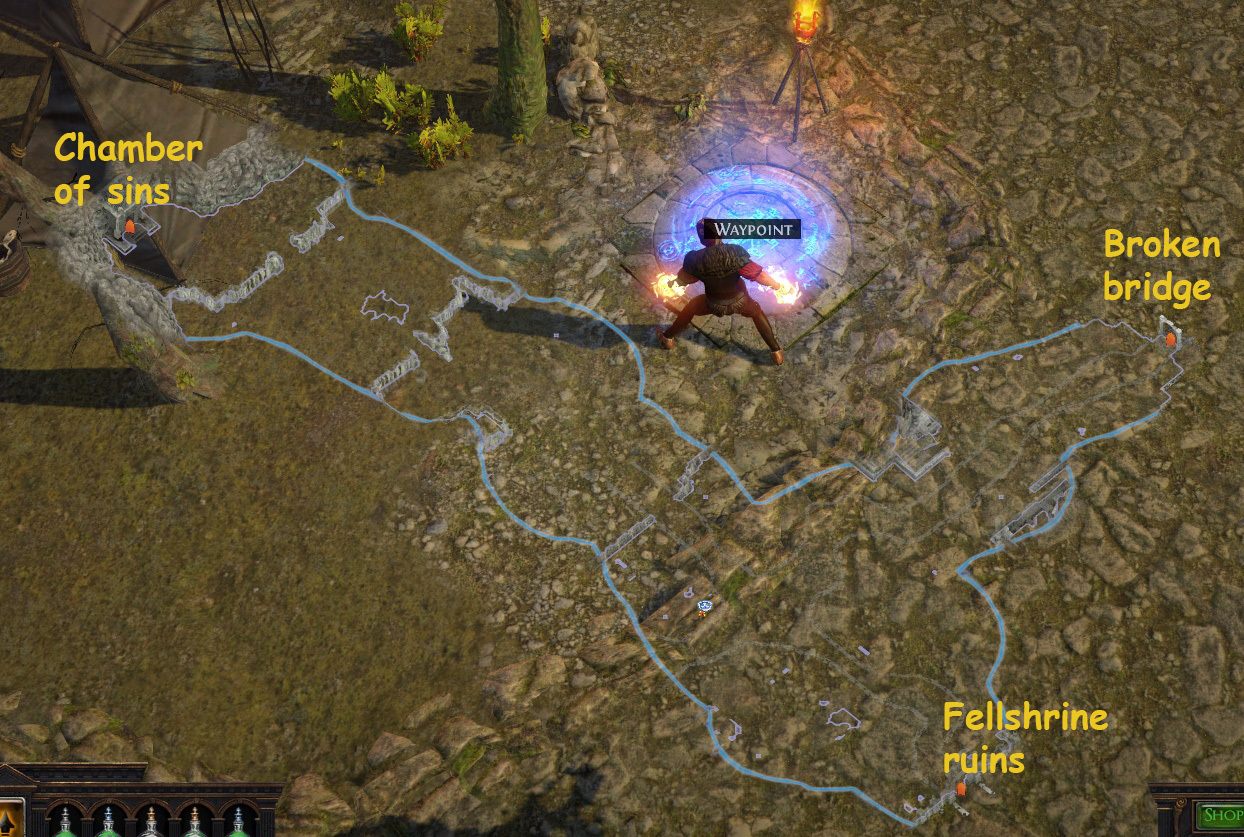
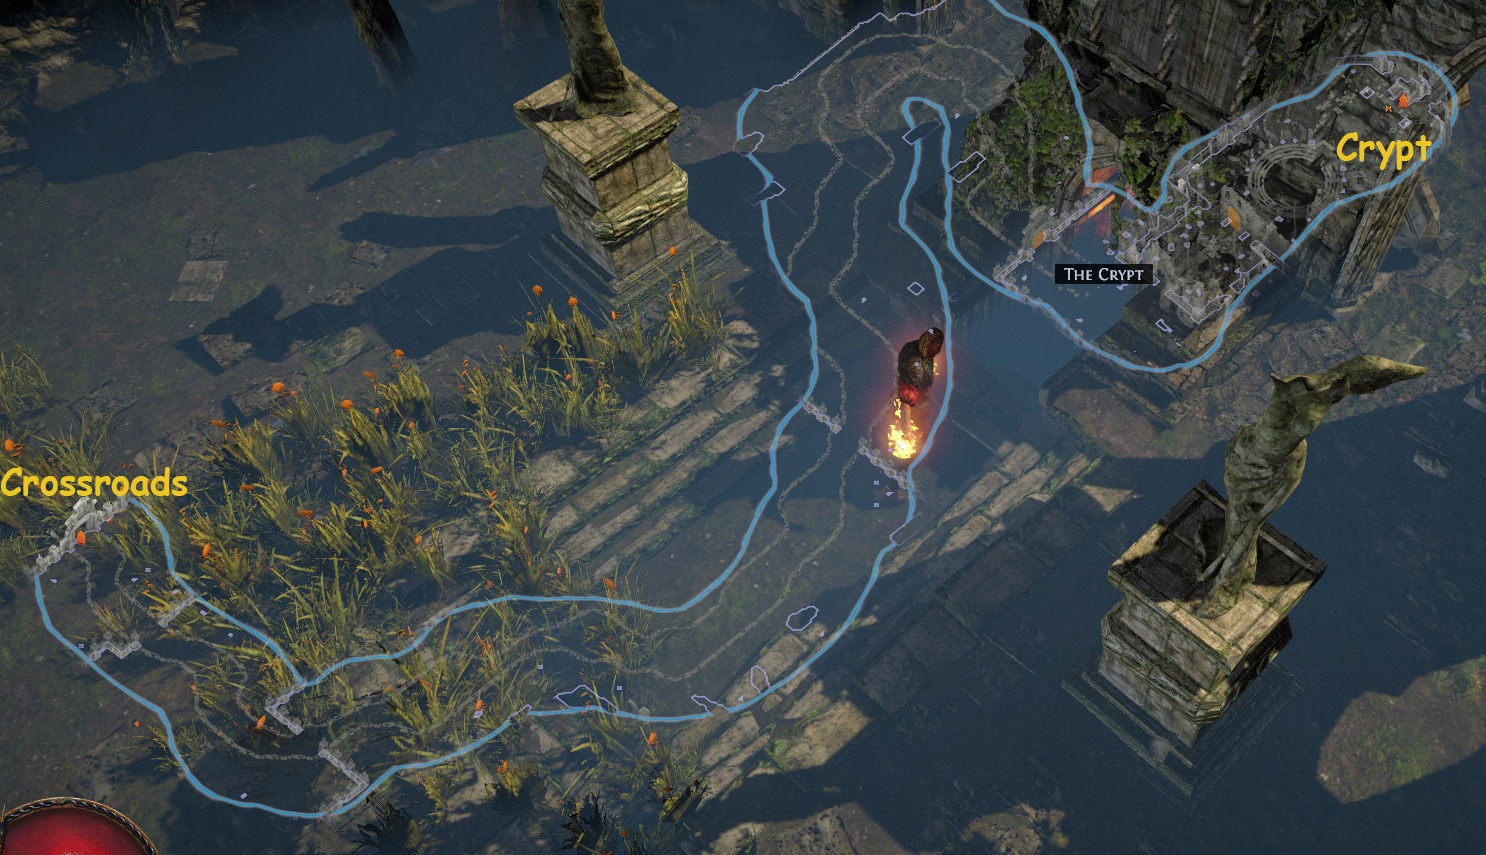
Enter the Crossroads
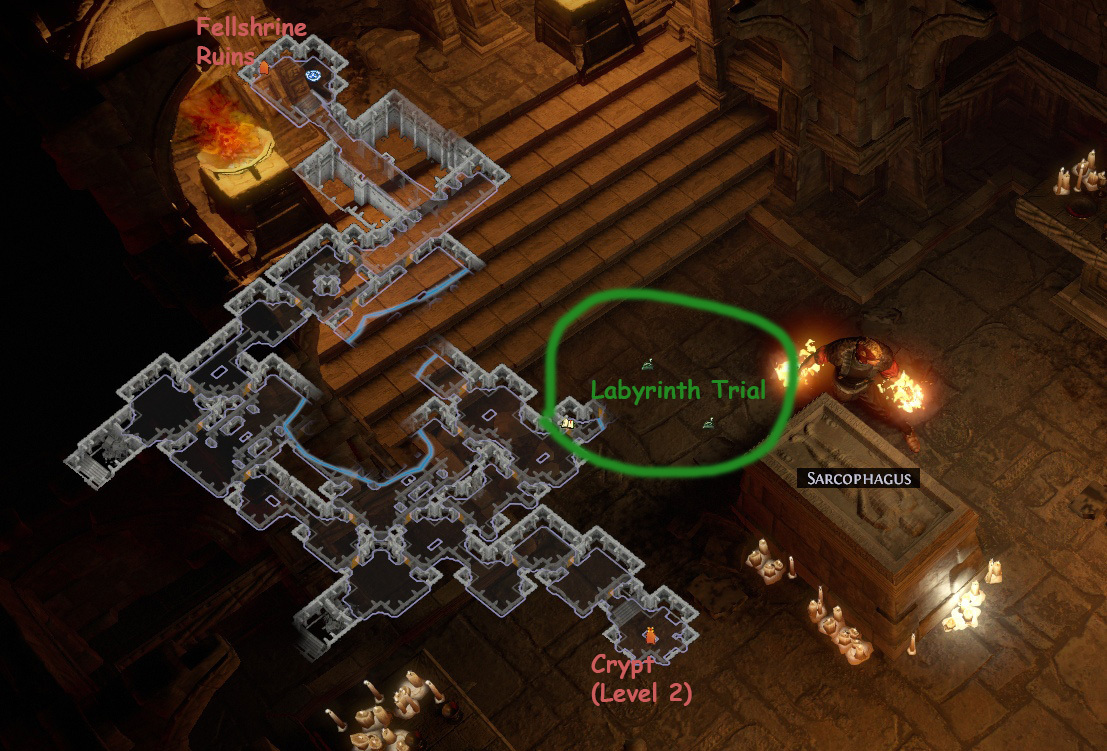
Follow the road, grab the Waypoint and enter the Fellshrine Ruins
Move through the expanse and enter the Crypt
(Optional): Find the Labyrinth Trial and consummate it
Find the Sarcophagus and descend to the Catacomb(Level2)
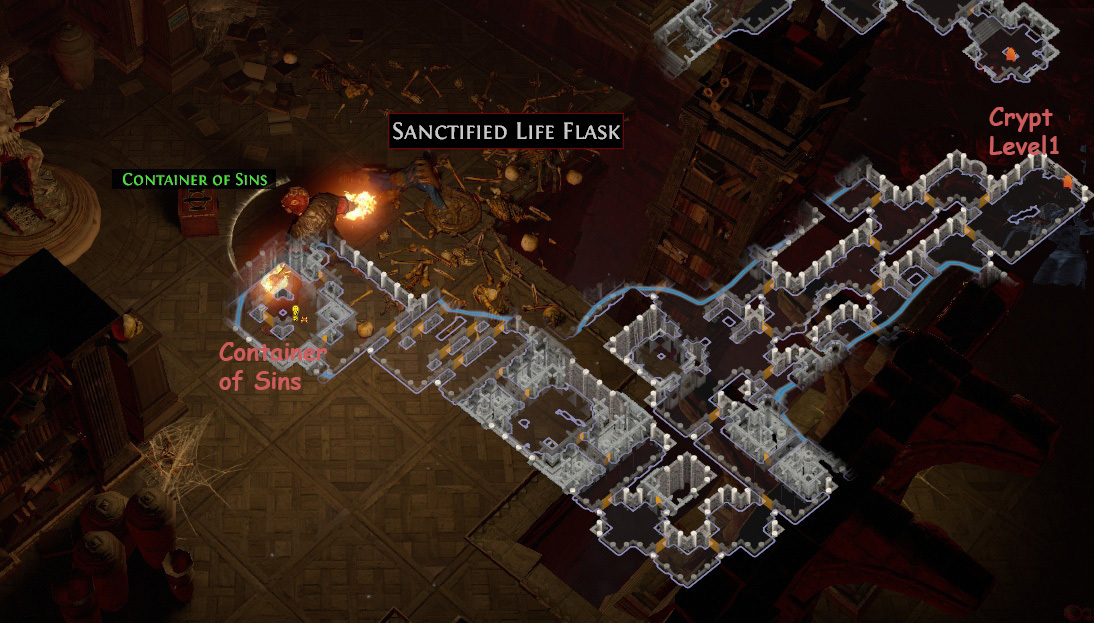
Find the Container of Sins and take Maligaro'southward Map. Logout
Talk to Weylam and take Diamond Flask as a reward. Equip it
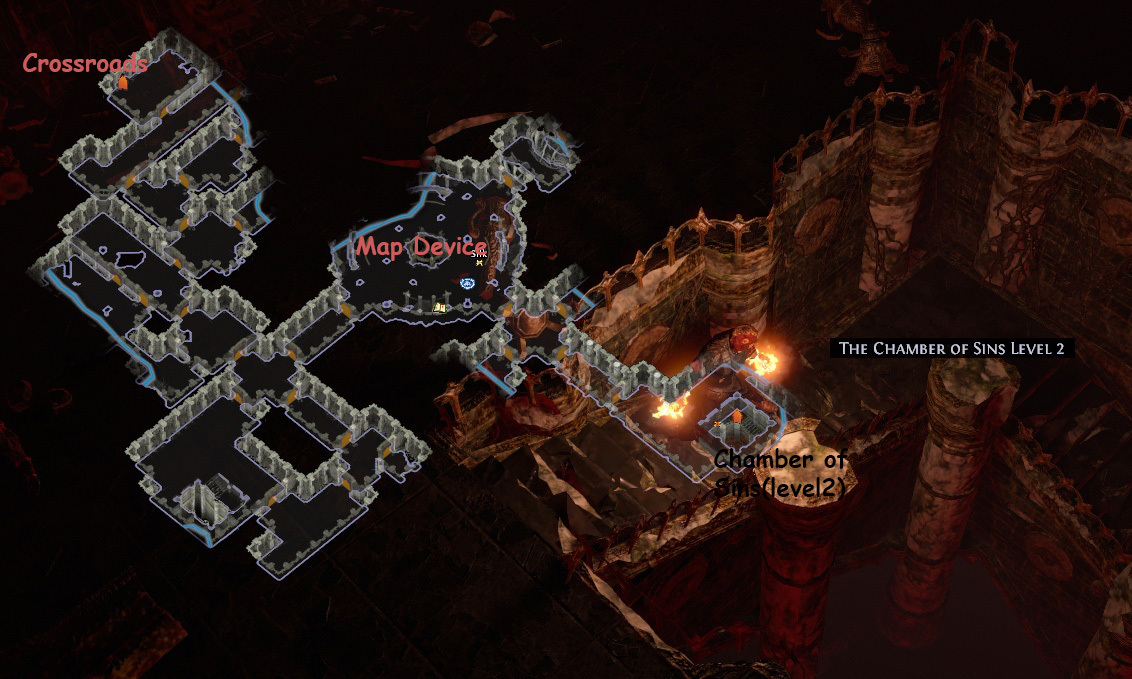
Take the Waypoint to the Crossroads
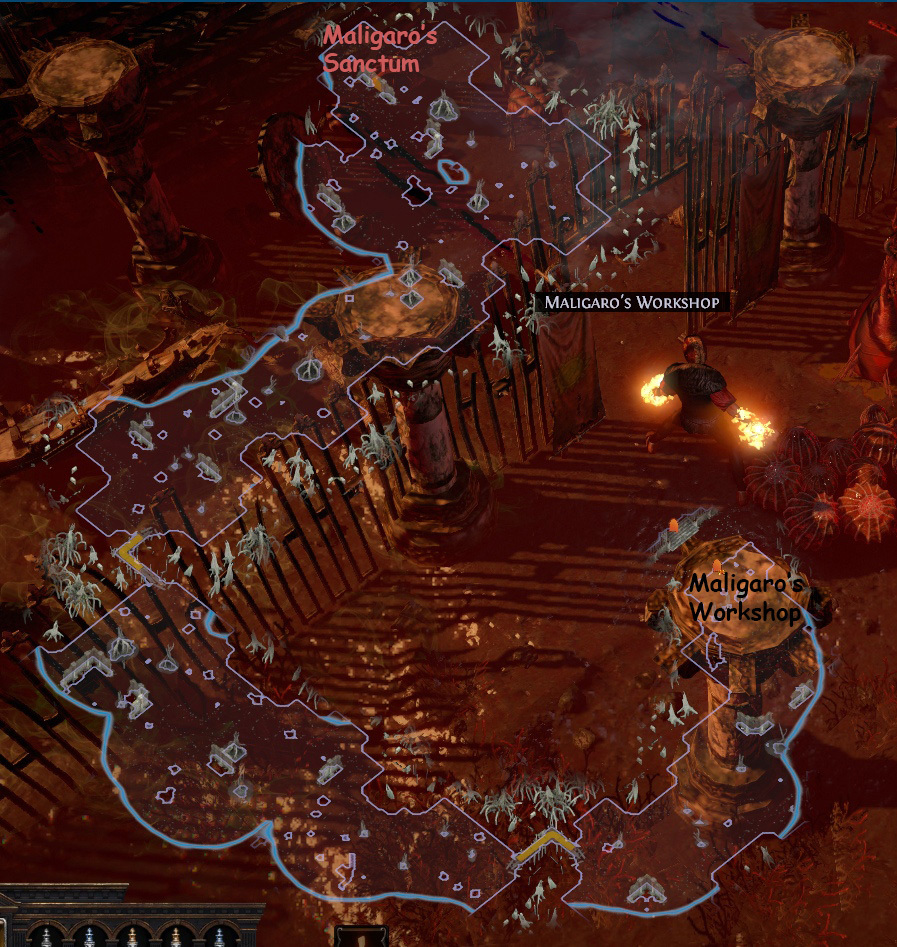
Enter the Bedchamber of Sins (Lvl1)
Observe the map device and insert Maligaro's Map into it
Enter Maligaro's Sanctum and notice Maligaro's Workshop
Impale Maligaro and take Blackness Venom. Get out the map via portal whorl
Talk to Silk and take the Obsidian Key
Find and enter the Chamber of Sins (Lvl2)
(Optional): Find and complete the final Labyrinth Trial for the Cruel Lab
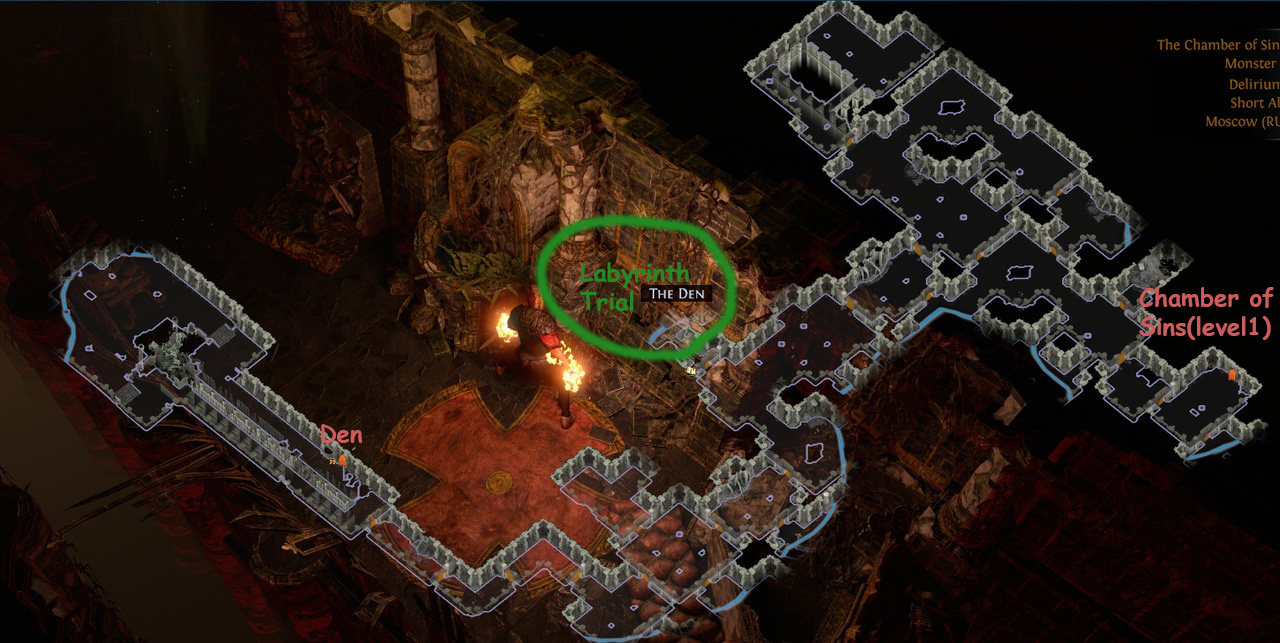
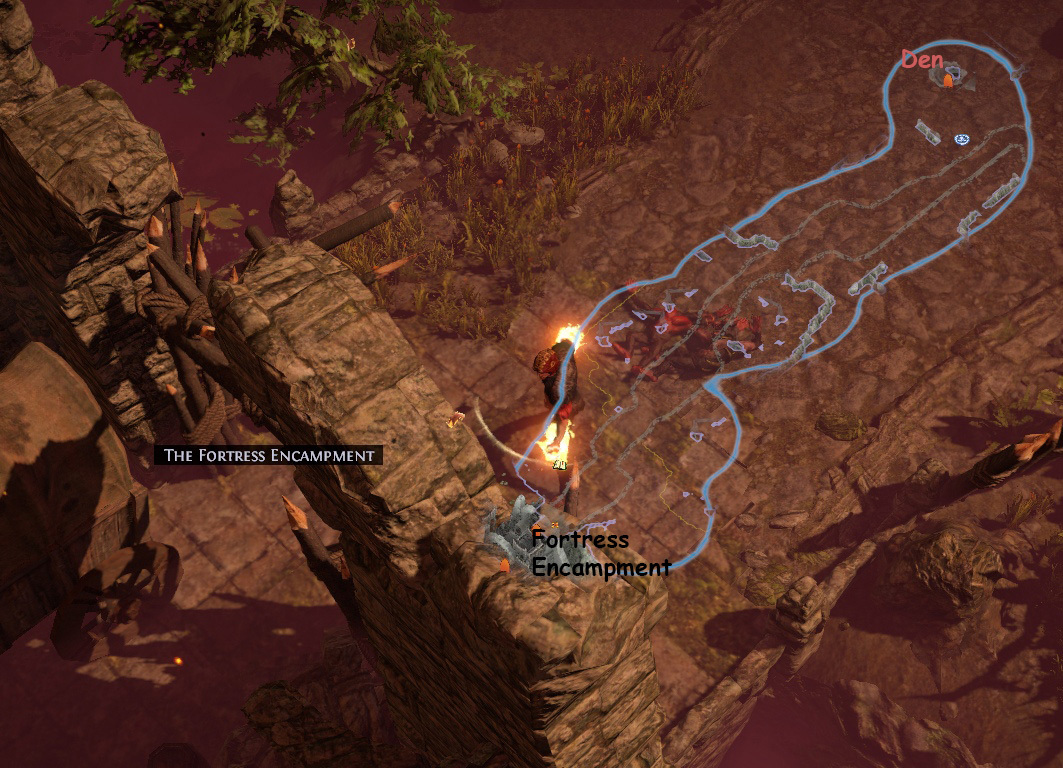
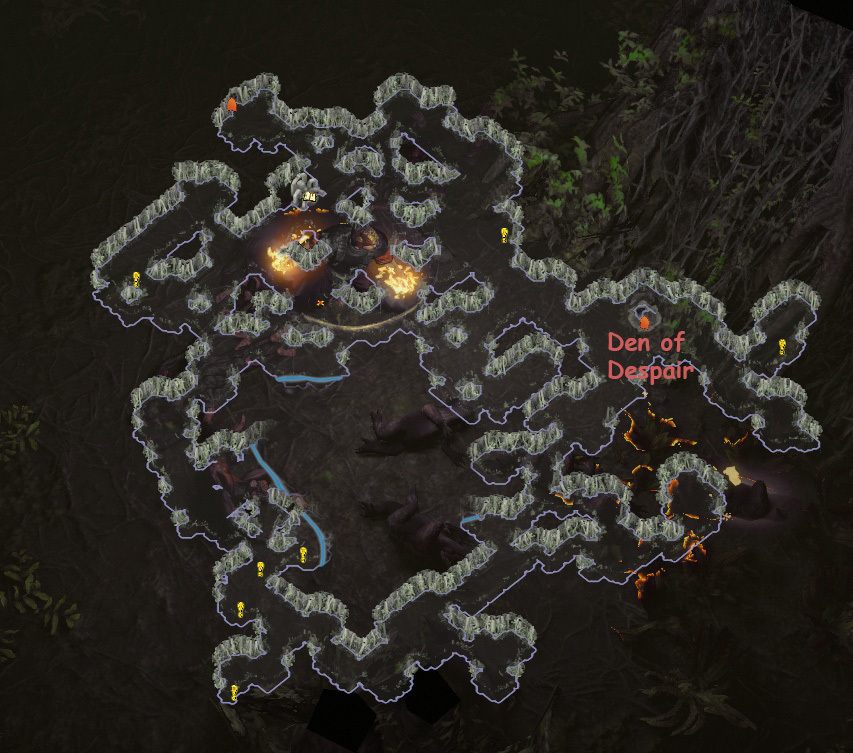
Observe and enter the Den
Move through the Ashen Fields and quit into the Fortress Encampment
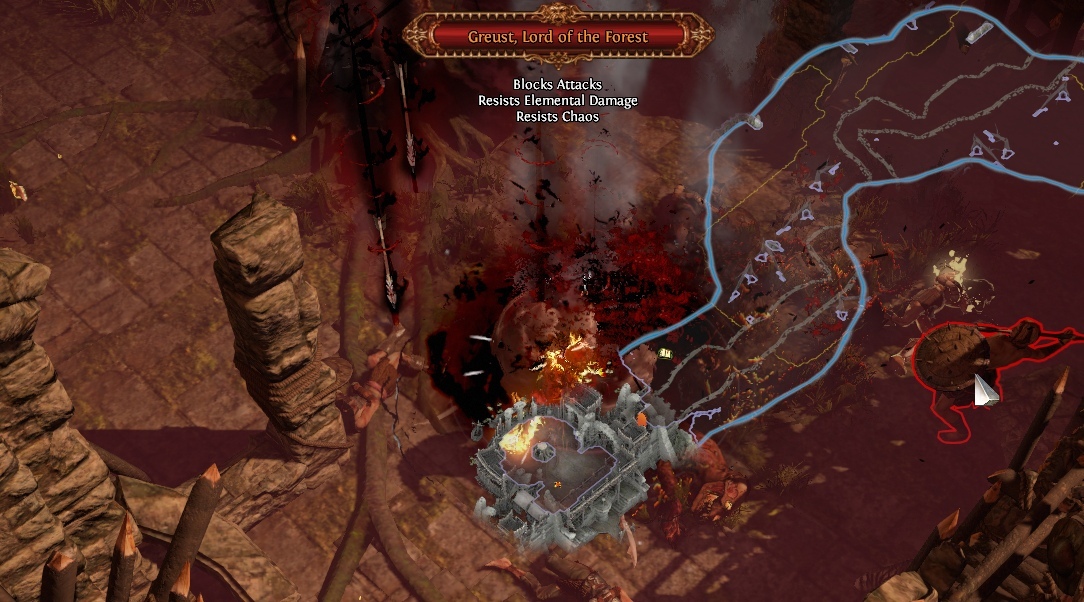
Impale Greust . Quit into the Northern Forest
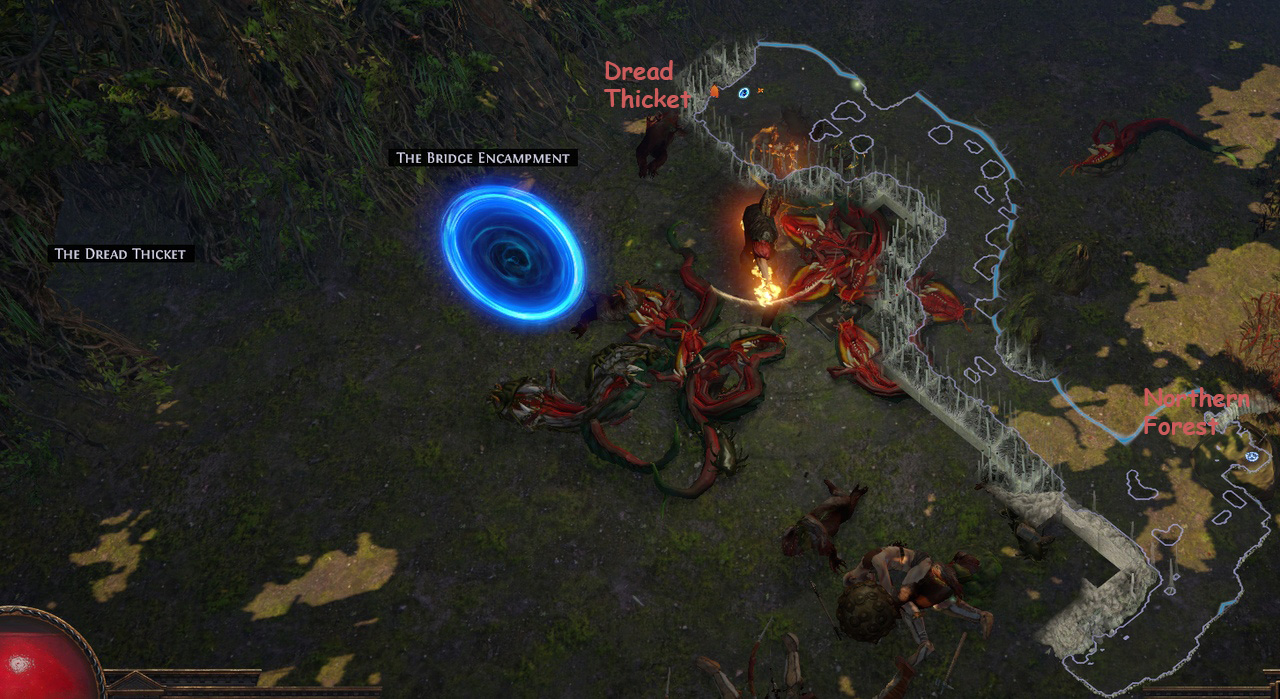
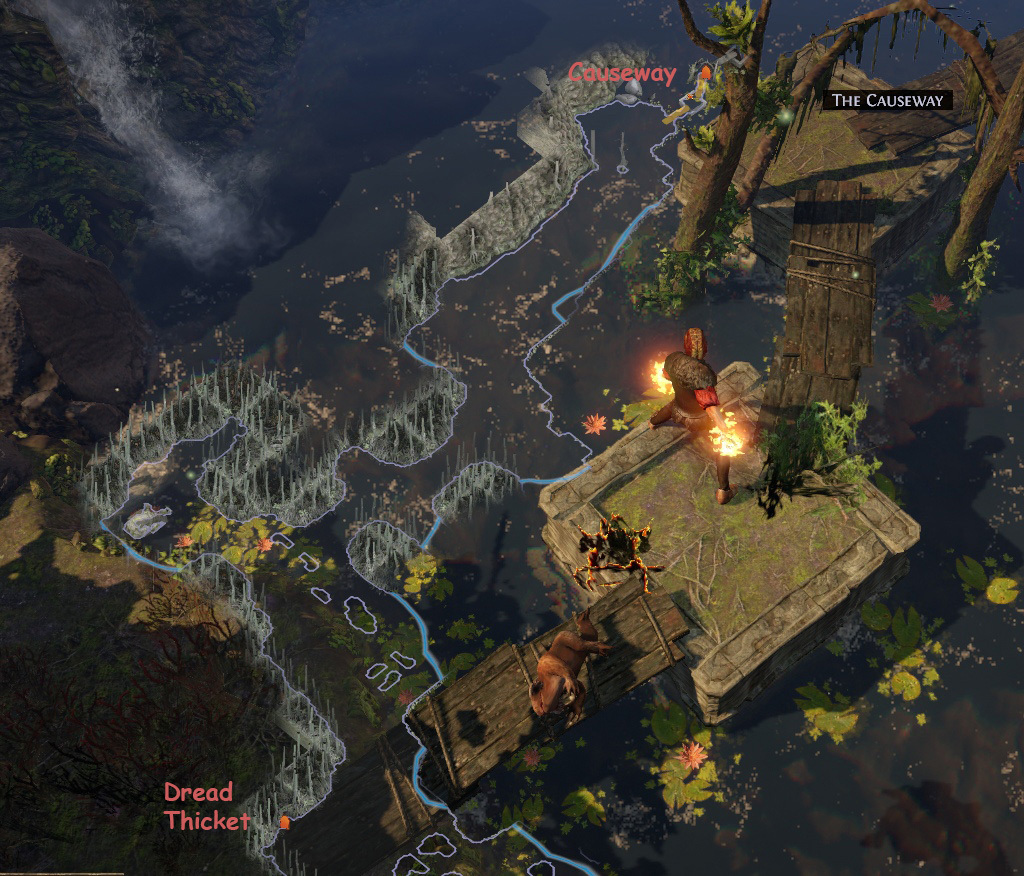
Move through the area and notice the Dread Thicket . Brand a portal most it and move on until you lot find the Causeway . Enter information technology
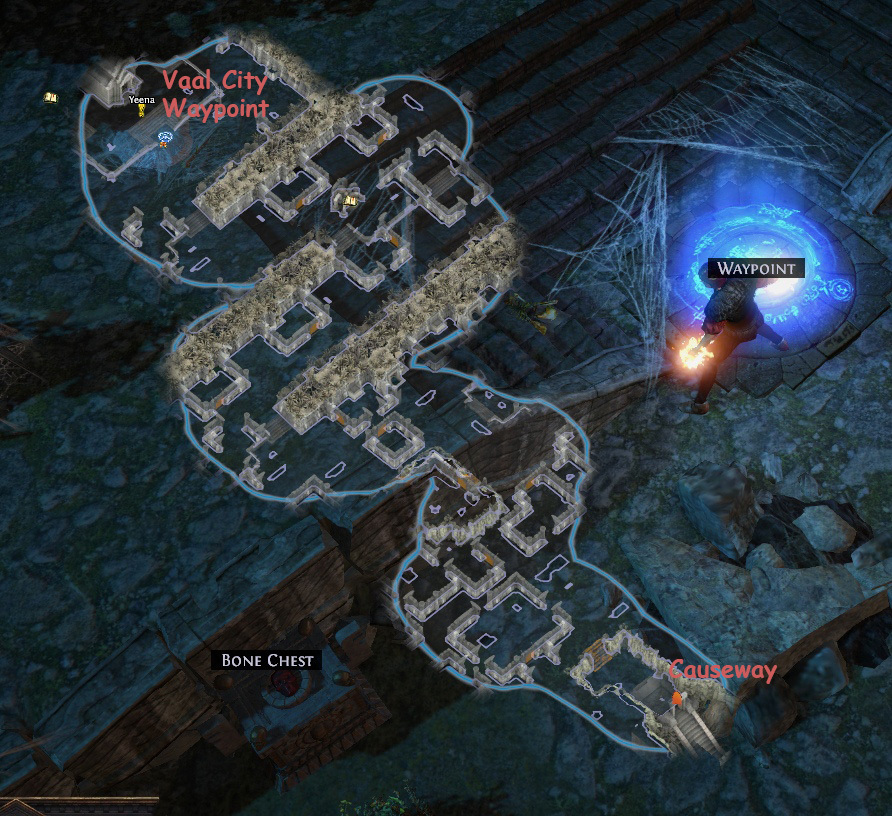
Move through the area . Find Kishara's Star and enter the Vaal City
Find Yeena and grab the Waypoint
Return to the Span Encampment via Waypoint and enter the portal
Enter the Dread Thicket
Collect 7 Fireflies from around the Dread Thicket
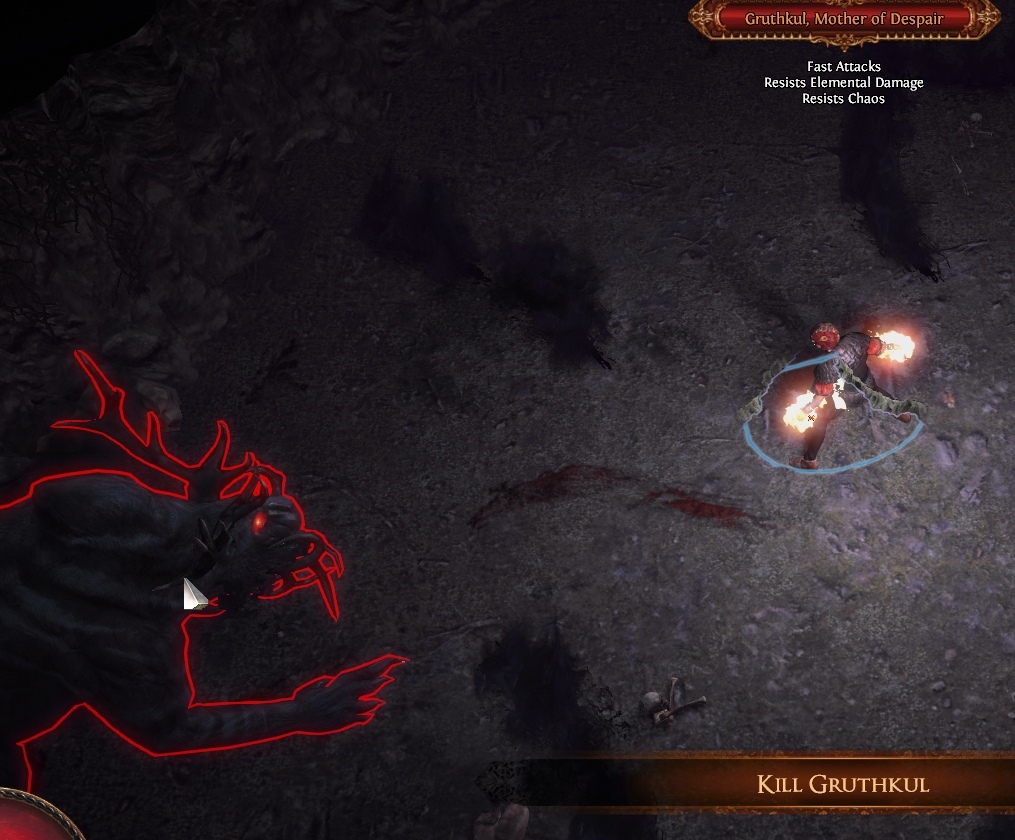
Find and enter the Den of Despair and impale Gruthkul . Logout
Talk to Weylam and Eramir to receive the volume of skill rewards
Take the Waypoint to the Vaal City
Talk to Yeena and enter the Temple of Disuse (Level 1)
Find and Enter the Temple of Decay (Level two)
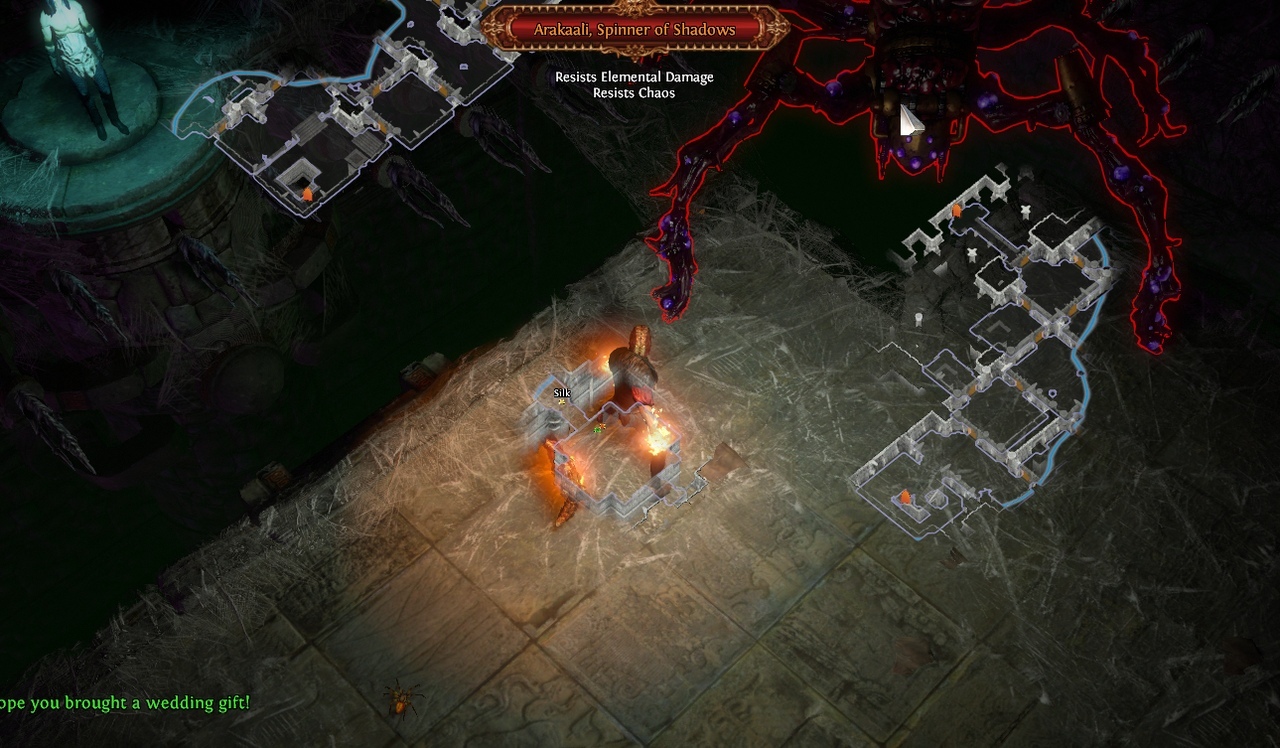
Find and Enter the Arakaali's Web
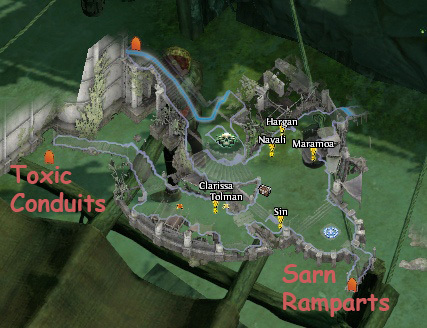
Impale Arakaali . Quit into the Sarn Ramparts
Move through the area and enter the Sarn Encampment(act8)
The Bridge Encampment(Act 7)
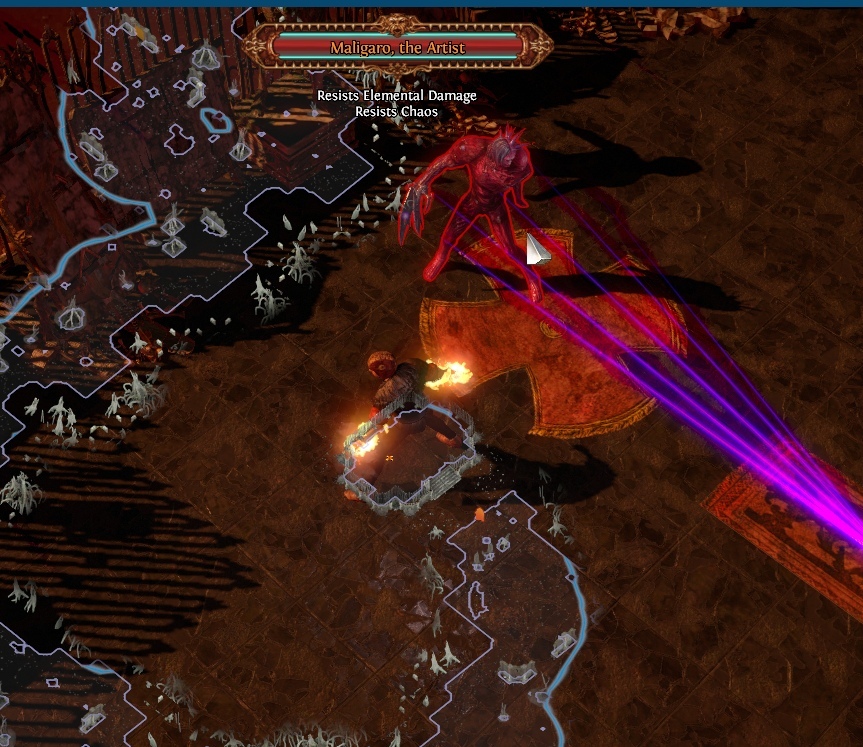

Make a portal when y'all enter the Maligaro's Workshop in example you die to him
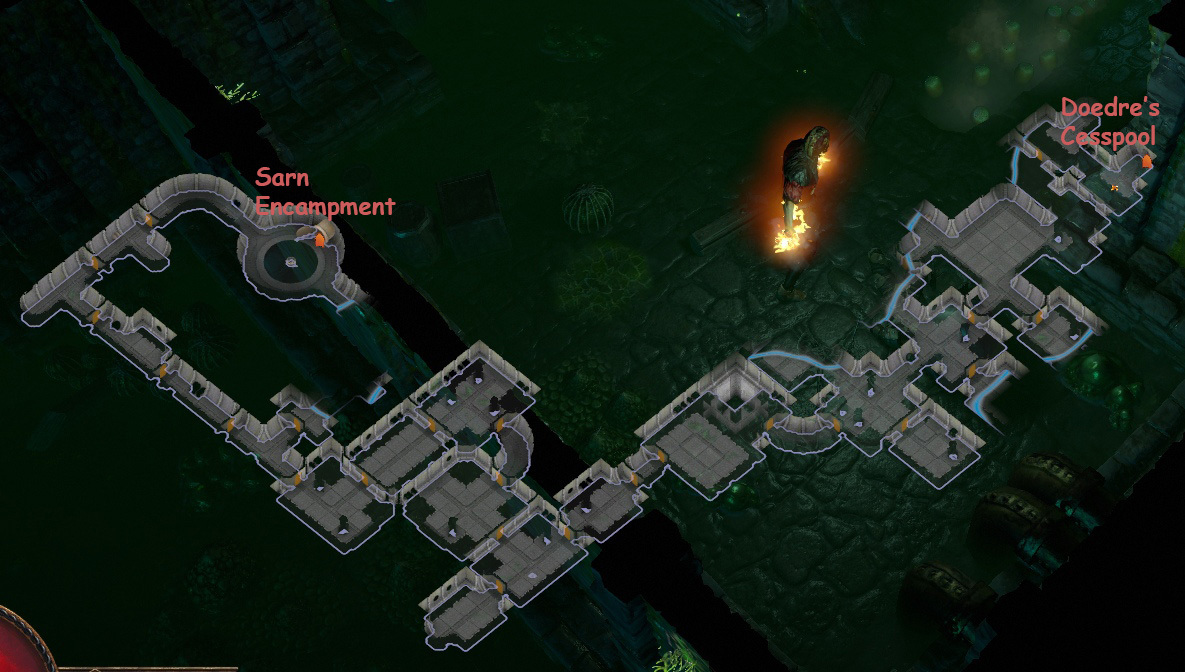
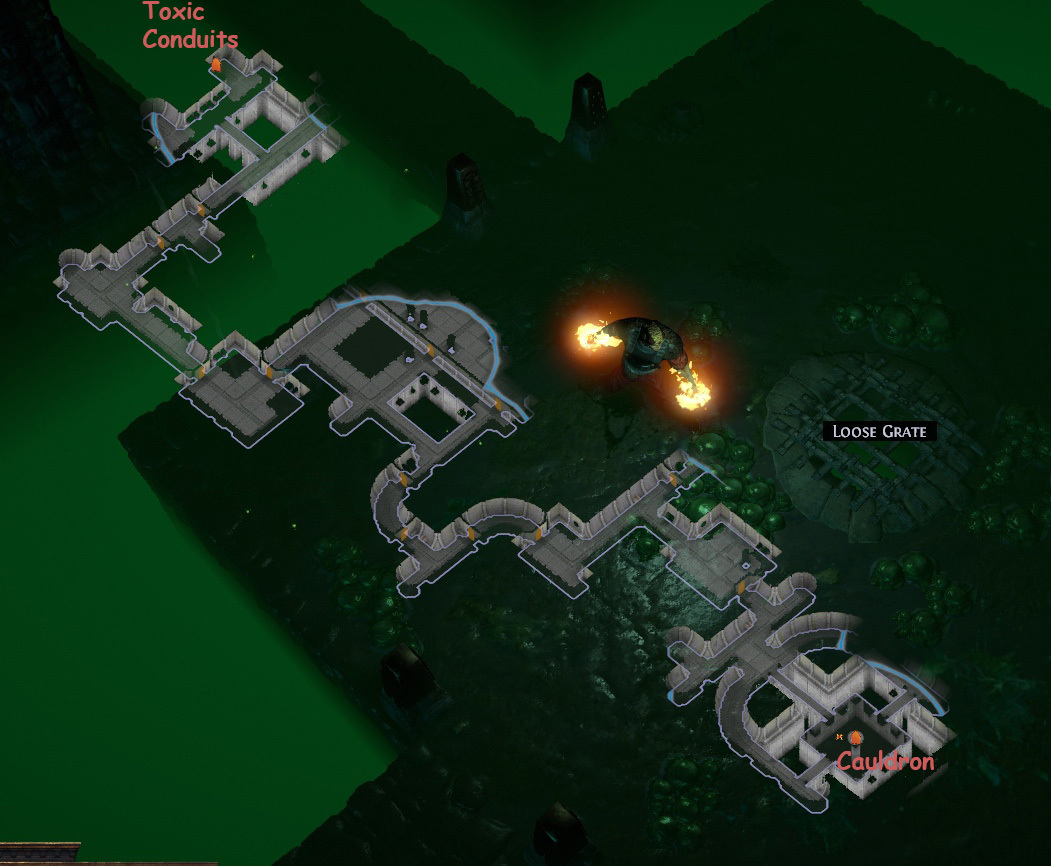
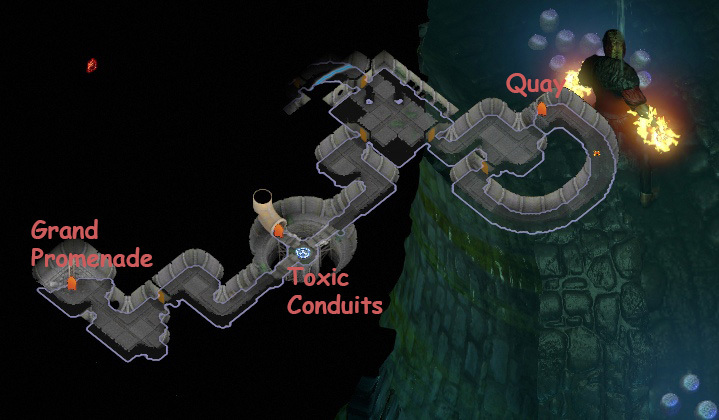
Enter the Toxic Conduits
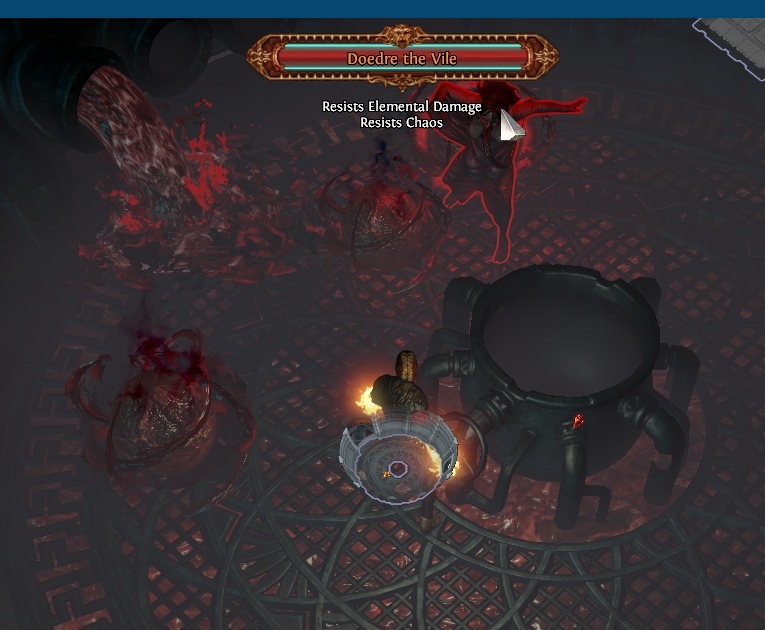
Find and enter the Doedre'southward Cesspool
Open up the grate and enter the Cauldron
Kill Doedre the Vile
Exit into the Toxic Conduits and grab the Waypoint
Accept the right path and enter the Quay
Discover the Sealed Casket and take the Ankh of Eternity
Notice and enter the Ressurection Site and talk to Clarissa
Kill Tolman . Return to the Quay
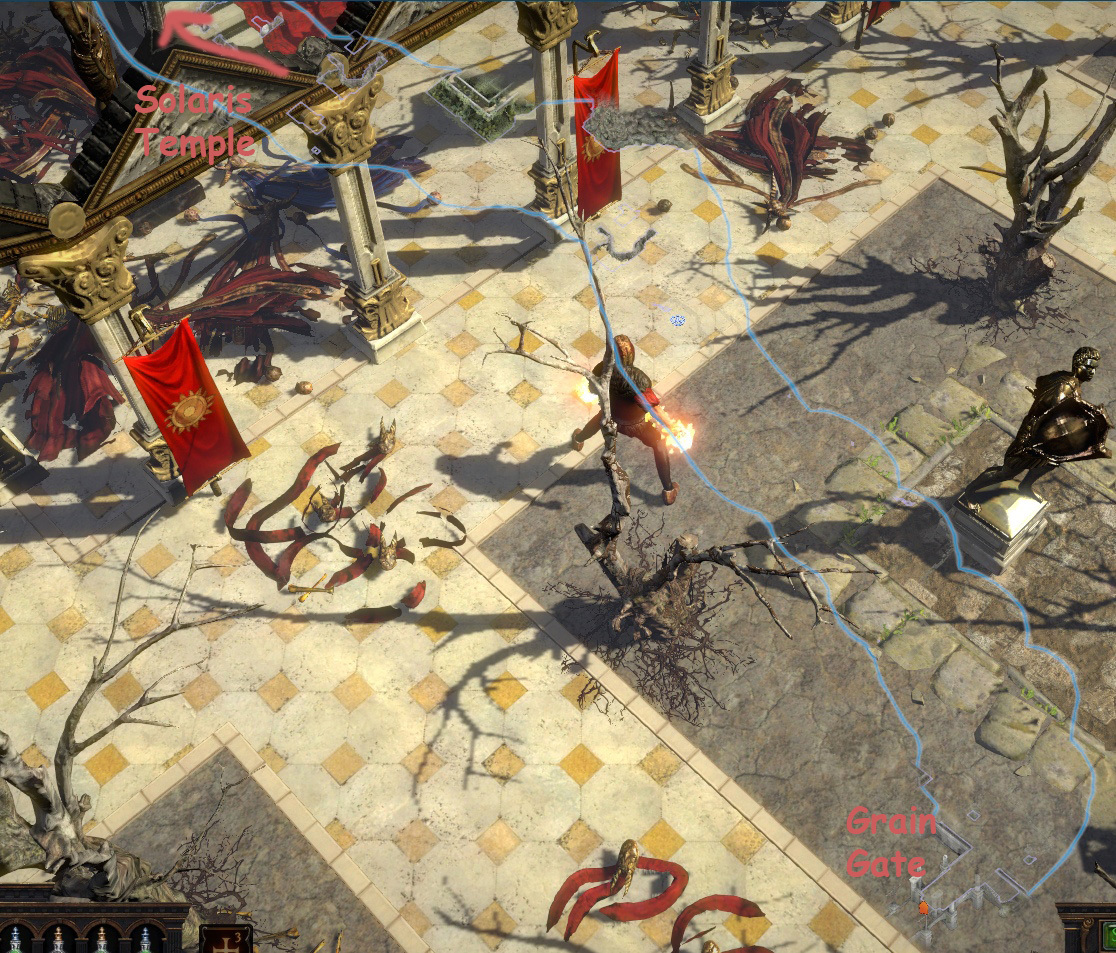
Enter the Grain Gate
Kill the Gemling Legionnaires
Enter the Regal Fields
Motility through the area and enter the Solaris Temple(Lvl1)
Notice and take hold of the Waypoint
Find and enter the Solaris Temple(Lvl2)
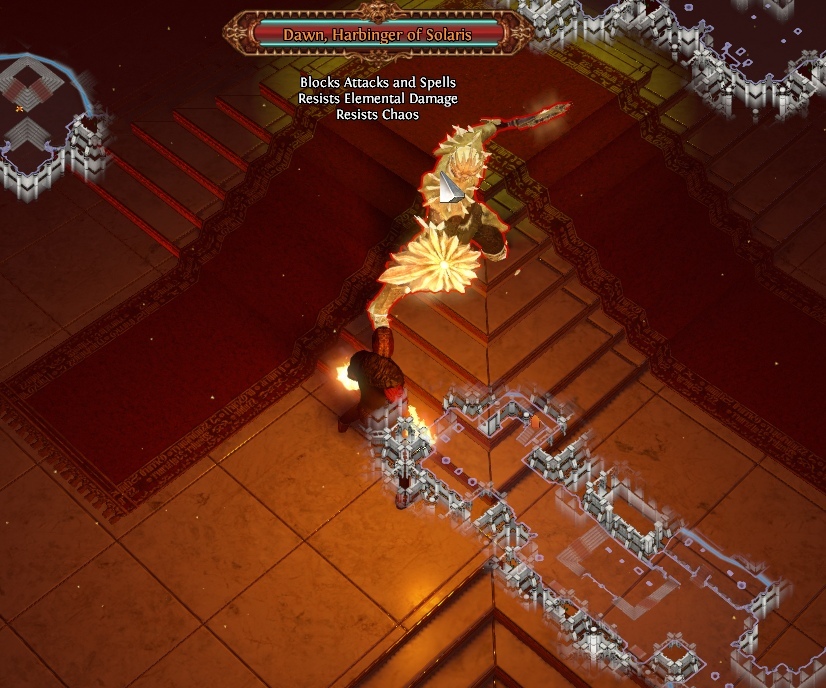
Kill Dawn and have Sun Orb. Logout
Take the Waypoint to the Solaris Temple (Lvl1)
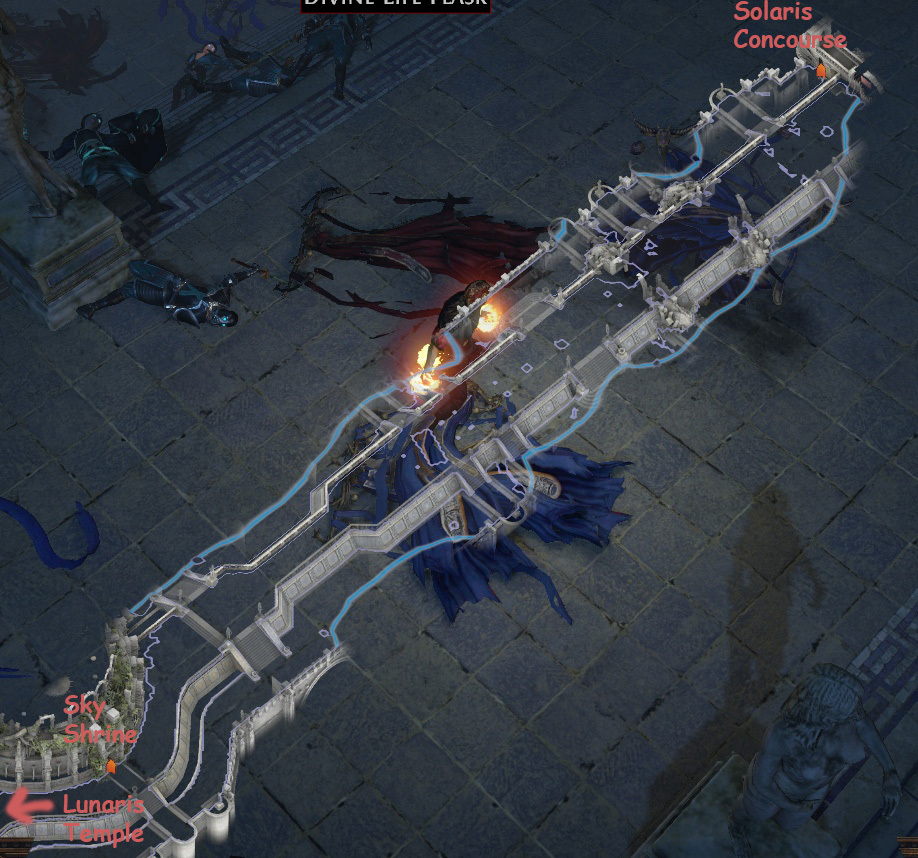
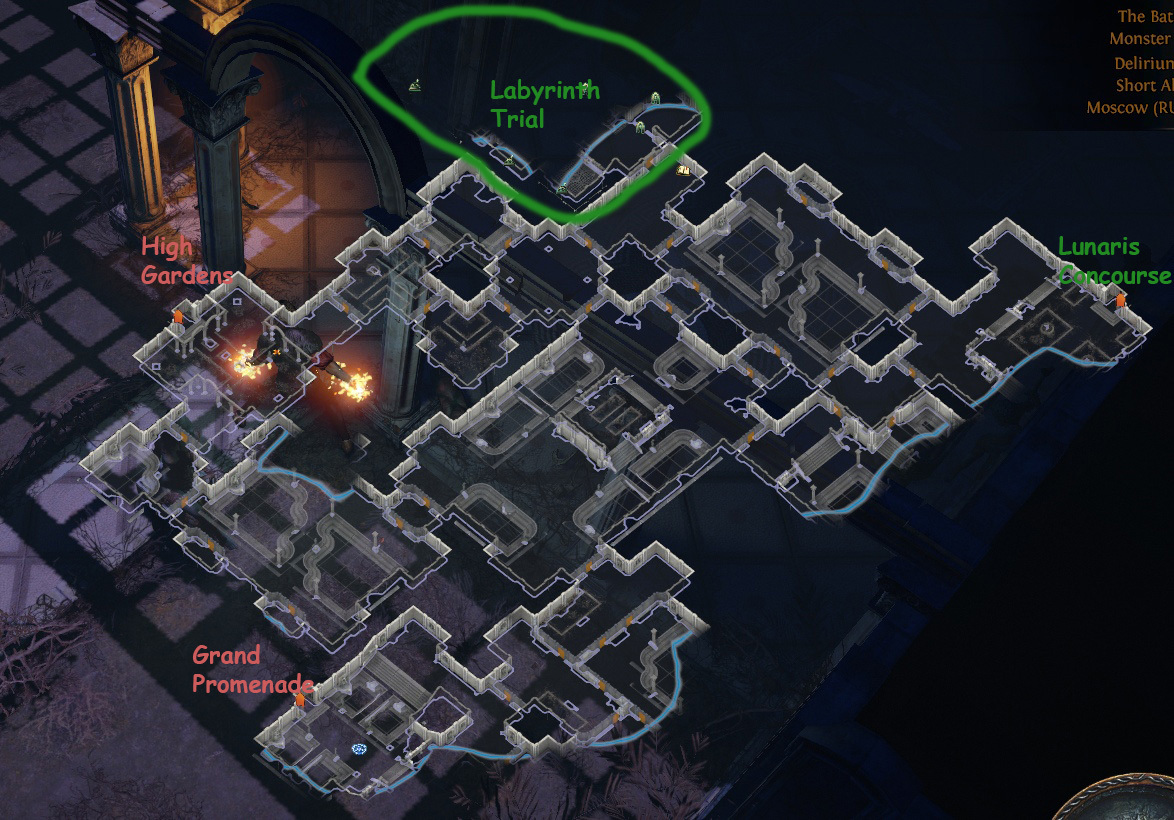
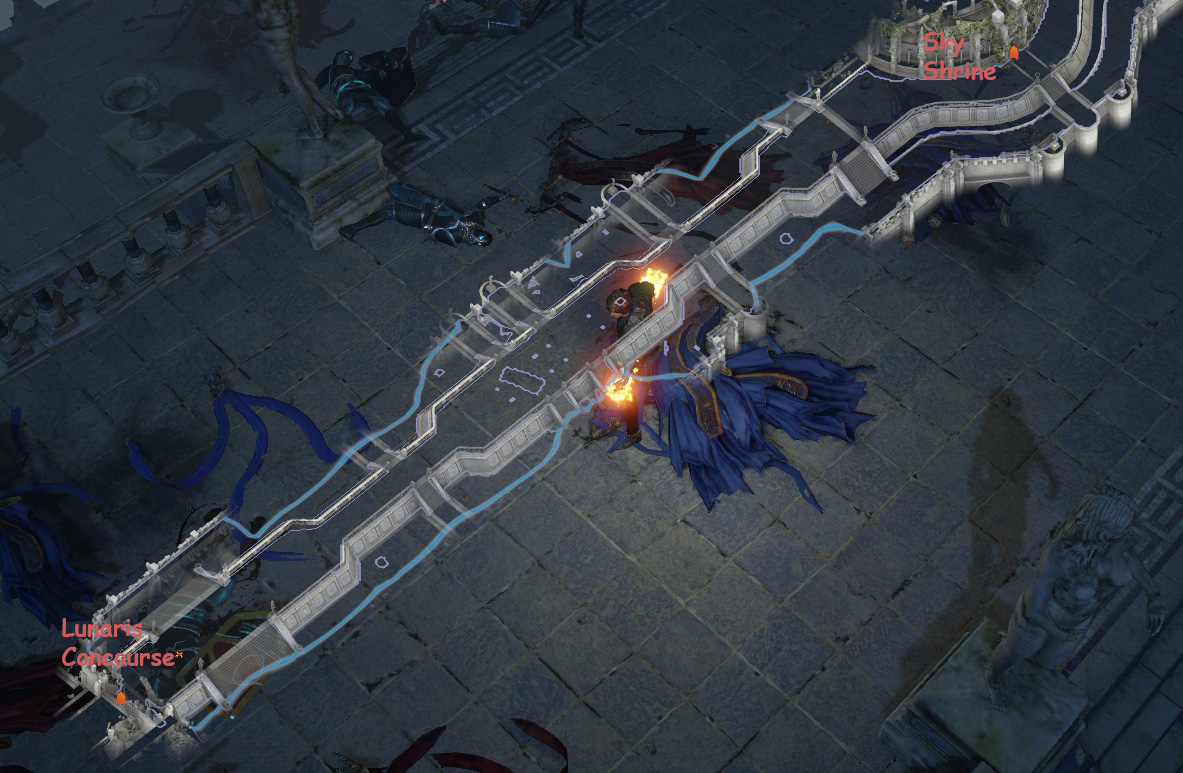
Find and enter the Solaris Concourse
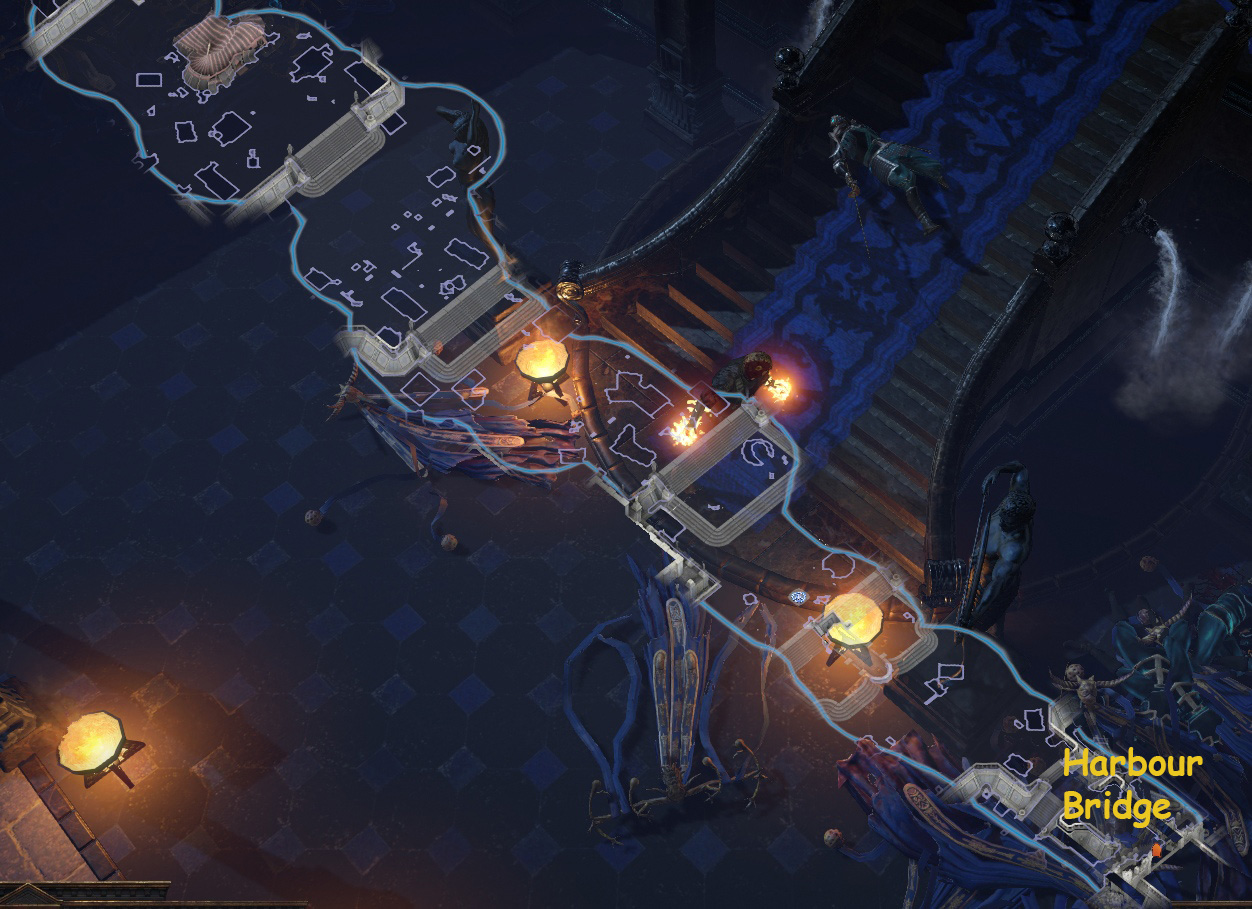
Enter the Harbour Bridge
Move through the expanse, past Sky Shrine until
you encounter Lunaris Concourse , enter it
Move through the area, enter the Lunaris Temple (Lvl1)
Enter the Lunaris Temple (Lvl2)
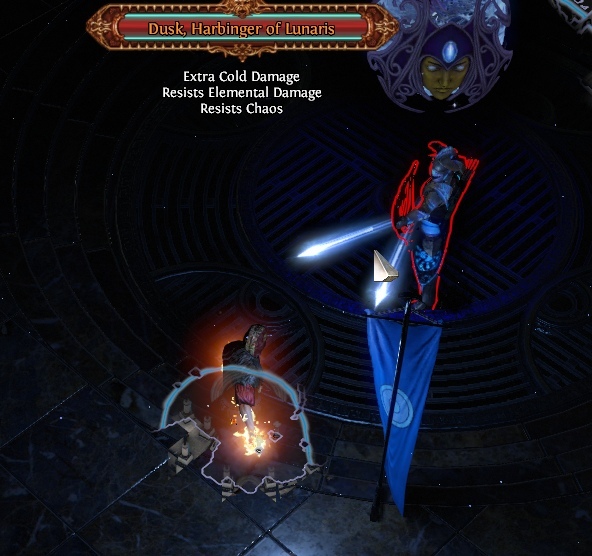
Kill Dusk and accept Moon Orb. Logout
Take the Waypoint to the Lunaris Concourse. Enter the Harbour Span
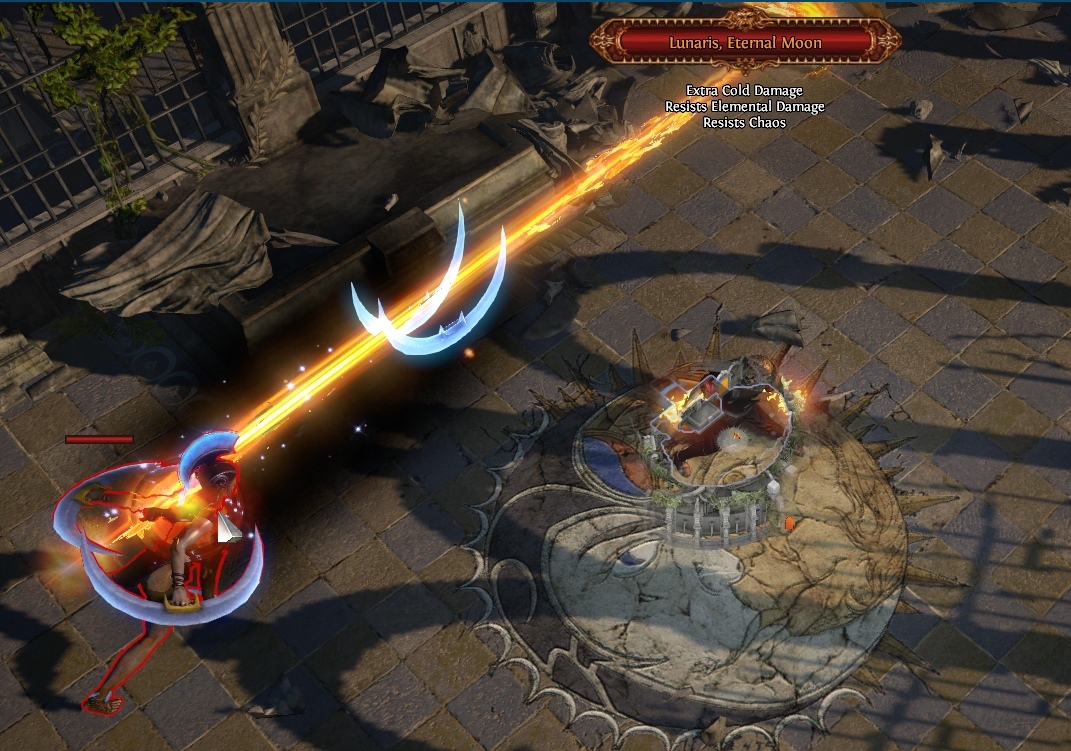
Move through the area and enter the Sky Shrine
Kill Solaris and Lunaris
Enter the Blood Aqueducts
Enter the Highgate
Render to Toxic Conduits(previous human activity) via Waypoint
Take the left path and enter the Grand Promenade
Enter the Bath House. Grab the Waypoint
(Optional): Find and complete the Labyrinth Trial
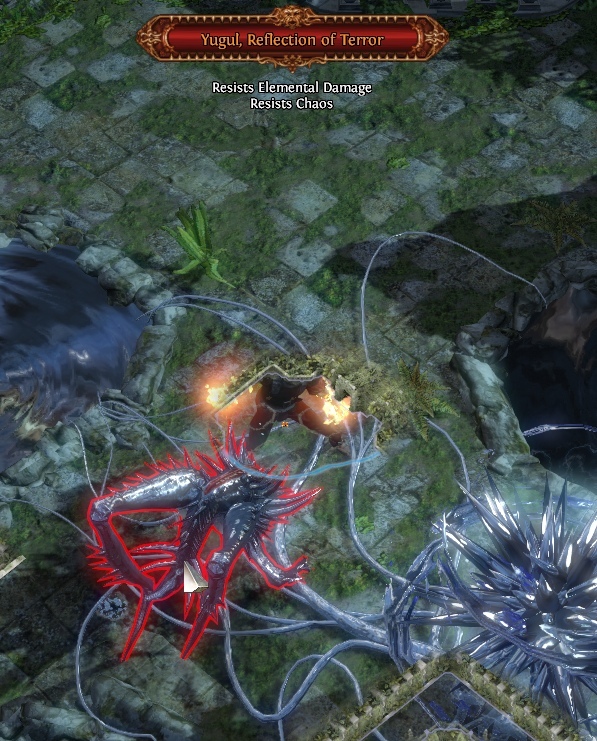
Enter the Loftier Gardens and run until you encounter the Pools of Terror
Enter and kill Yugul . Logout
Talk to Maramoa , Hargan and Clarissa to receive the book of skill rewards
Return to Highgate(act9)
The Sarn Encampment(Act8)


Enter the Aspirant's Plaza. Complete 2nd labyrinth
Skill Blood in The Optics . Render to town
You tin can purchase two-hand axe ~52 level, use x4 blacksmith to increase quality and sell it with blacksmith+rare Rustic Sash before going lab#ii
Highgate(act9)


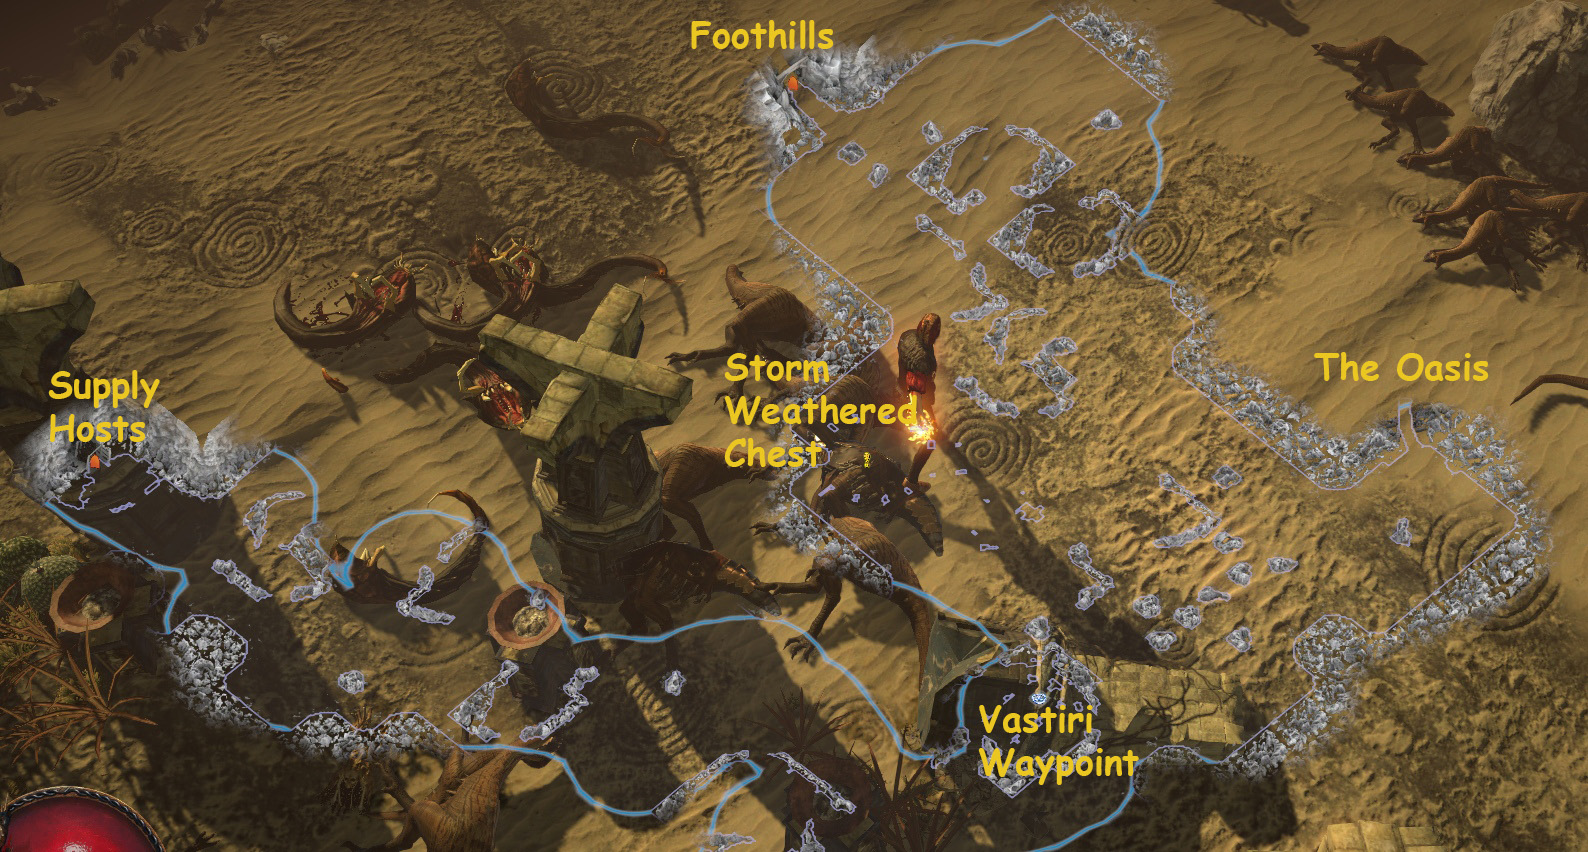
Enter the Descent
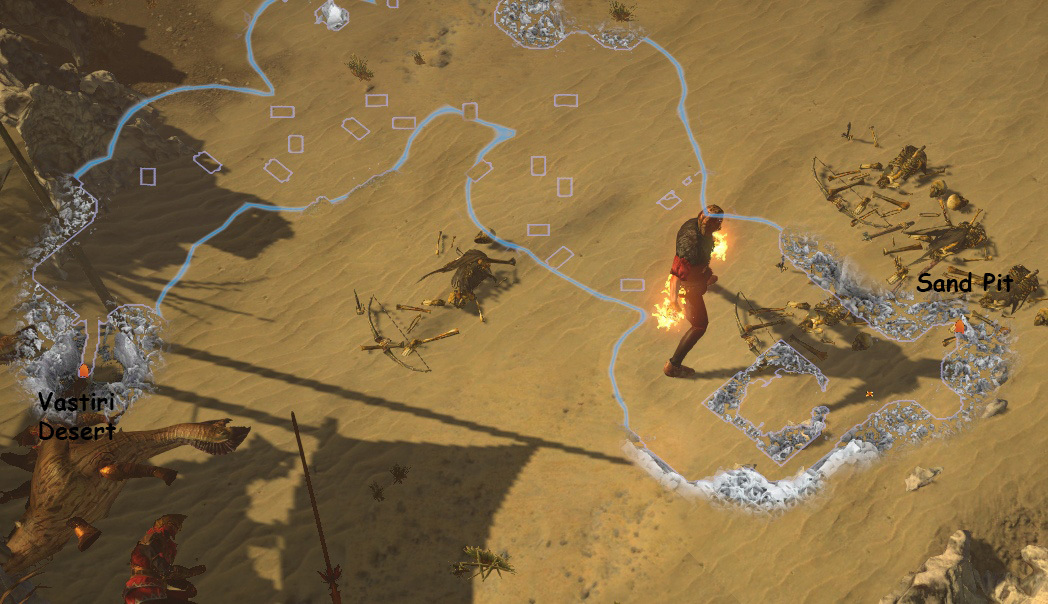
Descend via the Supply Hosts until you locate the exit into the Vastiri Desert
Find and grab the Waypoint
Find the Storm Weathered Chest
Defeat the waves of mummies that deadfall you, and so have the Storm Blade
Find the entrance to the Oasis
Render to boondocks via portal scroll
Talk to Sin . Talk to Petarus and Vanja and accept Bottled Tempest
Use portal to return to Vastiri Desert
Enter the Oasis
Find and enter the Sand Pit
Kill Shakari and return to Highgate
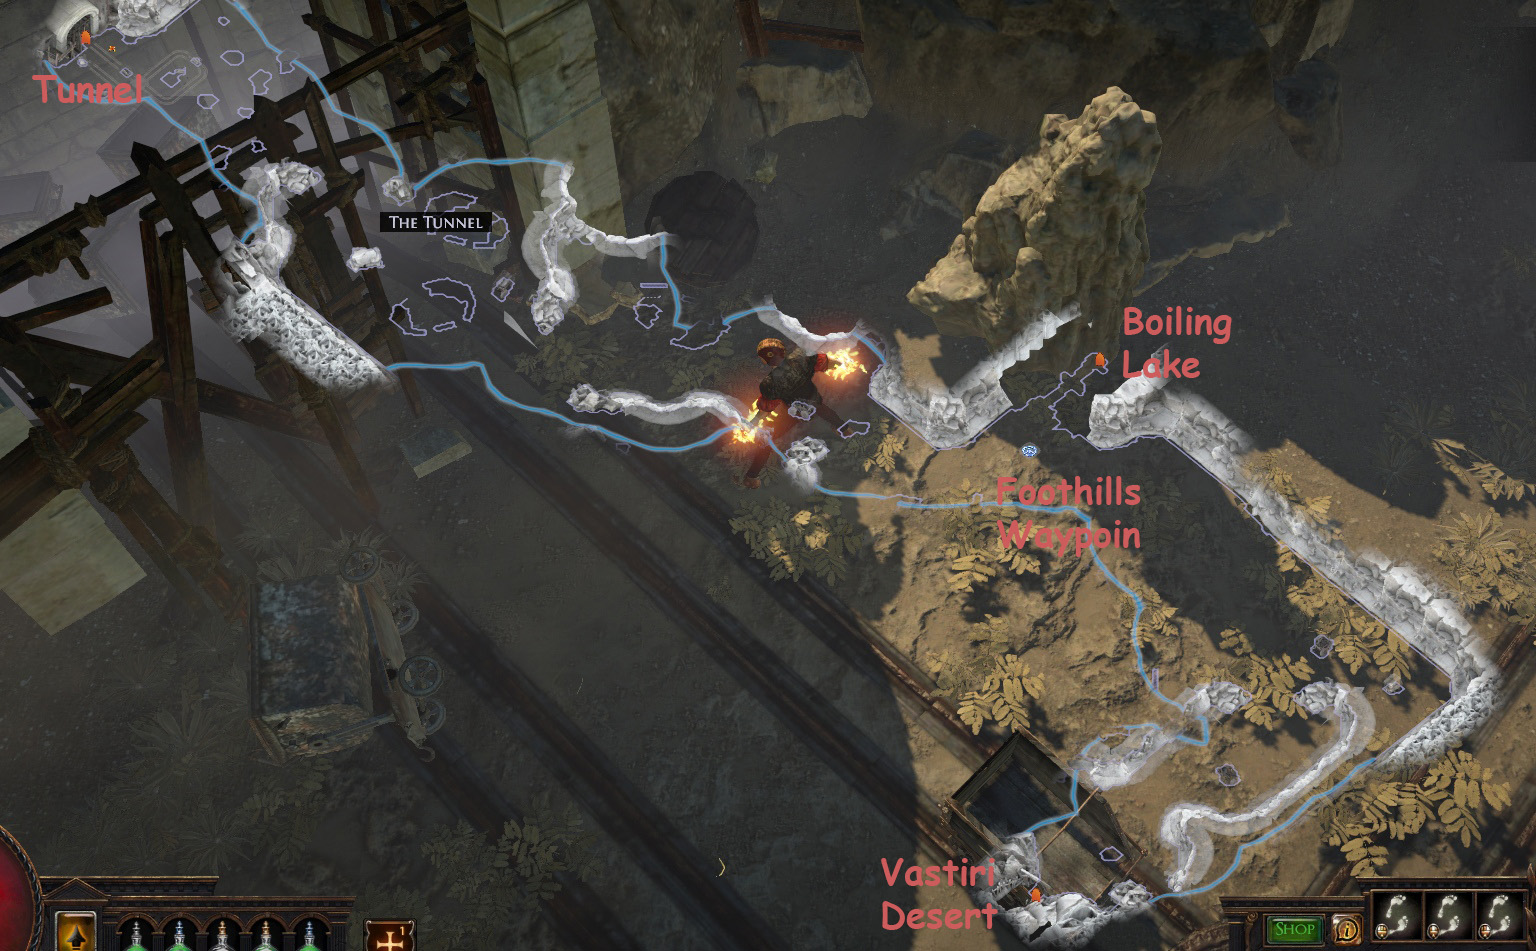
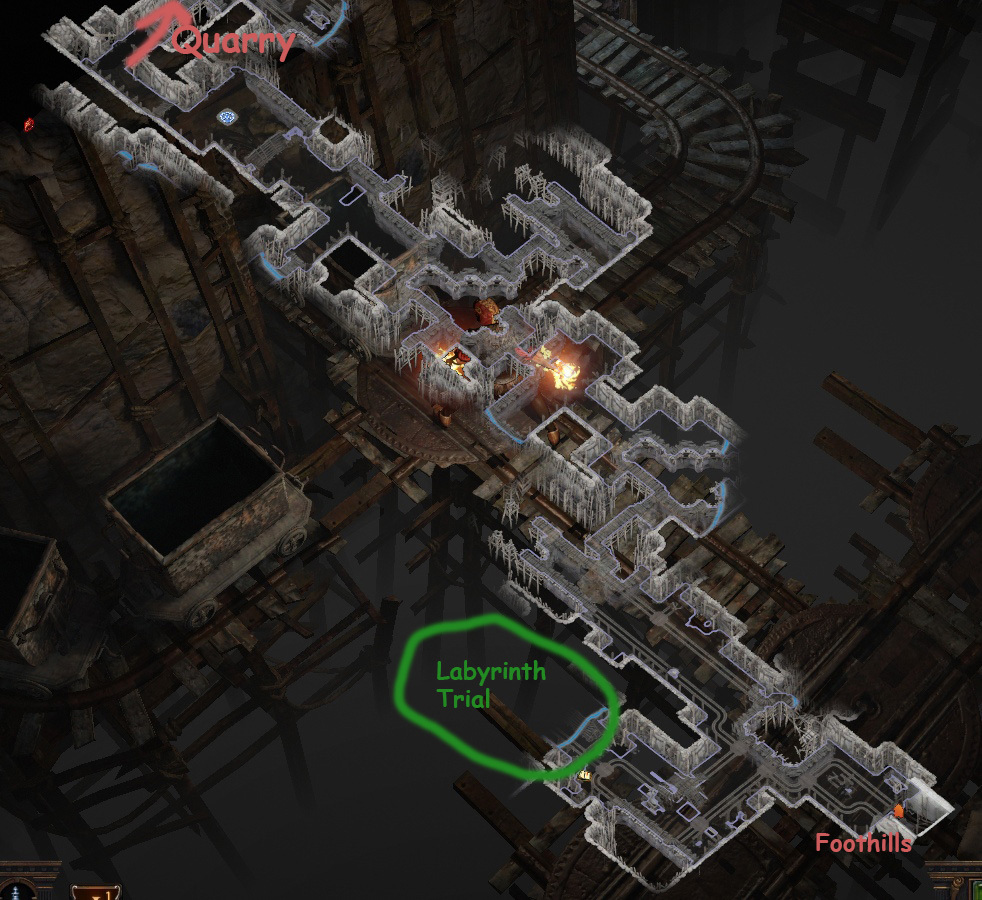
Have the Waypoint to the Vastiri Desert . Detect and enter the Foothills
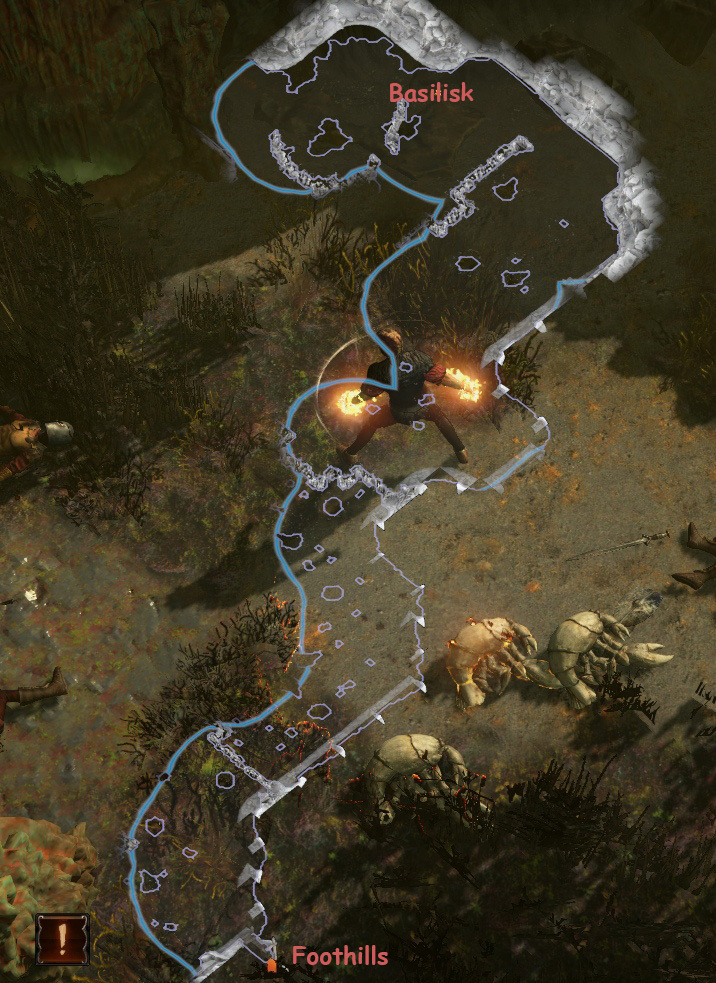
Grab the waypoint and enter the Boiling Lake
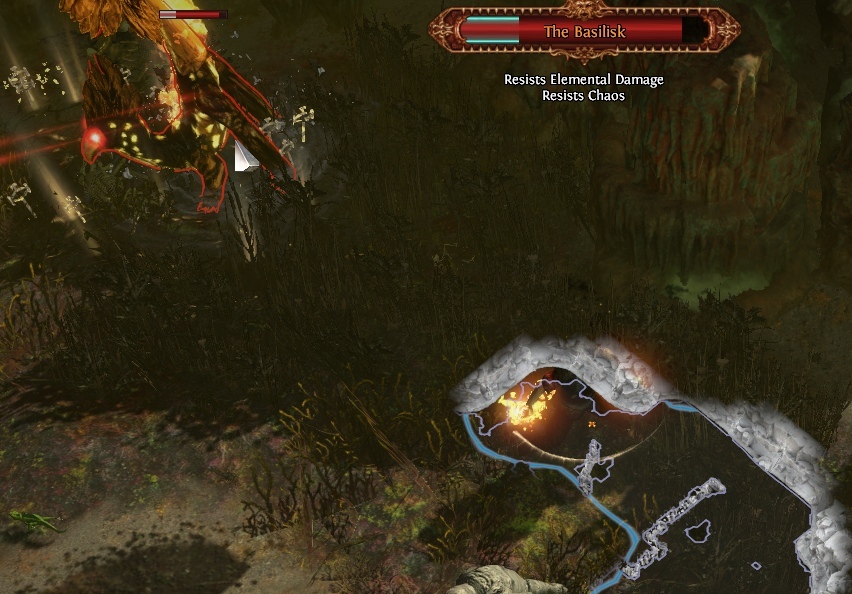
Motion through the area and Kill Basilisk and take Basilisk Acrid. Logout
Return to Foothills via Waypoint
Find and enter the Tunnel
(Optional): Find and complete the Labyrinth Trial
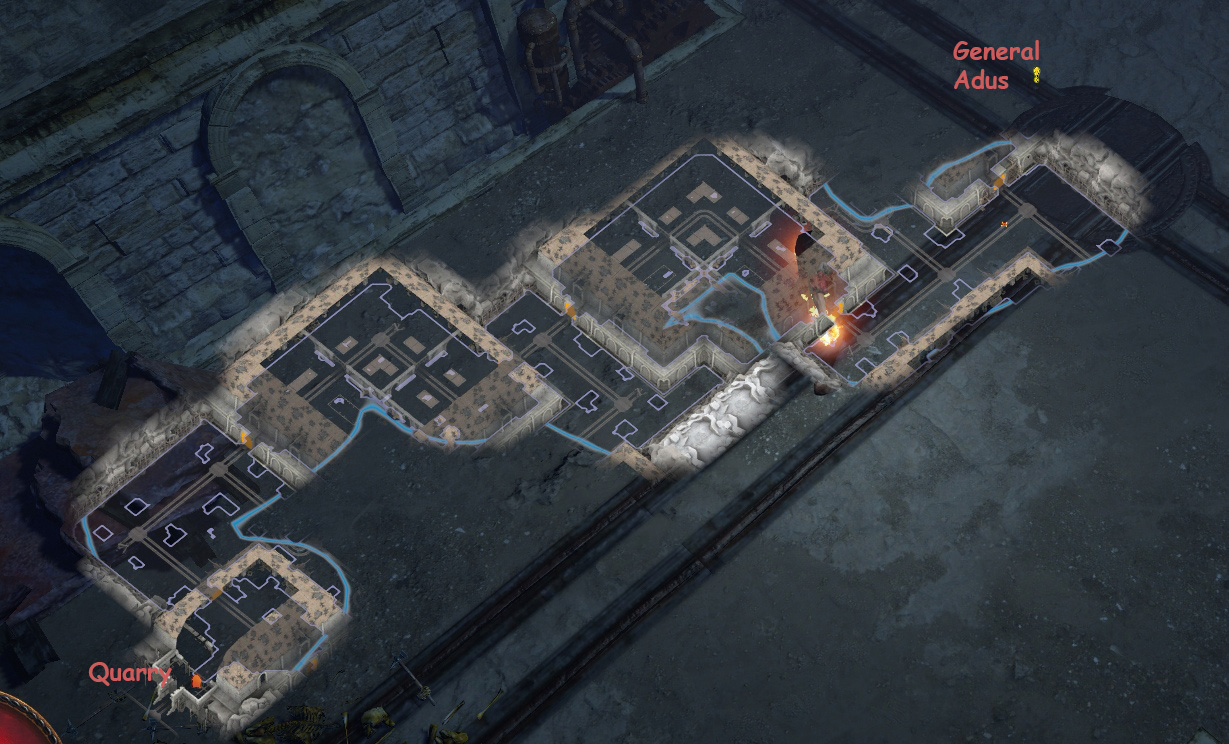
Enter the Quarry
Move directly to the middle of the zone and grab the Waypoint
( If refinery is on the right side - Shrine of the Winds is on the left one
If yous see Shrine of the winds on right side - Refinery is on top of the area )
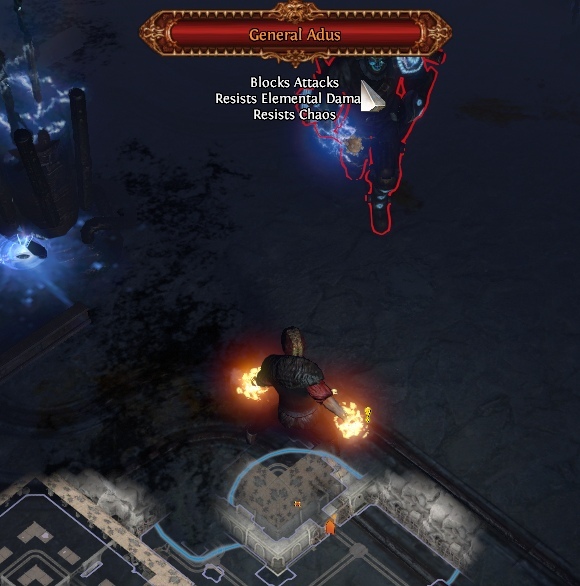
Enter the Refinery and explore the area until you find and kill General Adus
Take Trarthan Powder. Logout
Return to Quarry via Waypoint
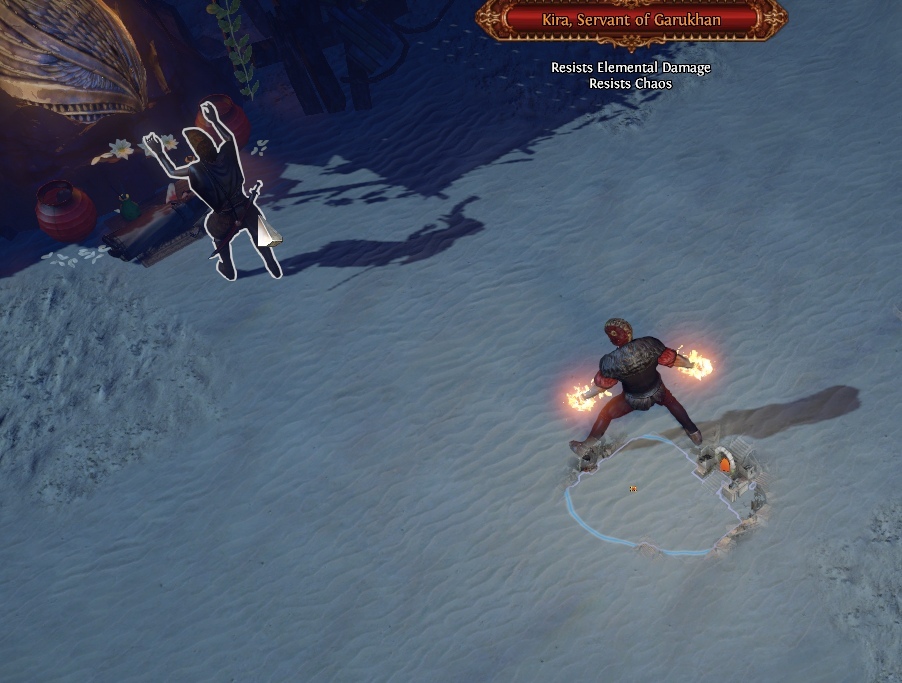
Enter the Shrine of the Winds and kill Garukhan . Take Sekhema Feather
Return to town. Talk to Irasha and Tasuni to receive the book of skill rewards
Return to Quarry via Waypoint
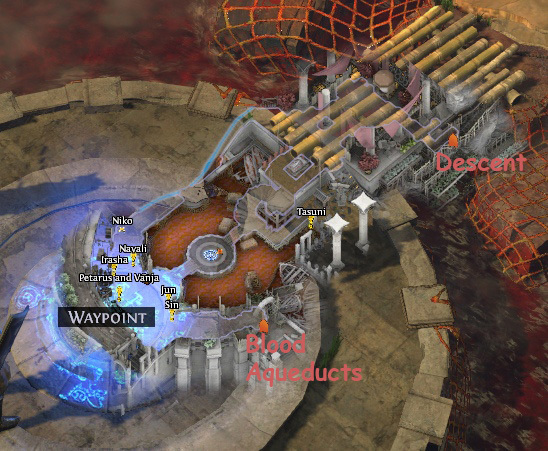
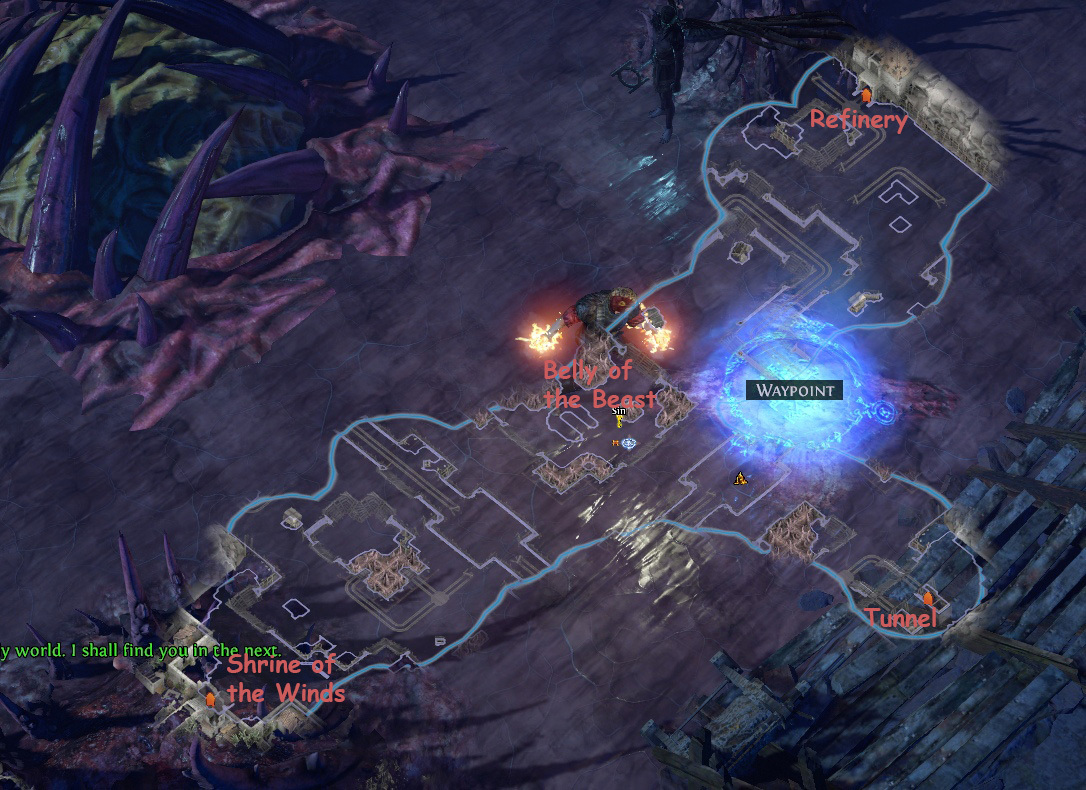
Talk to Sin and enter the Abdomen of the Beast
Enter the Rotting Core and make your way through the area
Enter the Black Core and talk to Sin
Enter each of the portals in your social club of choosing and defeat Malachai'due south guardians (Shavronne, Maligaro and Doedre)
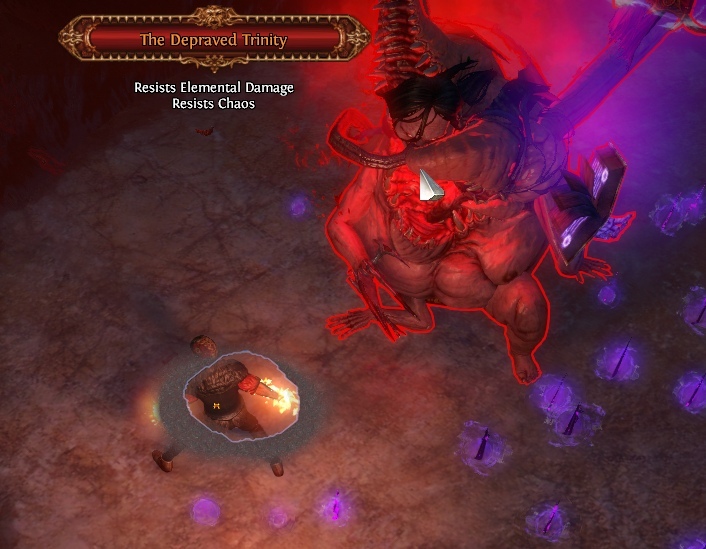
Enter the Black Heart and kill Depraved Trinity
Talk to Lilly and sheet to Oriath
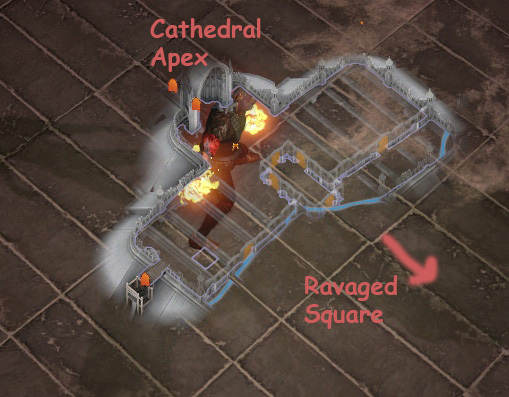
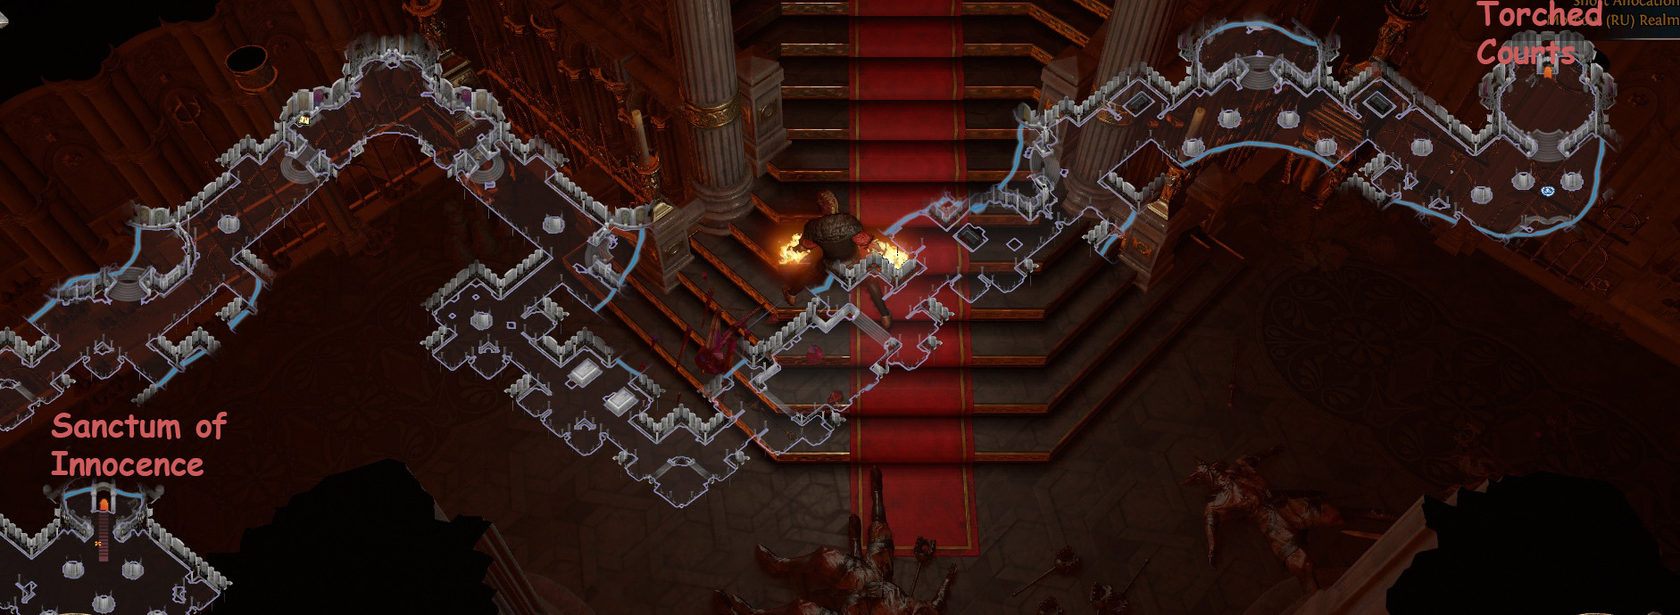
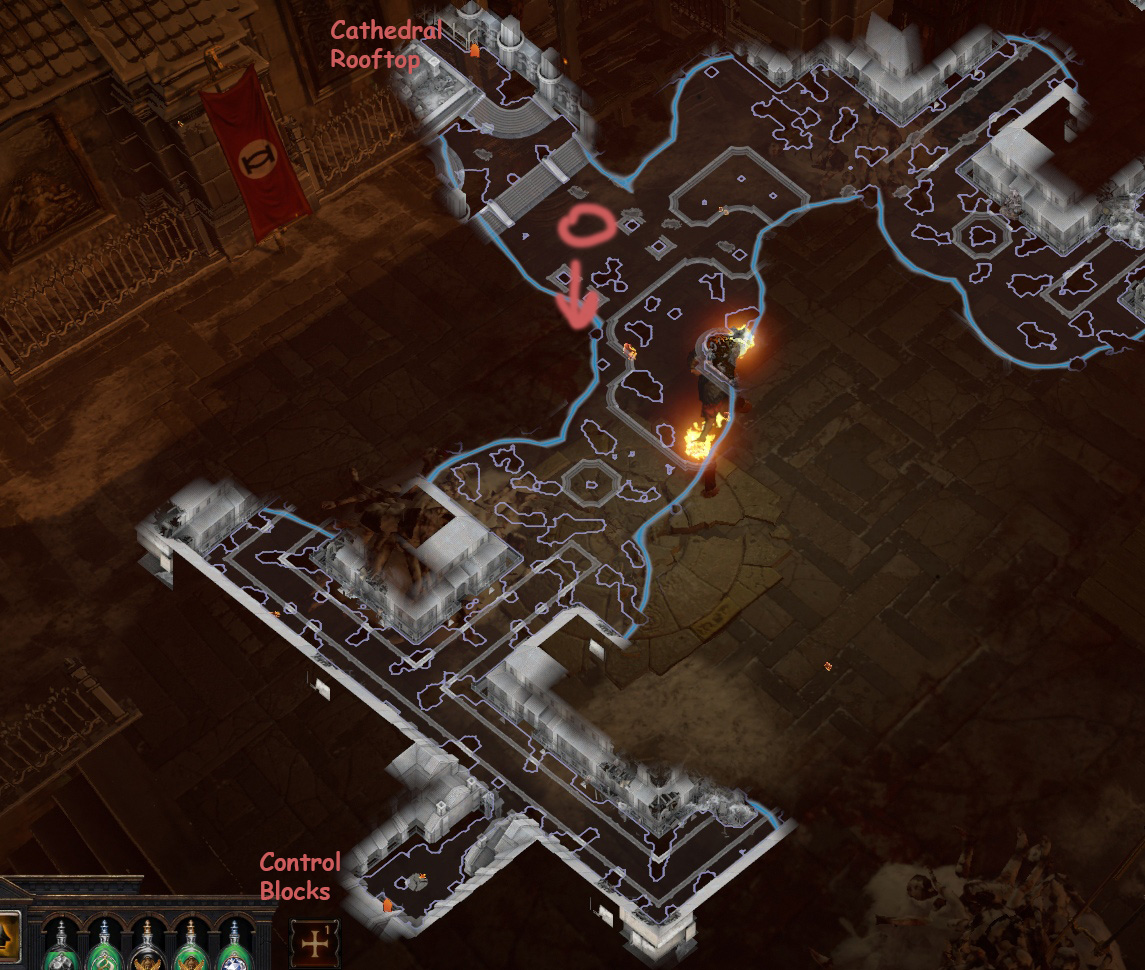
Enter the Cathedral Rooftop
Enter the Cathedral Apex
Impale the Cultists and Gargoyles to gratuitous Bannon
Return to the Cathedral Rooftop and make your way to the right
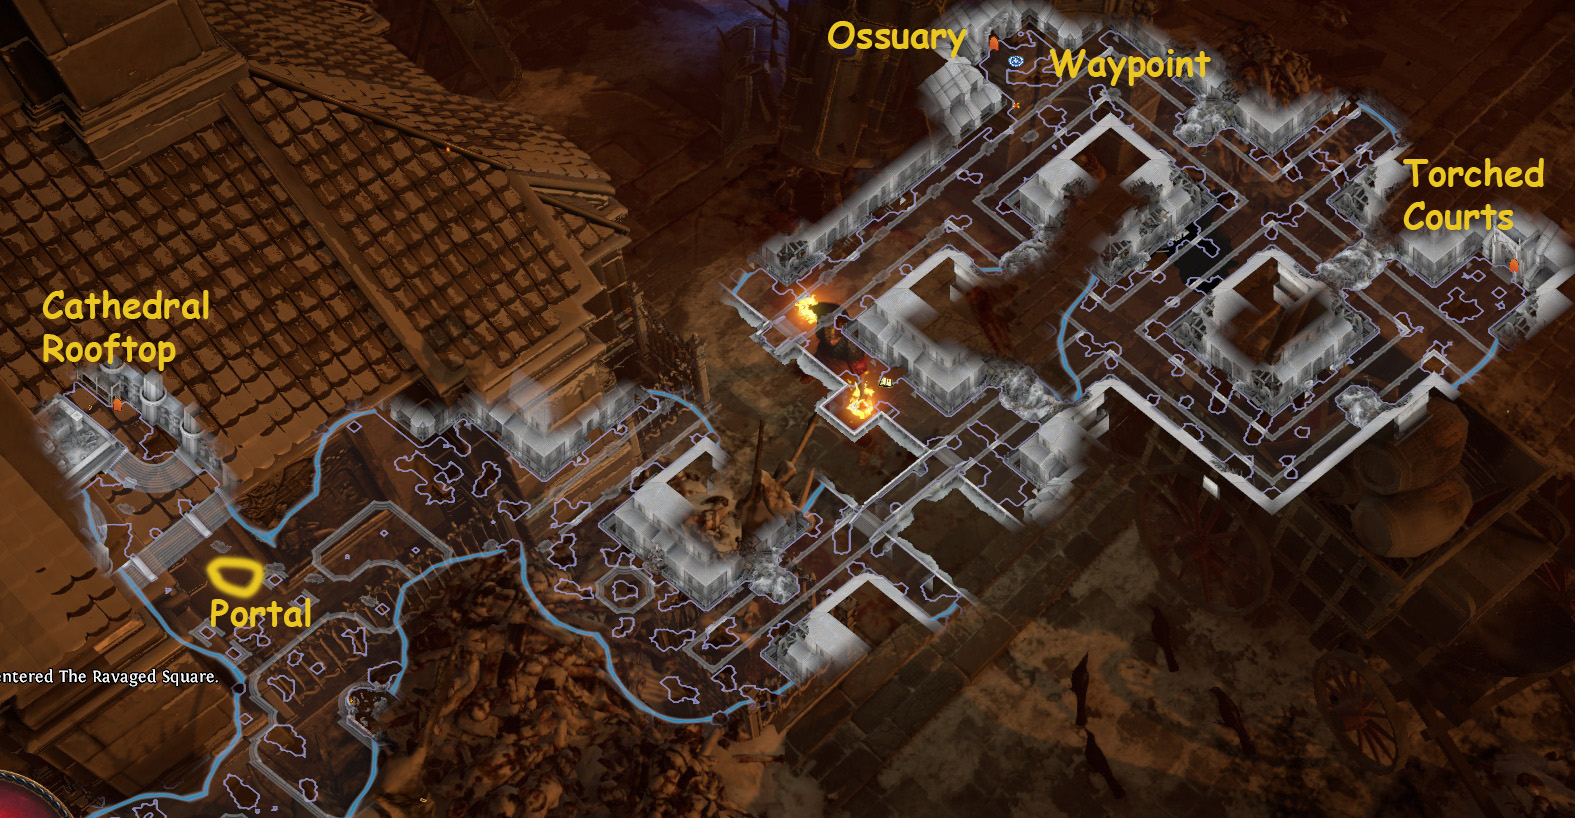
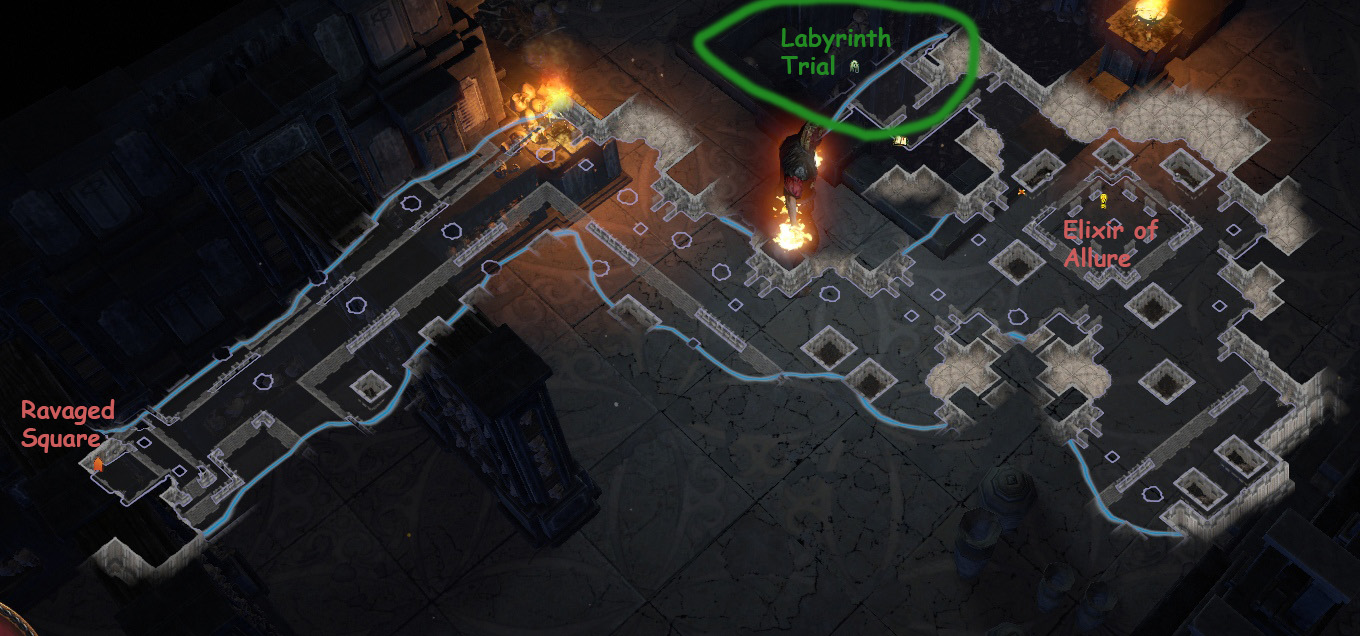
Enter the Ravaged Foursquare
Create portal , take hold of the Ravaged Square Waypoint
Motion to the Torched Courts
Run through the area, enter the Desecrated Chambers
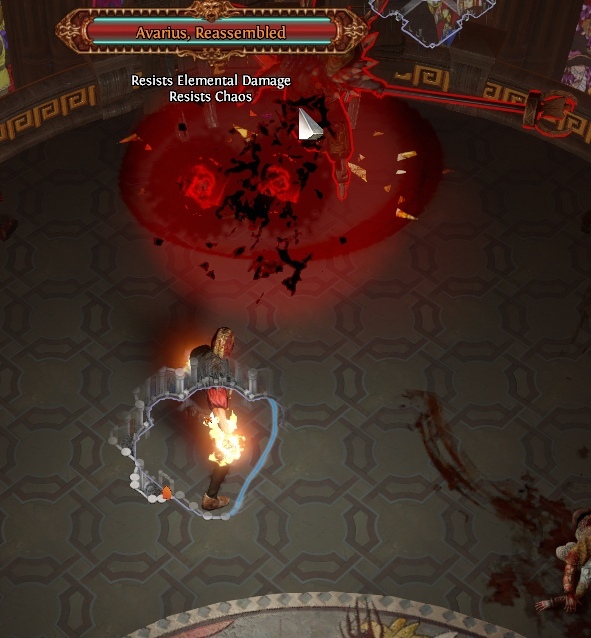
Run through the surface area, enter the Sanctum of Innocence
Impale Avarius Reassembled . Quit to the Desecrated Chambers
Return to the Oriath Docks via Waypoint
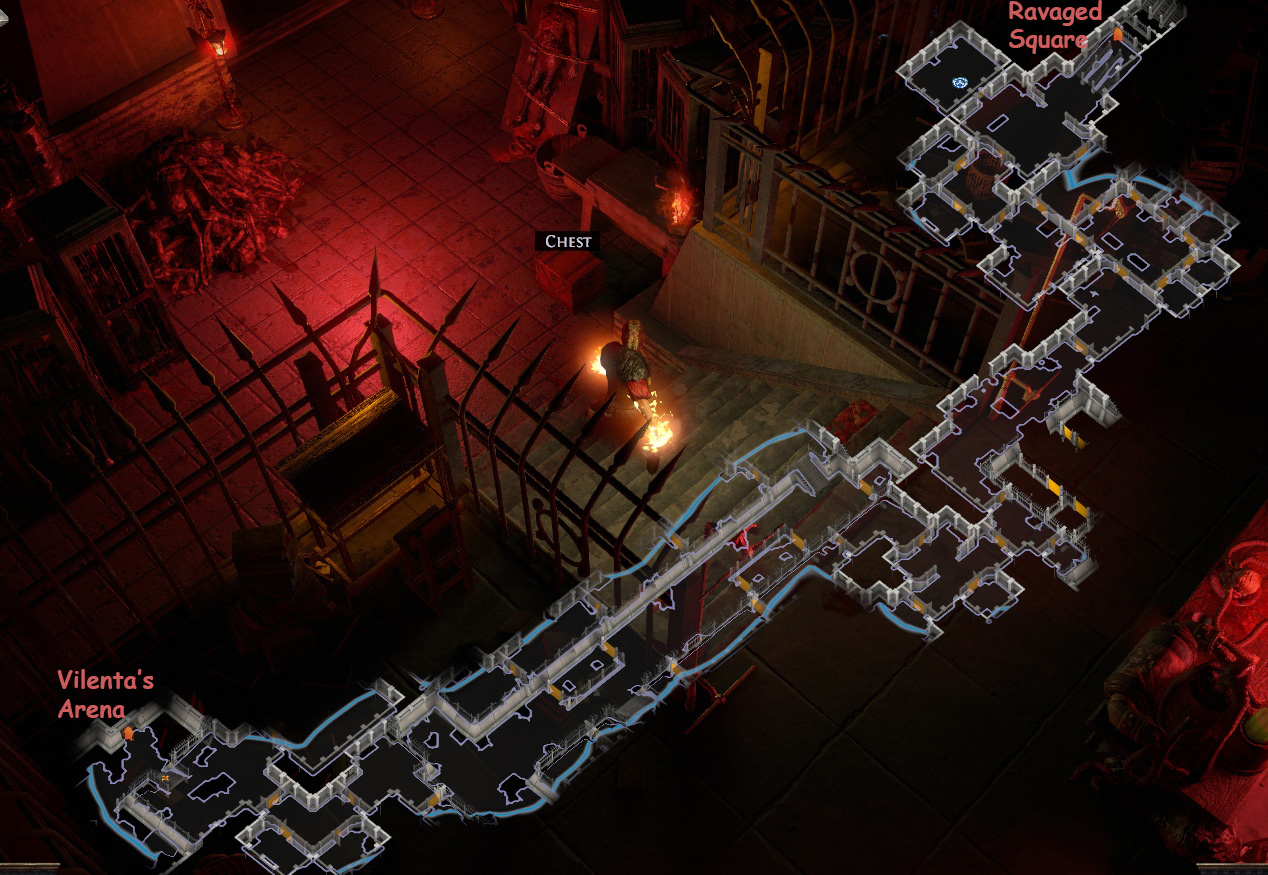
Enter the portal y'all have created earlier
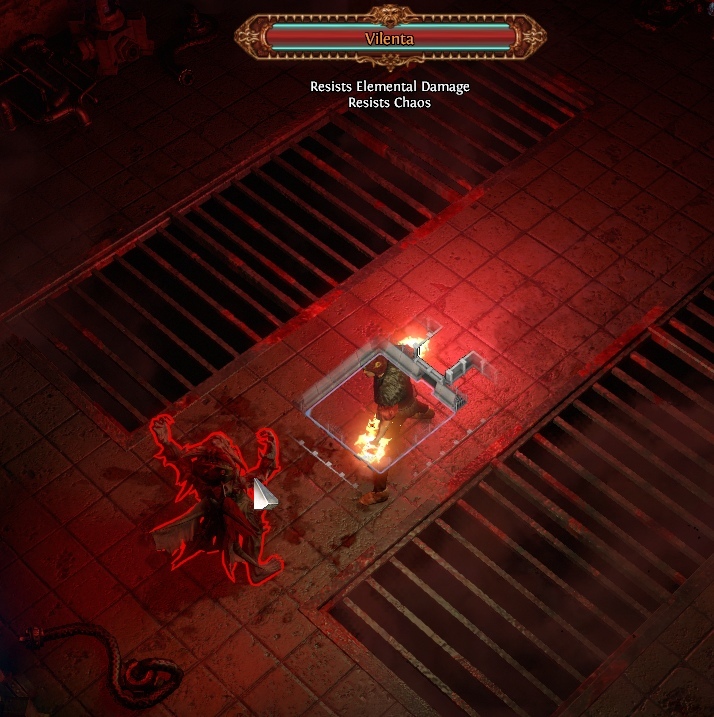
Enter the Control Blocks . Movement through the area and impale Vilenta . Logout
((optional): Take the Waypoint to the Ravaged Foursquare
Enter the Ossuary and Elixir of Allure
Find and complete the final Labyrinth Trial for the Merciless Lab . Logout )
Talk to Lani to receive the book of skill reward
Talk to Innocence Accept the Waypoint to the Aspirant's Plaza. Complete 3rd labyrinth
Skill Gratuitous Violence. Return to Oriath Docks
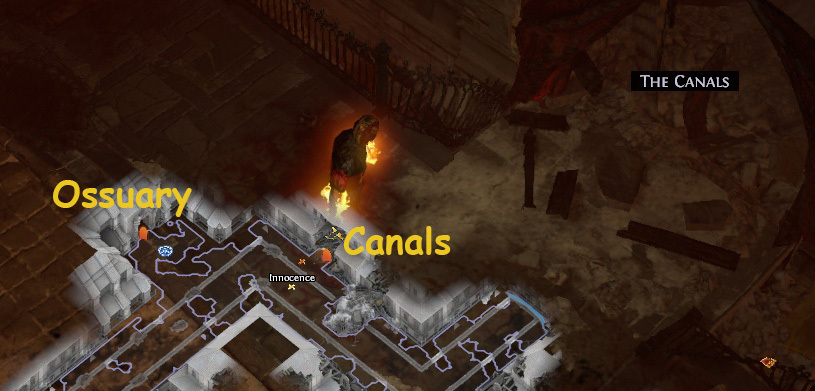
Take the Waypoint to the Ravaged Square . Talk to Innocence
Enter the Canals and move through the area
Enter the Feeding Trough and movement through the area
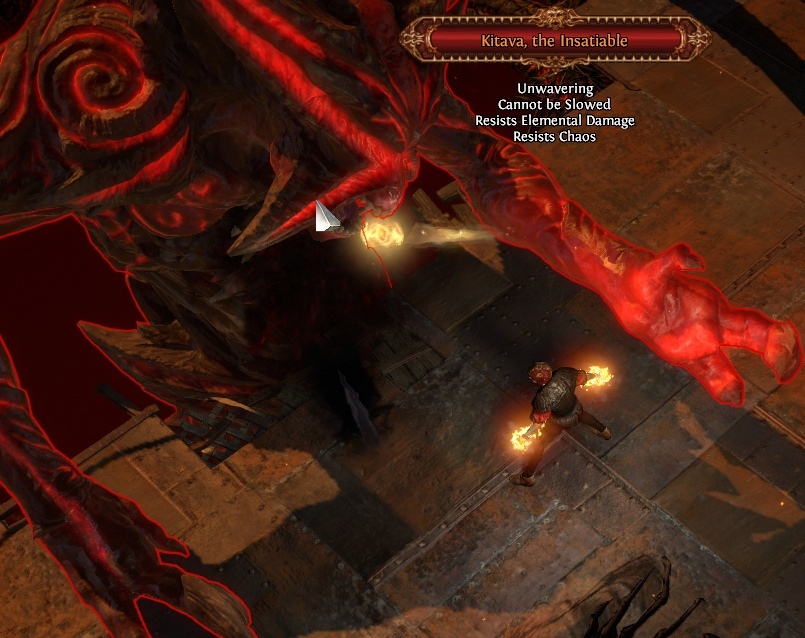
Talk to Sin and enter the Altar of Hunger
Impale Kitava
Talk to Lani in Oriath to receive the Volume of Skill reward
Oriath Docks(Act10)


Go to the Templar Laboratory, talk to Kirac
Get to the Fallen Courts. Enter the Dominus's office. Find the vault key
Go to the Haunted Reliquary and enter the Vault of Venarius
Observe Kirac and talk to him
Become to act vii and talk to Helena to create a Hideout
Meet Kirac in your Hideout to rebuild the Map Device
Performed once per league
Source: https://poestock.net/spectral-helix-gladiator
0 Response to "Gladiator Ravaged Her Again and Again"
Publicar un comentario